-

Win a Free Custom Engraved Brass Coin!!!
As a way to introduce our brass coins to the community, we will raffle off a free coin during the month of August. Follow link ABOVE for instructions for entering.
-

PRE-ORDER SHIPS IN SCALE TODAY!
The beloved Ships in Scale Magazine is back and charting a new course for 2026!
Discover new skills, new techniques, and new inspirations in every issue.
NOTE THAT OUR FIRST ISSUE WILL BE JAN/FEB 2026
- Home
- Forums
- Ships of Scale Group Builds and Projects
- Le Coureur 1776 1:48 PoF Group Build
- Le Coureur 1776 1:48 Group Build Logs
You are using an out of date browser. It may not display this or other websites correctly.
You should upgrade or use an alternative browser.
You should upgrade or use an alternative browser.
Very good idea
Questions to group members who already made the building berth. Did you do any modifications /adjustments to any of the berth parts?
I did not expect that modifications would be needed but I just assembled the berth (luckily without glue) and then I could not get the keel to fit in the berth. It seems to me as if the A8 part needs to be modified with 2.5 mm?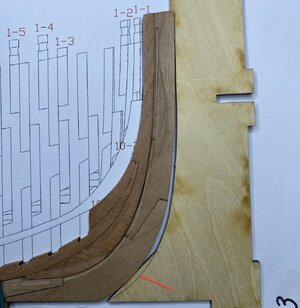
I did not expect that modifications would be needed but I just assembled the berth (luckily without glue) and then I could not get the keel to fit in the berth. It seems to me as if the A8 part needs to be modified with 2.5 mm?

Correct - you have to adjust this part - no need to be very exact - most important is, that the keel will lay later on over the complete length on top of the base - without correcting the A8 element the keel will be not flat on the base in the area of the bowQuestions to group members who already made the building berth. Did you do any modifications /adjustments to any of the berth parts?
I did not expect that modifications would be needed but I just assembled the berth (luckily without glue) and then I could not get the keel to fit in the berth. It seems to me as if the A8 part needs to be modified with 2.5 mm?View attachment 185618
Questions to group members who already made the building berth. Did you do any modifications /adjustments to any of the berth parts?
I did not expect that modifications would be needed but I just assembled the berth (luckily without glue) and then I could not get the keel to fit in the berth. It seems to me as if the A8 part needs to be modified with 2.5 mm?
I think it is a great idea by CAF to adjust this part according to your own assembly. all parts have +\- tolerance, also sanding and glue may add to it... Very good. I am really enjoying watching Coureur builds!Correct - you have to adjust this part - no need to be very exact - most important is, that the keel will lay later on over the complete length on top of the base - without correcting the A8 element the keel will be not flat on the base in the area of the bow
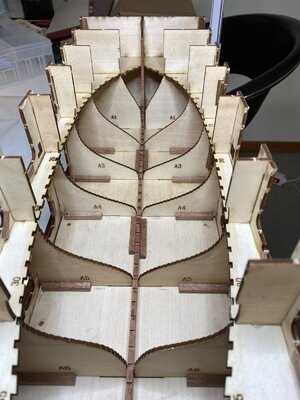
The building berth is done. Maybe it is superflous but I put in a few reinforcements here and there and some extra keel support. I have put shellac on all the notches and edges that will touch the ship
Building the berth was out of instruction sequense and I just realize that part A9 should be used when making the stern . Well, I hope I can adjust the stern within the berth. If not I'll have to trace the contour of A9 and make a template myself.
 Search
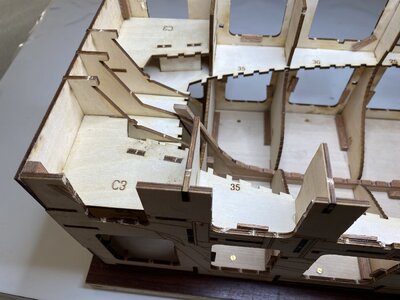
I have also made 1 frame (no.9) and started on one more (I know it takes longer to make them one by one but I'm not in a hurry and the work more varied that way. Besides I can rest my fingers and do some 'home duties' etc. while the glue is drying )
)
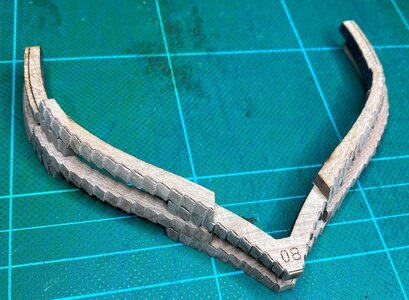
Building the berth was out of instruction sequense and I just realize that part A9 should be used when making the stern
 . Well, I hope I can adjust the stern within the berth. If not I'll have to trace the contour of A9 and make a template myself.
 Search
I have also made 1 frame (no.9) and started on one more (I know it takes longer to make them one by one but I'm not in a hurry and the work more varied that way. Besides I can rest my fingers and do some 'home duties' etc. while the glue is drying

Looking very good my friend 
Referring the Part A9:
I made the same "mistake" and installed it to early, but in the meantime I am convinced, that there is no way to construct the complex stern structure of the Le Coureur outside the berth - only laying on the part A9 I think it will be more or less impossible to produce the structure on the keel and install afterwards keel+ stern inside the berth / jig.
I will show this status in my building log asap...
- Joined
- Mar 19, 2020
- Messages
- 206
- Points
- 213

I have been thinking about this and although I have created a cardboard template for A9, it is very difficult to make it fit with the drawing. I’m leaning to @Uwek by building it in the berth. Maybe Tom @CAF can give us some feedbackLooking very good my friend
Referring the Part A9:
I made the same "mistake" and installed it to early, but in the meantime I am convinced, that there is no way to construct the complex stern structure of the Le Coureur outside the berth - only laying on the part A9 I think it will be more or less impossible to produce the structure on the keel and install afterwards keel+ stern inside the berth / jig.
I will show this status in my building log asap...
Having built that stern structure outside of the jig, I am leaning towards @Uwek's opinion. I got lucky that mine mostly fit, but it's still not up to the same tolerance as the rest of the model so far.
If I were to do it this way, I would probably temporarily install the stern pieces of the jig and press the keel in place while building the stern structure. This is still a little problematic because once you push the keel firmly in place, the tabs are prone to popping off. However, it is easier to pry them loose and glue them back on than to just guess at the rest.
Even with this, the model has much tighter tolerance than anything else I've built. It all seems pretty correctable and there's little chance the average person will notice any small coverups.
Kurt Konrath
Kurt Konrath
You were heavy into your work again!
I also had to try and dry fit some of the stern parts. Probably have to take them in and out of the berth many times, which is a bit scary as some of the parts are very fragile.
In the mean time I have also recieved the Alert kit and now I simply cannot make up my mind if I should pack Le coureur away and start on the Alert first as planned, or if I should continue on Le Coureur for some weeks more. What do you think?
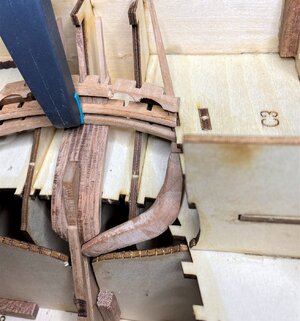
In the mean time I have also recieved the Alert kit and now I simply cannot make up my mind if I should pack Le coureur away and start on the Alert first as planned, or if I should continue on Le Coureur for some weeks more. What do you think?

Last edited:
Great progress, Poul. It looks common for both kits Aler and Coureur to 'try out' or adjust parts until perfect fit. This obviously required multiple times of parts removal. I called this process 'adaptation' e.g. each part needs its own placement to look 'in-place'.
...as for the choice of builds, it is hard to suggest. If you have already a passion for Coureur continue the build, you can always start the ALert, thought. Or... start the Alert and build both...
...as for the choice of builds, it is hard to suggest. If you have already a passion for Coureur continue the build, you can always start the ALert, thought. Or... start the Alert and build both...
- Joined
- Mar 19, 2020
- Messages
- 206
- Points
- 213

It’s definitely beginning to look like a ship!I must agree with @Chello, it is very motivating to see some frames in the jig. I can even fool myself to think that maybe it will eventually become something that with good will can be recognized as a ship
View attachment 187612
Great milestone, Poul!!  I know your filling.
 I know your filling.
Many thanks for the comment and likes 
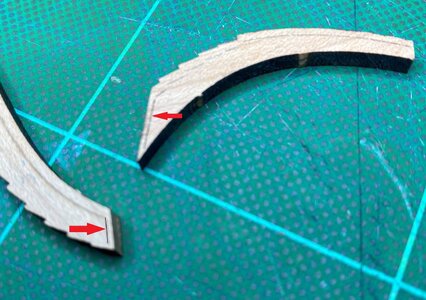
I need to ask you guys a question to be sure I'm not making a mistake. I have just noticed som etched lines along the horisontal edges on frame parts for some of the aft frames. I have no clue about the proper maritime term for these edges but it is the lines I have marked with red arrows in this picture:
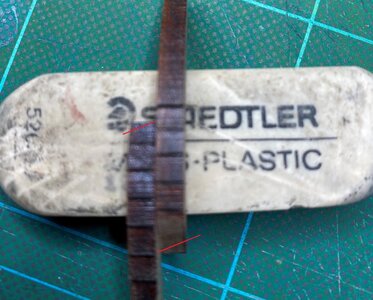
I assume these lines means that the horisontal edges on these frames should not be horisontal but should be beveled like the red lines I have made on this picture:
At a glance I don't understand why, so I thought I'd better ask if it is right, before I start beveling these edges?
PS: I had already glued the parts for frame 37 before I noticed but I tink I can anyway manage to bevel the edges - if it is needed.
I need to ask you guys a question to be sure I'm not making a mistake. I have just noticed som etched lines along the horisontal edges on frame parts for some of the aft frames. I have no clue about the proper maritime term for these edges but it is the lines I have marked with red arrows in this picture:

I assume these lines means that the horisontal edges on these frames should not be horisontal but should be beveled like the red lines I have made on this picture:

At a glance I don't understand why, so I thought I'd better ask if it is right, before I start beveling these edges?
PS: I had already glued the parts for frame 37 before I noticed but I tink I can anyway manage to bevel the edges - if it is needed.
I interpreted these lines also in this wayMany thanks for the comment and likes
I need to ask you guys a question to be sure I'm not making a mistake. I have just noticed som etched lines along the horisontal edges on frame parts for some of the aft frames. I have no clue about the proper maritime term for these edges but it is the lines I have marked with red arrows in this picture:
View attachment 187839
I assume these lines means that the horisontal edges on these frames should not be horisontal but should be beveled like the red lines I have made on this picture:
View attachment 187840
At a glance I don't understand why, so I thought I'd better ask if it is right, before I start beveling these edges?
PS: I had already glued the parts for frame 37 before I noticed but I tink I can anyway manage to bevel the edges - if it is needed.


