Le Requin-Zebec-1750 POF 1:48 (ZHL)

Daniel,
Congratulations on your project. You are moving quickly. Your building jig is complex ! Where did you get that metal triangle ? Looks like a helpful tool to square of everything. Did you customize the building jig with the metal screws and nuts, or are they included in the kit ? Time is well spent perfecting that rig..it will save you headaches in the future. I'm watching your build with attention, getting ideas for the 1:48 Enterprize that is coming next week. Will probably start building it in April.
Cheers
Alex R
 
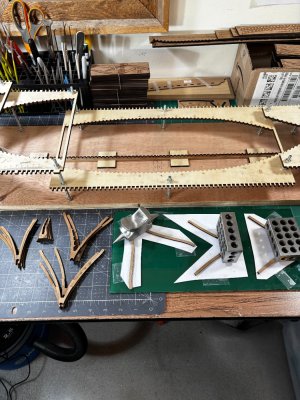
Hi Alex, everything you see came with the kit including the base which is a laminate. They don't show what to do on the bottom of the base, like do you leave the rod and nut exposed. It only made sense to countersink for the nut to recess into. The hole locations are marked on the base, but you have to drill them with a 6mm bit. Care should be taken to drill the holes accurately as everything comes down to all notches in the keel lining up with the jig. The big square is just a standard carpenters square with a flange on one side. Home Depot has them. I'll be looking forward to your Enterprize build, at 1:48 it's a big one too!
 
Good afternoon, all. I have spent about 4 hours setting up the jig, this was after I finished the keel assembly. The jig has 4 levels for fitting the ribs into but after you set the first lower layer, you have to set the keel in then finish the jig construction around it. I spent quite a bit of time fine tunning verticle as well as horizontal alignment. There are 90 notches that have to line up in X,Y,Z directions. Check it out.

View attachment 507226View attachment 507227View attachment 507228View attachment 507229View attachment 507230

Next comes the stage of very slow progress de-charring the multipiece ribs, who knows 5,000 hours should do it ROTF Explosion.
I will post periodic updates of stacks of frames.

Thanks for stopping by, have a great weekend.
Good morning Daniel. That is some good progress. So far looking mighty fine. Cheers Grant
 
I thought you’d be finished by now Dan. ;) There’s a lot of ‘building the thing to build the other thing’ with involved in this kit, isn’t there?
Hey Smithy, glad you found my build and welcome aboard. No doubt the jig will be the fastest part to build, the rest not so much.
 
Yep. I think you and I are in for many hours of making dust:D:D. It Must be fun or we would not do itROTF. Cheers Grant
I had sanded with a Dremel the bevel on both side of the keel while at my work desk so now everything in my office has a fine layer pearwood dust on it. I'll have to do like before and gather 15 or 20 frames at a time and take em to the garage, making my mess out there. I guess I should say the Admiral insist I take it outside :D.
 
And so it begins. After carefully checking the alignment of the notches once more, I then use a piece of glass to glue the frames together on. This is a good method for preventing any warping in the frames.

IMG_0915.jpg

To me it's a good idea to make copies of the frame templates to do the glue up on. If you use the originals and have a problem resulting in their destruction your out of luck.

IMG_0917.jpg

Till next time!
 
Hi Daniel,
I am not sure if you have seen my post - I just abandoned this build and want to give you some encouragement to avoid my mistakes. Whatever you do secure the keel to the build board. My keel warped during the framing process due to the laminated keel and the force of the rubber bands. I noticed the keel began pulling away while securing the frames and by the time I added the internal stringers it was too late.

Also my keel parts did not match the Chinese plans but were closer to the Ancre ones. There are significant differences between them so you will need to improvise. It is a great kit and I wish you the best success in building her !

In building the tiny (1:96 scale) card and paper ZHL ship's boats, I used Tite Bond liquid hide glue to assemble the building jigs and to affix the keel to them. The liquid hide glue is very slow drying, so leave a good 24 hours after application. For these parts I wanted a good strong bond, but quick and easy release for dis-assembly. The liquid hide glue comes apart with simple room temp (or warm) tap water applied with a fine brush. The de-bonding is nearly instant, but the bond is good and secure until you want to undo it. Better than rubber bands, no warping or crushing, easy disassembly. Lasts as long as you need it to. try this hack and avoid frustration and aggravation!
Best of luck with your build. No matter the kit producer, there always seem to be egregious errors in the design, construction and plans, begging the question: Do they actually build a prototype from their products as planned out of the box? Model Shipways and Syren are better than most but far from hassle free! A lot of research and pre-planning for the inevitable kit-bashing seem to be de-rigueur in order to complete the model of whatever ship you desire even when starting with a "kit". There will be no avoiding scratch building, bashing, research and re-designing, or an assortment of booby traps and the like, no matter how enticing and attractive the plans, instructions, the smell and contents of the kit when you open the box. As we all know with cars, the problems await long after the "new car smell" has wafted away.

Pete
 
The liquid hide glue comes apart with simple room temp (or warm) tap water applied with a fine brush. The de-bonding is nearly instant, but the bond is good and secure until you want to undo it.
Hi Peter, this type of glue sounds interesting in certain situations. I need to research it. I'll be holding the keel down with straps strategically located.
 
Good morning everyone. I just discovered a fantastic way to translate full page Chinese instructions to English and send it to my printer or PDF. I use an iPhone that has a Google Translate app. Witin the app focus on a page and let it translate, then hit the white photo button at the bottom. Next hit select all then copy text. Next open up your Notes app on your phone, create a folder if you want and paste into your notes app. Finally (if you have blue tooth conn to your printer) your printer will show up on your phone and you simply hit print! Here is a side by side result. This just thrills me to no end and needed to share it.

IMG_0920.jpg

I have the first 13 glue ups out of 93 so far.

IMG_0921.jpg

Till next time!
 
Back
Top