
They look bigger/thicker than needles. They almost look like dart tips. But I a get the idea of 'clamping" without 'piercing' the planks. Thanks you @Uwek .another tool I just found in the web is this one....producer is named "JoJo".....never tried it, but it looks reasonable
View attachment 35052

-

SUBSCRIBE TO SHIPS IN SCALE TODAY!
The beloved Ships in Scale Magazine is back and charting a new course for 2026!
Discover new skills, new techniques, and new inspirations in every issue.
NOTE THAT OUR NEXT ISSUE WILL BE July/August 2026 -

Win a Free Custom Engraved Brass Coin!!!
As a way to introduce our brass coins to the community, we will raffle off a free coin during the month of August. Follow link ABOVE for instructions for entering.
You are using an out of date browser. It may not display this or other websites correctly.
You should upgrade or use an alternative browser.
You should upgrade or use an alternative browser.
At this stage I have decided to use the crane boat as a buoy tender. However, the scene will be different as suggested. An old rusted buoy drifter upstream and got snagged on the riverbank. The tender is about to hoist the buoy off the riverbank. On the tender is a new updated buoy to replace it . . . somewhere downstream.Thanks @Aginvicta for that justification. It added extra weight towards using the boat for bouys. I am still undecided, yet still researching for other uses for a crane boat.
Though the scene is not dramatic, I think it will tell a plausible story for being there.
What do you think?
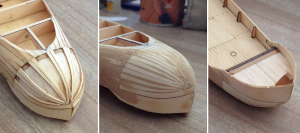
To make the boat look a bit bigger, I added a bow section. I am not happy with the shape. The bulkheads have forced the hull to curve too sharply and makes it look shallow. I would have liked it to be more deeper (vertical). It looks more like a pontoon than a boat. Anyway, it will have to do.

I made a plank bender of various curvature (funnel shape). It works okay. I think if I closed one end off, it will heat up more, and make for easier faster bends.
Since the boat is not actually going into water, and the hull is to be painted, I did not plank it all. Just enough planking to keep the wood filler secure.
Attachments
Since nobody has replied to this, I went ahead and built an old rusted buoy.At this stage I have decided to use the crane boat as a buoy tender. However, the scene will be different as suggested. An old rusted buoy drifter upstream and got snagged on the riverbank. The tender is about to hoist the buoy off the riverbank. On the tender is a new updated buoy to replace it . . . somewhere downstream.
Though the scene is not dramatic, I think it will tell a plausible story for being there.
What do you think?
Below (top) I took inspiration from these three images to formulate my own rusted and damaged buoy.
I used an old broom handle, red pen, and old copper wire.
Because the buoy is going to be in water, against the riverbank, I sanded one side of the buoy down.

It looks like a giant squid.
I don't like weathering, but in this case I really had no choice. The old buoy is the only thing in the whole diorama which shows weathering.


You dońt like weathering, but you are making it very good....especially the rust is looking very realistic
Finally made a decision on the boat cabin design. It will be at the bow, and the crane at the stern.

Now for the tricky part. I made some basic mistakes with this one, and as a result it is not as true as I would like it to be. If I ever do an overhanging cab roof again, I will do a better job than this one.
I only glued the slanted window frames to the roof. This is only because I had not yet made up my mind what to do with inside the cabin. Figurines need to be added, and I had to read up on the boating rules for stationary vessels working at night. Two lamps are required for this size boat. White mast and stern lights. Painted the inside white and added two figurines in the cabin.
Last edited:
Thank you @Aginvicta and @Jos for your 'likes'.
______________________________________________________
I have been busy over last few days. While waiting for something on the boat to dry, I am working on some other part. In this case it has been on a new buoy to replace the old damaged one (as described above).
The new versions are more complex these days, and I am quite surprised how tall they can actually get (7.5 m or 24 feet). For a 1/72 scale, that is 4 inches. My new buoy is slightly bigger.
Thank you @Aginvicta for your 'like'.
________________________________________
Since starting this boat project I have been learning a lot, from images, about the Coast Guard and their Buoy Tenders. The whole setup is a very specialized maritime service, much like the firebrigade is. I am impressed with all the things the buoy tender and its crew do, or can do. If I ever build from a kit (alone) I am tempted to build a buoy tender. Well, that is my thinking today.

Hi Uwe
They are known as plank clamps. I have some, but the effort to screw them in , the cost of the pins & the size of the hole they make, Map pins are much better option
They are known as plank clamps. I have some, but the effort to screw them in , the cost of the pins & the size of the hole they make, Map pins are much better option

Are not map pins a lot thicker than ordinary clothes pins?Hi Uwe
They are known as plank clamps. I have some, but the effort to screw them in , the cost of the pins & the size of the hole they make, Map pins are much better option
Last edited:
G'day Swabbie
Or my I call you Peter?
Your are inspirational to everyone mate. Keep up the great, fun job that you are doing.
Havagooday and happymodeling
Greg
Or my I call you Peter?
Brilliant work mate.
I simply love to watch these types of logs, that all you go by is your increadale imagination.Your are inspirational to everyone mate. Keep up the great, fun job that you are doing.
Havagooday and happymodeling
Greg
A litlle, but the plastic edge holds planks in palce and the PVA does not stick to them.
Thank you @Peglegreg for your very kind words.
I have a few map pin types, and the small planks I have been using would split with such thick pins. Unless I drill the wood. In that case, I might as well use a finer drill bit for the finer pins.A litlle, but the plastic edge holds planks in palce and the PVA does not stick to them.
I can see how map pins would be an advantage for larger size planks. If I ever do get to use larger planking, I will certainly buy a box of map pins. And for that, I thank you @paulv1958.
I might make my own sewing thimble. The ones available are too small for me. Here is my plan.

G'day Peter
I've made something similar years ago, it worked quite well, until I lost it somewhere.
Here is how I did it.
1- using a disposable rubber glove, I put a long pin with the plastic ball for a head into the tip of the fingers.
2- shape some candle to match my fingers.
3- pour a lot of epoxy glue into the fingers of the glove where the pins are. Then push the candles that has been shaped as your fingers into the glove to make an epoxy mold with the pin head inside.
4- using my wife's old leather gardening gloves I cut off the fingers to make a firm fit to my fingers.
5- when the epoxy is hard remove them from the disposable glove and push the pin through the leather tips of the fingers of the old gardening glove.
Now you will have a firm and strong needle finger tips on your own fingers.
I hope my instructions are clear yo you all.
Havagooday
Greg
G'day Peter
I just quickly drew these drawings on my phone. Please excuse my bad writing.


This is a very rough sketch of what I was talking about.
Havagooday
Greg
I just quickly drew these drawings on my phone. Please excuse my bad writing.
This is a very rough sketch of what I was talking about.
Havagooday
Greg
Thanks again Greg. Thank you for clarification and drawings.G'day Peter
I just quickly drew these drawings on my phone. Please excuse my bad writing.
View attachment 35529
View attachment 35530
This is a very rough sketch of what I was talking about.
Havagooday
Greg
This is what I thought your first description was about, but thought I got it wrong. So the idea is to pearce the wood first with this device, and then insert another pin through the wooden hole.
G'day Peter
Yes that is could be the use for that. It's like a centre punch for modelers.
I used it to do treenails in my planking. After the first vanishing coat of the planks, I 'pinned' the planks with my left hand holding the pin to guide it on the correct spot. Then I push down on my right index finger. You can get quite fast at this after a short time.
Then I wipe putty in the hole, sand lightly all over the planks, and do the second coat of vanish.
This method I found good for my Parkinson's problem.
")
You can make a set of these finger punch with different gauge pins, for the hole size you need.
Havagooday mate
Greg
Yes that is could be the use for that. It's like a centre punch for modelers.
I used it to do treenails in my planking. After the first vanishing coat of the planks, I 'pinned' the planks with my left hand holding the pin to guide it on the correct spot. Then I push down on my right index finger. You can get quite fast at this after a short time.
Then I wipe putty in the hole, sand lightly all over the planks, and do the second coat of vanish.
This method I found good for my Parkinson's problem.
You can make a set of these finger punch with different gauge pins, for the hole size you need.
Havagooday mate
Greg