Longlegs55 builds ZHL Soleil Royal

That seems like a long piece of wood in real life. Sometimes I found it easier to work with some that were shorter. My daughter has the one I made, so I can't look to see what I did. Don't forget to taper the boards toward the stem; otherwise, they tend to buckle as you try to bend them. I think I tapered them on the bottoms of the plans to no smaller than half the width. I also had to put in some planks with triangular points, cutting out a spot in surrounding planks. I forget what they're called. But I be Kurt @DARIVS ARCHITECTVS could name them. Whether they are in the front of the ship, or the aft, the pointy ends point toward the front.
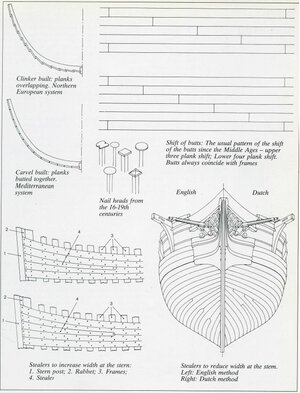
Pointy or dagger planks are to be avoided because they don't seal well against sea water, and if they rot, they open up holes readily in the hull. Here is my favorite reference for how to make drop planks and stealers.
Hull Planking Styles.JPG
 
cheers Vic,
just found a post saying between 7.15 and 16.25 metres which gives plenty of scope!!

i can't remember the name or the pointy inserts but i do know what you mean, Thanks again for your continued help it is invaluable
 
cheers Darivs Architectvs for those diagrams. Don't know if I have the technical ability for that hull construct but I guess I will have to improve my skills!!
 
The drop planks and stealers are not that hard. You will have gaps between planks because of where they come together at the bow. Just cut a stealer on one end of the plank, lay it over where they come together, mark it with a pencil, cut out the shape, and glue the new plank in. If I can do it, anybody can.
 
cheers Darivs Architectvs for those diagrams. Don't know if I have the technical ability for that hull construct but I guess I will have to improve my skills!!
The effort it takes to measure and cut stealers and drop planks for your model is a bit hard at first, but gets much easier after you do a few. And it demonstrates to other ship modelers that you understand how planking was actually shaped on real ships. You don't care what the first layer of planking looks like as long as it's smooth, but the final planking should be your best effort to make it look right. The results are well worth it, even if you paint the ship bottom.
 
thanks for the encouragement, i'll try a couple of test pieces then dive in for real. pictures to follow. I hope!!
 
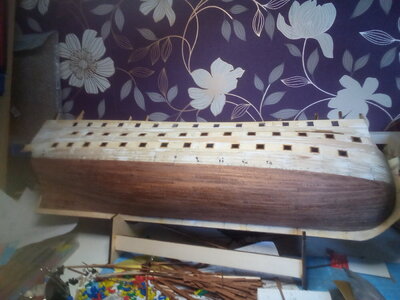
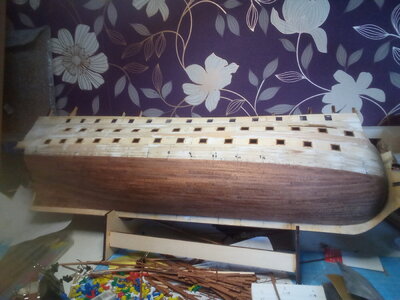
having followed the invaluable advice and encouragement, some progress has been madeIMG_20230530_130156.jpgIMG_20230530_130159.jpg

both sides now completed in sapele with stealers and drop planks, although you can't see them, are there. i guess not being able to see them means i must have done something right. now just wales up plus rear structure, decks etc.

Thanks for all the help and more to follow as soon as.

Cheers,
Neil
 
having followed the invaluable advice and encouragement, some progress has been madeView attachment 376995View attachment 376996

both sides now completed in sapele with stealers and drop planks, although you can't see them, are there. i guess not being able to see them means i must have done something right. now just wales up plus rear structure, decks etc.

Thanks for all the help and more to follow as soon as.

Cheers,
Neil
Good going, Neil! Now the fun stuff starts. I can’t wait to see your solution for the gallery problem.
 
well Vic,
Its funny you should mention that because, having banged my head against the wall for e reasonable time, I need to ask another question.

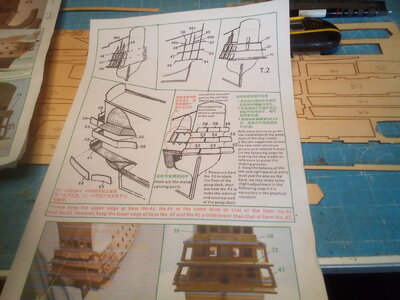
with regards to the galleries the instructions sayIMG_20230530_135803.jpg keep the upper edge of 43 and 43 the same as 44 and 45 but have lower edge of 42 and 43 a little lower.
personally i have never found " a little" to be a reliably accurate measurement and was looking for some guidance perhaps in mm or even inches, anything other than "a little"!!!
Hope you can help

Neil
 
well Vic,
Its funny you should mention that because, having banged my head against the wall for e reasonable time, I need to ask another question.

with regards to the galleries the instructions sayView attachment 376997 keep the upper edge of 43 and 43 the same as 44 and 45 but have lower edge of 42 and 43 a little lower.
personally i have never found " a little" to be a reliably accurate measurement and was looking for some guidance perhaps in mm or even inches, anything other than "a little"!!!
Hope you can help

Neil
I wish I could, Neil. I more or less used the side guides to help measure. If the sides are not done first, you run the risk of them not being aligned with the back. Also, keep in mind where the wales will run. Make sure all the elements on both the sides and back will run. Another issue I faced was that when I finished, the lower gallery was too low at the back. The pewter support pieces didn't reach from the bottom wall to the upper deck. I had to build the lower wall up with extra wood and add a small piece of wood to the decorative support. When I look at Gilbert's model @Gilbertm, I am impressed that he did a much better job of building the galleries than I. @BigMike and @paulb did better too. They might be able to talk you through it better than I could. @Jay had an interesting way of doing the built-up area above the galleries. His build-up was almost flat. I haven't seen much from him lately. He's been working on using resin molds to replace the pewter castings. I'll look over the instructions again to see if anything pops into mind.
 
I just re-read the instructions. Two millimeters should do it. There's a slight overhang there. I didn't have any problems with that part. The rest of it still gives me nightmares, though!
 
having followed the invaluable advice and encouragement, some progress has been madeView attachment 376995View attachment 376996

both sides now completed in sapele with stealers and drop planks, although you can't see them, are there. i guess not being able to see them means i must have done something right. now just wales up plus rear structure, decks etc.

Thanks for all the help and more to follow as soon as.

Cheers,
Neil
I was also a bit disappointed on my first model that the speckled grain of mahogany and sapelle wood tends to hide the seams of a careful planking job creating stealers and drop planks. The seams are easier to see if the hull in planked in pear wood, but that is not easy to obtain.
 
Darivs, hopefully after some sanding and varnishing it may bring the grain and seams out a bit more. Hopefully!!
 
just had a look for pear wood. not only is it almost unobtainable in the UK but it is also bloody expensive!!! it is also sheets rather than strips
 
Darivs, hopefully after some sanding and varnishing it may bring the grain and seams out a bit more. Hopefully!!
Sanding very smooth and varnishing removes the scratched that ALSO make the plank seams less evident, but that effect is minor. What is DOES do for you is make the grain of the wood clear and sharp, and brings out rich color. If you can find or make planking that doesn't have a heavy cross striping and freckling, use it. Mahogany is a rich brown wood, but it traditionally was not used for ship models in the past, mostly because of the coarse, open grain. The color is awesome, even if the grain is freckled. That, and the fact that it's not a very expensive wood, is why I think it's the most popular wood used in the Italian model ship kits. If you want to draw attention to those hard won planking lines, a wood that it more plain is better. And if you're painting the hull, who cares? :D
 
good morning, afternoon, evening, fellow modellers. sorry for the absence but had a fight with an extending ladder.

as i am sure you will all know, i lost!! double leg break and dislocated and fractured ankle so i have been about as interested in model making as plaiting fog!!

I blame the Mrs, she wanted stuff from the loft! However if she sees this post it will probably be my last!

Back to this ZHL SR, and more questions. on the "instructions" the front section and rear transom are stated as P3 which is 6mm beech but i saw on one log, i have been reading many, they said P13 which is 3mm sapele. they are both different thicknesses, the beech being 0.5mm and the sapele 1mm. Perssonally i think it should be the sapele but that will sink the gunports deeper than the rest of the model. Suggestions please!!!!

Also whoever posted on their log to use UHU Hart glue for the beech wood is a modelling genius and i would have a large pile of matchsticks by now without this tip. Thanks.

Anyway, that's me for now, hopefully by next week the pain will subside and i'll be back to it, with photo's.

Many thanks for all the interest and comments/encouragement. I'd be lost without it!!

Happy modelling till then!

Neil
 
Back
Top