- Joined
- Aug 8, 2019
- Messages
- 4,121
- Points
- 688

I did a lot of research on how to make rope on a rope walk and build my own rope walk. I love to share my experience with you.
The quality of the rope delivered in your kit is not always of high quality. Fluffy, badly made so that you can better use it to tie up your old paper than to rig your ship with. The colour is too bright and it detracts from the whole. It bothered me quite a bit and this prompted me to look for alternatives or brands that were nice. But these are mostly quite expensive, high shipping cost (depending on the country) and you are still dependent on what the supplier has to offer. Make rope by yourself is an option. You determine the quality, colour and appearance. The price is also manageable. I buy a spool, for example, of yarn for under €10.- ($ 11,-), I can make the rope for an entire ship on a scale of 1:75 and still have enough left over for the next ship. And believe me, it is also fun to do.
Ohla Batchvarov @shipphotographer.com was one of my inspirations to build my machine. My knowledge I found on al the internet and books I combined into a build of a machine that looks likes Ohla's machine. It works perfect and is very controllable.

But first I want to tell you something about the history of ropes and how it was made the last few thousands of years. The method is still too today the same.
Rope has been made for centuries. A piece of ship's rope, which was already 2000 years old, was found during excavations of the Roman forts in Velsen (the Netherlands). U can find a picture of it here: tweeduizend-jaar-oud-touw The piece was about 30cm long and about 3cm thick. It was made of hemp, which makes it special because this material decays quickly. The composition was almost identical to the present day. Hemp has therefore been used for centuries to make rope and is particularly suitable for this purpose. The fibres are spun into threads and from these threads yarns are made by twisting them. In earlier times it was quickly discovered that rope twisted clockwise is the strongest rope. That is why you find mainly right-hand twine in history. Today we know that this is due to the natural shape of the cells in the hemp fibre. By twisting it clockwise, you go with the lay of the cells and the fibre retains its natural resilience and strength. Bill Fronzaglia wrote in The History of Rope: "Even the standardization of the Right Hand Lay rope dates back to the early days of rope production, when it was known that Hemp retains more strength when the yarn is twisted to the right. This resulted in a left hand strand, and a right hand rope. It wasn't until modern times that microscopic examination of the plant illustrated that the structure of the plant has a natural twist that causes this effect" (Source: the-history-of-rope )
The fibres spun into threads are called yarns. They are twist in a clockwise direction (Z-twist). From the yarns, counterclockwise (S-twist) strands are then twist and these are used to make clockwise (Z-twist) rope, Hawser laid rope. Please correct me if I’m wrong.")

Touw = rope
Garen = yarn
Kardeel = strand
Kabel = cable
The twist of a rope can be seen by placing the rope on the palm of your hand, S- and Z-twist are clearly visible.

More about this subject you can find in Knowing the Ropes: The Need to Record Ropes and Rigging on Wreck-Sites and Some Techniques for Doing So by Damien Sanders
Another remarkable fact I found in my search was that ropes before the 19the century were probably never thicker than 229 mm (9") in circumference, or 73 mm in diameter. If one wanted a rope with a larger diameter than Ø73 mm, this was done by beating the ropes into a cable. The source for this information can be found in the quote by Damien Sanders: 'Knowing the Ropes' A cable is composed of ropes, usually S-twist and has a larger diameter than 73mm. To keep it simple: a cable can also have a diameter smaller than Ø73mm, but then it is called a Cablet. The yarn used in modelling is usually Z-twist, but do check this. I use Serafil from the brand Amann, this is Z-twist, but this yarn can also be used for S-twist rope. The yarn yarn is so thin that you won't notice it when twist.
Materials for making your own rope
I have seen examples of cotton, hemp, polyester and even silk. I came across the latter from a modeller on a German forum. https://shipsofscale.com/sosforums/threads/la-cr%C3%A9ole-1827-by-archjofo-scale-1-48-french-corvette.7643/ user @archjofo uses YLI #100 silk lock yarn and Gütermann S 303 yarn. It gives a beautiful result, but it does come at a price, of course. By the way, it is not strange to use silk, as it has been used in the past in model shipbuilding. There are museum pieces where this has been applied. It looks very nice, but whether it is easy to work with? Maybe Johann can tell us. In my search, I saw comments that many museums that restore a model switch to polyester, because there are more advantages to it. It is more durable, does not expand and is not fluffy. With a good treatment it does not fray either. In this topic I will limit myself to polyester, as I have the most experience with it. The actions that will be discussed are applicable to all materials, with the exception of the after-treatment of polyester against fraying (unravelling). If you prefer to use cotton, I recommend Egyptian cotton. The fibres are longer and therefore stronger in thinner yarns and because of the way they are picked, there is less fluff.
There are many types of polyester yarn that you can use, such as zipworld Tytan, AriadneTytan, Amann Serafil, Gütermann, all sewing or locker yarns.Look what is availleble in your country. Note that there are also blends of polyester and cotton such as Forbilux. I don't use this, it is very fluffy. But it is a good alternative if you prefer the cotton look. It is thinner and stronger than cotton, but the difference is almost indistinguishable. I myself use Serafill 120/2, which is similar to Tytan 250, it is 100% lock yarn.


Its thickness is 0.12 mm and it consists of 2 wires that are Z-twist. It is available in various colours. The Tytan and Serafil have a silky sheen, which gives a nice appearance in normal light. When using a flash, it does light up, so you will always see a sheen on the photos. In the future I want to try other yarns, especially for thicker rope a slightly thicker yarn can be welcome. @mati.n uses differed brands, maybe he will share here also his experience with us.
The ropewalk
How rope is actually made can be found on the internet, see for example https://en.wikipedia.org/wiki/Rope To be able to twist the rope, a rope-walk is needed. This can be a simple manual version, but also an electrical one. A rope-walk twists the yarns to a strand and then twist the strand in turn into a rope. In below picture the upper hooks twist the strands, the lower hook the rope.

Four-strand rope usually has an extra thin strand (core) in the middle to accommodate the hollow, the builders of French ships usually used six-strand rope. I have no experience with these builds, the builders here who have maybe can tell you more about this. I just mentioned it because my rope walk can make rope with 4 strands and core.

Four-strand rope with core has a little more flexibility, but is rarely used. And when it is used only for the thicker ropes on the ship. The smaller 4 strands are not strong enough. That’s wat I had read about it. @Dubs modelling can maybe tell more about it. For example I use it to make 0.5 mm. rope from Serafil. I then put 4x2 yarns in the machine plus a core. This produces a 0.5 mm. rope.
The rope-walk basically consists of the winding mechanism, a strand turner, a strand separator and a 'fixed' point to which the yarns are attached. The "fixed" point (which can be rotated) will twist the rope if the strands are sufficiently twisted. Below picture shows the prototype of the gear construction for making a six-strand rope. The central gear wheel drives the gears for twisting the strands. The core wire can be attached in the centre of this rope-walk.

After the necessary tests with the prototype, a housing for the walk was designed with AutoCAD. Below picture shows mine rope-walk version for four strands and one core.

In addition to the drive, it also houses the electronics.


The drive motor is a 12V/600 rpm reduction motor from Aliexpress, dimensions Ø37x55mm. motor The controller (6-30V, 80W) is also from Aliexpress,. With it, the speed of the process and the direction of rotation can be adjusted. controller
This rope-walk allows me to make ropes over a length of 3.70m: wall to wall in my hobby room. When you have a bigger shipyard you will be lucky enough to make longer ropes.
The process is like Ohla Batchvarov shows in her video’s
Mine looks like this


The wooden stick is to keep the trolley in place when I attach the yarn to the machine and keep the yarn in tension.
This horizontal arrangement has two powered sides: the trolley, the part that turns the rope, is on a trolley that compensates for the shortening that occurs during winding. A weight is attached to the trolley. Which, by a pulley, keeps the tension on the wires.
The yarns are looped around the hooks of the rope-walk and return to the hook on the trolley. The core wire is guided to the side of the rope-walk and stretched there with a weight (in the picture I use a clip). It does not twist during the twisting process and keeps its length. After the yarns (including the core) have been attached to the trolley, they are passed through the separator. I use a piece of MDF but in the video of Ohla you see a stick with a cone. I’m going to experience with that someday. Maybe someone can explain the advantage to me.


Once everything is securely fastened and stretched, the rope-walk is started and the threads are twisted. When the machine reaches the 10% mark (the length of the threads is only 90% of the length at which it started), the motor of the trolley is started and twisting of the rope begins. The separator is slowly moved forward until it reaches the rope-walk. The speed at which this is done is a part by feel the push of the twisted rope, the twisted rope pushes against the separator. So a little experience need to be train to do this. When you arrive at the rope-walk, both machines are stopped immediately. If you don't, the rope snaps.


You have to master this process. The tension on the threads, the speed of turning and the smooth movement of the separator all play a part in achieving a beautiful end result.
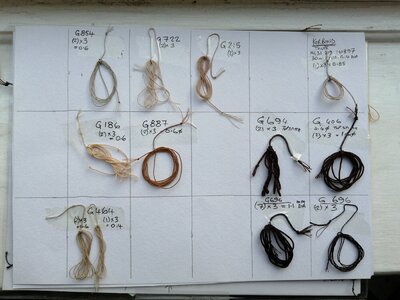
Every machine will be different, but a basic rule is: wait with twisting until the strands have decreased in length by 10-15% (the twisting makes the strands shorter). I use 8% for thin rope (3x2 yarns) and 15% for thick rope (3x 32 yarns), the rest in between. The table in below picture shows the results of tests I made with Serafil. For this material these are good guidelines, the deviations are only small. I will mentioning that when I make 2x1, 3x1 or 4x1 rope (this is very thin. I only make S-twist rope of Serafil. This works better when twisting the rope and you need a microscope to see if the end result is S- or Z-twisted. No problem at al.

Edit: Forget the contra weight in the diagram. This is wrong and need to be more. Example 3x2 must be at least 80 grams.
Other brands of yarn may give different values. To find out, it is a good idea to systematically record all data and every action during the test, such as the yarn, number of yarns, the length, how much you shrink the yarn on the rope bearing before starting to rope, the end result, etc. This makes it easier to make a rope for the next ship and ensures consistent results.
The rope-walk is suitable for making very thick rope, the thickest I have made with it so far with Serafil is Ø2 mm. thick rope of 3 threads, each consisting of 32 yarns (3x32).
Reprogramming polyester rope
Polyester is a rather stiff yarn and has the property of taking its original shape. A twisted rope will then, when cut, return to the form it had, namely all loose yarns. You will then be left with a thick brush instead of a piece of string. This can be taken into account by tying a knot or immediately sealing the cut rope with glue or heat.

Max of pictures
The quality of the rope delivered in your kit is not always of high quality. Fluffy, badly made so that you can better use it to tie up your old paper than to rig your ship with. The colour is too bright and it detracts from the whole. It bothered me quite a bit and this prompted me to look for alternatives or brands that were nice. But these are mostly quite expensive, high shipping cost (depending on the country) and you are still dependent on what the supplier has to offer. Make rope by yourself is an option. You determine the quality, colour and appearance. The price is also manageable. I buy a spool, for example, of yarn for under €10.- ($ 11,-), I can make the rope for an entire ship on a scale of 1:75 and still have enough left over for the next ship. And believe me, it is also fun to do.
Ohla Batchvarov @shipphotographer.com was one of my inspirations to build my machine. My knowledge I found on al the internet and books I combined into a build of a machine that looks likes Ohla's machine. It works perfect and is very controllable.
But first I want to tell you something about the history of ropes and how it was made the last few thousands of years. The method is still too today the same.
Rope has been made for centuries. A piece of ship's rope, which was already 2000 years old, was found during excavations of the Roman forts in Velsen (the Netherlands). U can find a picture of it here: tweeduizend-jaar-oud-touw The piece was about 30cm long and about 3cm thick. It was made of hemp, which makes it special because this material decays quickly. The composition was almost identical to the present day. Hemp has therefore been used for centuries to make rope and is particularly suitable for this purpose. The fibres are spun into threads and from these threads yarns are made by twisting them. In earlier times it was quickly discovered that rope twisted clockwise is the strongest rope. That is why you find mainly right-hand twine in history. Today we know that this is due to the natural shape of the cells in the hemp fibre. By twisting it clockwise, you go with the lay of the cells and the fibre retains its natural resilience and strength. Bill Fronzaglia wrote in The History of Rope: "Even the standardization of the Right Hand Lay rope dates back to the early days of rope production, when it was known that Hemp retains more strength when the yarn is twisted to the right. This resulted in a left hand strand, and a right hand rope. It wasn't until modern times that microscopic examination of the plant illustrated that the structure of the plant has a natural twist that causes this effect" (Source: the-history-of-rope )
The fibres spun into threads are called yarns. They are twist in a clockwise direction (Z-twist). From the yarns, counterclockwise (S-twist) strands are then twist and these are used to make clockwise (Z-twist) rope, Hawser laid rope. Please correct me if I’m wrong.
Touw = rope
Garen = yarn
Kardeel = strand
Kabel = cable
The twist of a rope can be seen by placing the rope on the palm of your hand, S- and Z-twist are clearly visible.
More about this subject you can find in Knowing the Ropes: The Need to Record Ropes and Rigging on Wreck-Sites and Some Techniques for Doing So by Damien Sanders
Another remarkable fact I found in my search was that ropes before the 19the century were probably never thicker than 229 mm (9") in circumference, or 73 mm in diameter. If one wanted a rope with a larger diameter than Ø73 mm, this was done by beating the ropes into a cable. The source for this information can be found in the quote by Damien Sanders: 'Knowing the Ropes' A cable is composed of ropes, usually S-twist and has a larger diameter than 73mm. To keep it simple: a cable can also have a diameter smaller than Ø73mm, but then it is called a Cablet. The yarn used in modelling is usually Z-twist, but do check this. I use Serafil from the brand Amann, this is Z-twist, but this yarn can also be used for S-twist rope. The yarn yarn is so thin that you won't notice it when twist.
Materials for making your own rope
I have seen examples of cotton, hemp, polyester and even silk. I came across the latter from a modeller on a German forum. https://shipsofscale.com/sosforums/threads/la-cr%C3%A9ole-1827-by-archjofo-scale-1-48-french-corvette.7643/ user @archjofo uses YLI #100 silk lock yarn and Gütermann S 303 yarn. It gives a beautiful result, but it does come at a price, of course. By the way, it is not strange to use silk, as it has been used in the past in model shipbuilding. There are museum pieces where this has been applied. It looks very nice, but whether it is easy to work with? Maybe Johann can tell us. In my search, I saw comments that many museums that restore a model switch to polyester, because there are more advantages to it. It is more durable, does not expand and is not fluffy. With a good treatment it does not fray either. In this topic I will limit myself to polyester, as I have the most experience with it. The actions that will be discussed are applicable to all materials, with the exception of the after-treatment of polyester against fraying (unravelling). If you prefer to use cotton, I recommend Egyptian cotton. The fibres are longer and therefore stronger in thinner yarns and because of the way they are picked, there is less fluff.
There are many types of polyester yarn that you can use, such as zipworld Tytan, AriadneTytan, Amann Serafil, Gütermann, all sewing or locker yarns.Look what is availleble in your country. Note that there are also blends of polyester and cotton such as Forbilux. I don't use this, it is very fluffy. But it is a good alternative if you prefer the cotton look. It is thinner and stronger than cotton, but the difference is almost indistinguishable. I myself use Serafill 120/2, which is similar to Tytan 250, it is 100% lock yarn.
Its thickness is 0.12 mm and it consists of 2 wires that are Z-twist. It is available in various colours. The Tytan and Serafil have a silky sheen, which gives a nice appearance in normal light. When using a flash, it does light up, so you will always see a sheen on the photos. In the future I want to try other yarns, especially for thicker rope a slightly thicker yarn can be welcome. @mati.n uses differed brands, maybe he will share here also his experience with us.
The ropewalk
How rope is actually made can be found on the internet, see for example https://en.wikipedia.org/wiki/Rope To be able to twist the rope, a rope-walk is needed. This can be a simple manual version, but also an electrical one. A rope-walk twists the yarns to a strand and then twist the strand in turn into a rope. In below picture the upper hooks twist the strands, the lower hook the rope.
Four-strand rope usually has an extra thin strand (core) in the middle to accommodate the hollow, the builders of French ships usually used six-strand rope. I have no experience with these builds, the builders here who have maybe can tell you more about this. I just mentioned it because my rope walk can make rope with 4 strands and core.
Four-strand rope with core has a little more flexibility, but is rarely used. And when it is used only for the thicker ropes on the ship. The smaller 4 strands are not strong enough. That’s wat I had read about it. @Dubs modelling can maybe tell more about it. For example I use it to make 0.5 mm. rope from Serafil. I then put 4x2 yarns in the machine plus a core. This produces a 0.5 mm. rope.
The rope-walk basically consists of the winding mechanism, a strand turner, a strand separator and a 'fixed' point to which the yarns are attached. The "fixed" point (which can be rotated) will twist the rope if the strands are sufficiently twisted. Below picture shows the prototype of the gear construction for making a six-strand rope. The central gear wheel drives the gears for twisting the strands. The core wire can be attached in the centre of this rope-walk.
After the necessary tests with the prototype, a housing for the walk was designed with AutoCAD. Below picture shows mine rope-walk version for four strands and one core.
In addition to the drive, it also houses the electronics.
The drive motor is a 12V/600 rpm reduction motor from Aliexpress, dimensions Ø37x55mm. motor The controller (6-30V, 80W) is also from Aliexpress,. With it, the speed of the process and the direction of rotation can be adjusted. controller
This rope-walk allows me to make ropes over a length of 3.70m: wall to wall in my hobby room. When you have a bigger shipyard you will be lucky enough to make longer ropes.
The process is like Ohla Batchvarov shows in her video’s
Mine looks like this
The wooden stick is to keep the trolley in place when I attach the yarn to the machine and keep the yarn in tension.
This horizontal arrangement has two powered sides: the trolley, the part that turns the rope, is on a trolley that compensates for the shortening that occurs during winding. A weight is attached to the trolley. Which, by a pulley, keeps the tension on the wires.
The yarns are looped around the hooks of the rope-walk and return to the hook on the trolley. The core wire is guided to the side of the rope-walk and stretched there with a weight (in the picture I use a clip). It does not twist during the twisting process and keeps its length. After the yarns (including the core) have been attached to the trolley, they are passed through the separator. I use a piece of MDF but in the video of Ohla you see a stick with a cone. I’m going to experience with that someday. Maybe someone can explain the advantage to me.
Once everything is securely fastened and stretched, the rope-walk is started and the threads are twisted. When the machine reaches the 10% mark (the length of the threads is only 90% of the length at which it started), the motor of the trolley is started and twisting of the rope begins. The separator is slowly moved forward until it reaches the rope-walk. The speed at which this is done is a part by feel the push of the twisted rope, the twisted rope pushes against the separator. So a little experience need to be train to do this. When you arrive at the rope-walk, both machines are stopped immediately. If you don't, the rope snaps.
You have to master this process. The tension on the threads, the speed of turning and the smooth movement of the separator all play a part in achieving a beautiful end result.
Every machine will be different, but a basic rule is: wait with twisting until the strands have decreased in length by 10-15% (the twisting makes the strands shorter). I use 8% for thin rope (3x2 yarns) and 15% for thick rope (3x 32 yarns), the rest in between. The table in below picture shows the results of tests I made with Serafil. For this material these are good guidelines, the deviations are only small. I will mentioning that when I make 2x1, 3x1 or 4x1 rope (this is very thin. I only make S-twist rope of Serafil. This works better when twisting the rope and you need a microscope to see if the end result is S- or Z-twisted. No problem at al.
Edit: Forget the contra weight in the diagram. This is wrong and need to be more. Example 3x2 must be at least 80 grams.
Other brands of yarn may give different values. To find out, it is a good idea to systematically record all data and every action during the test, such as the yarn, number of yarns, the length, how much you shrink the yarn on the rope bearing before starting to rope, the end result, etc. This makes it easier to make a rope for the next ship and ensures consistent results.
The rope-walk is suitable for making very thick rope, the thickest I have made with it so far with Serafil is Ø2 mm. thick rope of 3 threads, each consisting of 32 yarns (3x32).
Reprogramming polyester rope
Polyester is a rather stiff yarn and has the property of taking its original shape. A twisted rope will then, when cut, return to the form it had, namely all loose yarns. You will then be left with a thick brush instead of a piece of string. This can be taken into account by tying a knot or immediately sealing the cut rope with glue or heat.
Max of pictures
Last edited: