Forward deck fittings
The forward deck area has several fixtures like an on-deck anchor locker, companion way, and a trawling light on a pole. In this case, I decided to have a working trawl light, so the electrical feed was installed before the hull was fully planked and the lantern and its pole were constructed differently to the plan. This was described in detail in earlier posts (post #36), but the main difference is that it has a brass tube for the pole instead of a piece of dowel…this conceals the wiring.
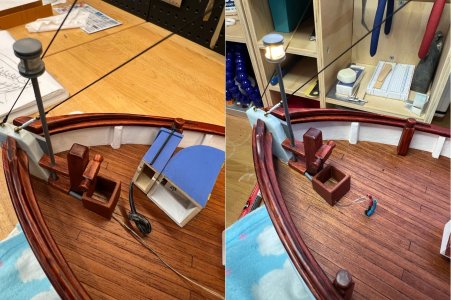
I made a few subtle changes to hide the wiring…there is an additional block of wood at the foot of the light post (the plan has the pole directly attached to the deck) and this has a hidden pathway underneath for the wiring, and a short piece of plastic tubing joins that block and takes the wiring through the anchor locker, like a conduit, and under the next fixture and into the companionway where the electrical feed comes above deck. In the following photos you can see the wire path through the conduit and the sections cut from the base of the companionway to allow the wires to sit underneath.

The light is ‘on’ in the right hand shot…always test before gluing things down, right? Yeah, well, it wasn’t until a few days later when I was demo’ing progress to the Admiral when I noticed that the trawl light was significantly brighter than all the other lighting. Hmmm, I think I forgot to add the current limiting resistor!! Luckily the LED didn’t let go.
I had two choices…remove the companionway (glued to the deck with a spot of CA and white glue) or hope that the internal wiring had enough length to allow me to add the resistor inline inside the main hold. I didn’t fancy removing the building…adding any sort of solvent, even carefully applied, was likely to upset the finish on the deck (and hence me!). So, it was time to test my philosophy of making the electricals accessible and removable if needed. Things went well and the job was done in less than hour and everything back in place and working.
Shroud pin rails
Fiddly job…very fine timber used here, tiny hole at each end, difficult to paint neatly, then they are attached by tying a fine rope between the holes in each end. I also added a spot of CA to make sure they stay in place. For this boat, they are mainly used to hold the extra gear used during fishing…float on one side and a pike pole on the other, and a piece of timber that I’m not sure of its use except maybe as a fairly large pin to store spare rope on?

Forward trawling gear and the winch
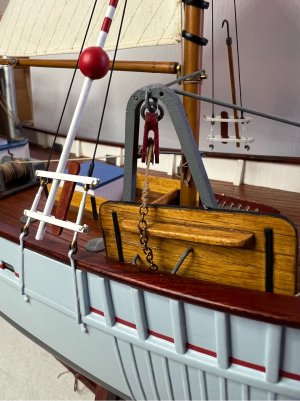
The trawling gear, otter boards and their gallows, were put together way back in post #54. I’ve left installing these until almost last as they are in a vulnerable spot and likely to get knocked about during construction, plus the fore and aft sets have a rope line permanently run to the central winch. In the photos on the box, the forward running line is under tension, ie suspended above the deck, so that would have got tangled in something for sure. The forward boards and gallows can be seen in the photo above.
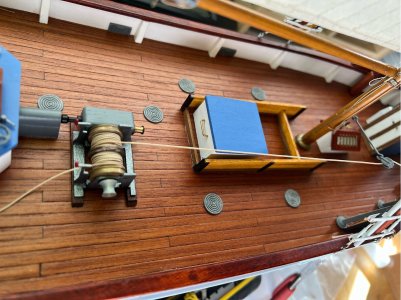
The winch is made up from a set of mainly brass parts…some punched sheet, some nicely machined pieces and a few pieces of wood. Its construction was described in post #31. The spools of each side of the winch hold a reasonable length of rope, and I don’t want to ‘waste’ that much of my scale rope, so I decided to use some of the kit-supplied rope to fill the bulk of the spool and then I just put the final two layers of the scale rope on over that. I’m using 0.7mm rope for this, that would scale to 23mm…sounds about right to me. The two spools can be removed from the body of the winch as I haven’t glued the end capstan to the shaft, this makes it much easier to wind the rope onto the spool. Don’t forget that it needs to be wound in opposite directions for each side, to match the direction that the rope needs to pull from. After getting everything in place, I then gave the two spools of rope a light soaking with thin CA to lock it all in place. The body of the winch was glued to the deck using epoxy glue.

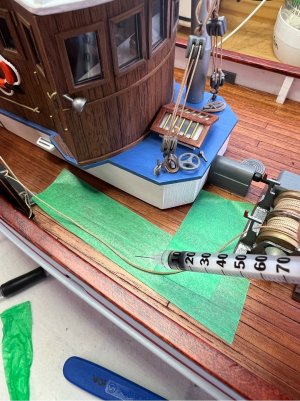
While the forward rope is under light tension and runs overhead, the rope that goes to the aft gallows is left loose on the deck. To ensure that this stays in place and lays along the deck, I carefully wet the rope with thin CA (using a fine syringe) while holding it in place. I protected the deck with masking tape because I didn’t want to stick it down, just make it stiff. This has worked out well, it looks natural but doesn’t get caught up in anything.

Next time a few finishing touches aft of the wheelhouse.
The forward deck area has several fixtures like an on-deck anchor locker, companion way, and a trawling light on a pole. In this case, I decided to have a working trawl light, so the electrical feed was installed before the hull was fully planked and the lantern and its pole were constructed differently to the plan. This was described in detail in earlier posts (post #36), but the main difference is that it has a brass tube for the pole instead of a piece of dowel…this conceals the wiring.
I made a few subtle changes to hide the wiring…there is an additional block of wood at the foot of the light post (the plan has the pole directly attached to the deck) and this has a hidden pathway underneath for the wiring, and a short piece of plastic tubing joins that block and takes the wiring through the anchor locker, like a conduit, and under the next fixture and into the companionway where the electrical feed comes above deck. In the following photos you can see the wire path through the conduit and the sections cut from the base of the companionway to allow the wires to sit underneath.

The light is ‘on’ in the right hand shot…always test before gluing things down, right? Yeah, well, it wasn’t until a few days later when I was demo’ing progress to the Admiral when I noticed that the trawl light was significantly brighter than all the other lighting. Hmmm, I think I forgot to add the current limiting resistor!! Luckily the LED didn’t let go.
I had two choices…remove the companionway (glued to the deck with a spot of CA and white glue) or hope that the internal wiring had enough length to allow me to add the resistor inline inside the main hold. I didn’t fancy removing the building…adding any sort of solvent, even carefully applied, was likely to upset the finish on the deck (and hence me!). So, it was time to test my philosophy of making the electricals accessible and removable if needed. Things went well and the job was done in less than hour and everything back in place and working.
Shroud pin rails
Fiddly job…very fine timber used here, tiny hole at each end, difficult to paint neatly, then they are attached by tying a fine rope between the holes in each end. I also added a spot of CA to make sure they stay in place. For this boat, they are mainly used to hold the extra gear used during fishing…float on one side and a pike pole on the other, and a piece of timber that I’m not sure of its use except maybe as a fairly large pin to store spare rope on?

Forward trawling gear and the winch
The trawling gear, otter boards and their gallows, were put together way back in post #54. I’ve left installing these until almost last as they are in a vulnerable spot and likely to get knocked about during construction, plus the fore and aft sets have a rope line permanently run to the central winch. In the photos on the box, the forward running line is under tension, ie suspended above the deck, so that would have got tangled in something for sure. The forward boards and gallows can be seen in the photo above.
The winch is made up from a set of mainly brass parts…some punched sheet, some nicely machined pieces and a few pieces of wood. Its construction was described in post #31. The spools of each side of the winch hold a reasonable length of rope, and I don’t want to ‘waste’ that much of my scale rope, so I decided to use some of the kit-supplied rope to fill the bulk of the spool and then I just put the final two layers of the scale rope on over that. I’m using 0.7mm rope for this, that would scale to 23mm…sounds about right to me. The two spools can be removed from the body of the winch as I haven’t glued the end capstan to the shaft, this makes it much easier to wind the rope onto the spool. Don’t forget that it needs to be wound in opposite directions for each side, to match the direction that the rope needs to pull from. After getting everything in place, I then gave the two spools of rope a light soaking with thin CA to lock it all in place. The body of the winch was glued to the deck using epoxy glue.

While the forward rope is under light tension and runs overhead, the rope that goes to the aft gallows is left loose on the deck. To ensure that this stays in place and lays along the deck, I carefully wet the rope with thin CA (using a fine syringe) while holding it in place. I protected the deck with masking tape because I didn’t want to stick it down, just make it stiff. This has worked out well, it looks natural but doesn’t get caught up in anything.

Next time a few finishing touches aft of the wheelhouse.

