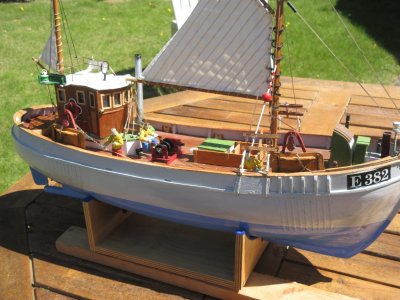
Mary Ann by Billing Boats 472 - Build log

Hello, very nicely built. I have two working Mary Anns but not with your excellent cabin detail. The motor you have chosen is good for the job and although the 2 blade prop is correct I fitted a small 30mm 3 bladed one. I used Marx Monoperm supers (because I have several) for my boats but current consumption is less than an amp. I used very cheap esc's from AliExpress at £2 each they may have gone up in price now but that will need to have the small red 2 lead connectors fitted which are very cheap. They work very well without any failures, there is a tiny switch on the esc that switches the breaking as for cars ,on and off.

The model only needs a 9 gram servo fitted for the rudder as there is not much power needed. I too have made brass rudders almost identical to yours as they do look much better. I have a small area for getting at the top of the rudder post under the grating, which always seems to stay in place.

I have some old wartime photos of the fishing boats in a WW2 Naval Intelligence book documenting all fishing in the North Sea from every country involved together with the seasons for catching different fish species.

I did note that one fishing boat similar to Mary Ann had the trawl winch at right angles to the placement in the kit plans. You said you have some experience on the fishing boats is that something you can tell us about? It would seem more logical.
I do have a 3 man crew on each model which rather brings them to life. Thank you for the information for the requirement for the sails.

I look forward to seeing the finished model.

Roy
 
Hello Roy,
Thanks for stopping by for a look at what I've been doing. It's always interesting to hear from fellow builders who have tackled the same boat. I've thought that a three man crew would be about right...I have a few potential crew members underway on my bench at the moment, but I haven't yet decided who will make it through the selection process for inclusion in the maiden crew.

But it wasn't me that had the real-life experience on these boats, that was another member of the name of El Capi, he sailed on them for a few years in his younger days and has good knowledge of their setup if you're after more info (he also has lots of photos). He did also mention that the winches varied between the boats...some mounted longitudinally and others perpendicular.

I've been letting other things get in the way of my building recently, but hopefully I'll have more to report on by the end of the week.
 
Hello thanks for your response, I read through 5 pages and got lost in the threads. But your info on the winch placement was interesting. The Billing Mary Ann is the most attractive fishing boat and I just like looking at her. I found my second crew lurking in my garage.! It was a father anf two beefy sons who volunteered! I explained the pay was awful and there was no time off, but they said if I got them some heavy weather gear they would man the boat.

Billing do another fishing boat Cux 87 (I think) and the hull keel and frames are exactly the same with the same Billing sheet numbers. I have a third kit with just the frames assembled but I wanted a different boat and maybe look at the Nordern plans and copy that deck layout.
My kits are old and have the trawl gallows in brass.

I do recommend the cheap esc I use from AliExpress. They are the only ones I use these days.
My preference is for model yachts of which I have about 10. I have a Mantua Bruma kit unstarted, but I want to have the sails also functioning which is going to take some thinking about. I have been advising another modeller on the Model Boats Website on how to place a temporary keel in a Bruma without it being obvious when removed. The challenge is switching off the mixer to the twin motors and have separate control of the boat rudder while sailing. I think I have solved it but most starts can be improved on.

I am scratch building a Wild Duck scale yacht yacht at the moment but the next one will be an Artisania Latina Trotamores, (converted fishing boat), from a static to a working model. I am the despair of my family with over 40 model boats in the house all radio controlled.

Regards
Roy
 
It’s been a frustrating few days
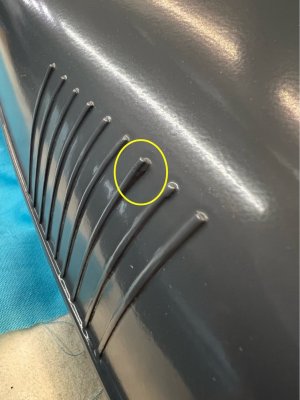
Well, I did ask for it last time…I shouldn’t have mentioned anything about ‘luck’. Anyway, I noticed one of the vertical rubbing rails at the stern end was starting to lift. These are only thin strips of wood, but there is a fair bend in the shape of the hull at that point and I obviously didn’t get sufficient bend ‘set’ into the strip before gluing it down. I thought it best to sort that out now before doing any further painting - that was about the only good thought I had in this little episode!

1732505127757.jpeg

I decided to glue the end down with some thin CA, using its wicking ability to get back under the timber and then hold it down while it dried. The first problem encountered was that I should have used a fine syringe to apply the glue, but I used an extension nozzle on a new bottle of CA and, when turned upside down, the full bottle gave it enough momentum to inject way too much glue and that came out the other side and over the paintwork…dissolving the acrylic top coat as it went. Then I put a rubber band over top of the piece being glued (around the hull), to let it dry properly before sorting out the paint damage.

This brings me to problem number two…and it’s a bit embarrassing. I thought I’d put the hull back out in the sun for a bit while it dried off (just for a few minutes), and I then went off to do something else. And, you know that feeling you get when you remember something an hour or so later…yes, I’d left it baking in the sun and it was quite hot to touch when I bought it back in. This had allowed the rubber band to cut into the paint work quite badly. A frustrating morning overall…and I only had myself to blame. Unfortunately, I didn’t take any photos of this. Anyway, I’m now back to fixing things prior being able to finish the painting.

First, I removed the worst of both issues by rubbing them back with 600 grit wet & dry, but there were areas that needed a small amount of filler to bring the surface back to a consistent level. Now to problem number three…it turns out that automotive spray primers and putties are solvent rich and that can dissolve dry acrylic paint that is already on the surface…not to the point of wrinkling or peeling, but it does etch the acrylic out to the edges of the applied primer. In my case this was complicated by me using masking tape to try to limit the size of the area I was fixing. This resulted in the primer etching a square of fine lines at the tape edge.

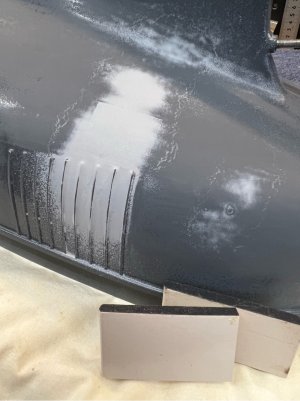
Here (below) is one side after spraying and rubbing back the spray putty, and you can see both the remnants of the masking border, and also a line right around the edge of where the putty was re-sprayed to try and fill the line around the masked area. That wavy, dotted line is actually a line of small cavities in the surface where the solvent has etched the acrylic. At this point I felt this job is getting bigger rather than better!

1732505490956.jpeg

The small blocks shown near the hull, above, are a couple of thin sanding boards I made up so that I can 600 wet & dry sand between the rubbing bands, they worked well when I got to that stage. The other thing that you can see in that photo is that the fourth band from the left of the photo is also starting to show signs of lifting at the end, probably due to the spray putty softening the paint and Weld-Bond glue below it. Remember the rhyme about the 'old lady who swallowed a fly'...

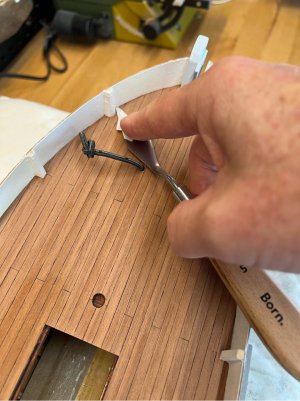
At this point I decided to re-glue all of the ends that showed even the slightest movement. I used a scalpel blade to carefully slice from the end for a few millimetres and then I used a very small 1ml syringe with a needle point to inject the smallest quantity of thin CA under the timber. This wicked in immediately and each was carefully held in place with a screwdriver blade until dry. The 1ml syringe worked very well, I filled it with a small amount of CA directly from the bottle and it was easily cleaned afterward with acetone…this is how I’ll probably use the thin CA in future.

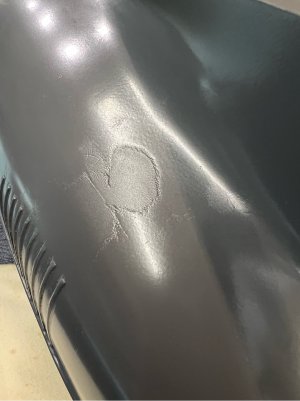
Finally, I feel as though I’m starting to make progress again. Now the issue that I still have to sort out is filling all those small etched areas around where I had used the spray putty & primer. All of the fillers I have used thus far are not great for this task…the blue Sika 107 is too coarse and the Deluxe Lite does not stick or sand well in very fine applications. I did a bit of research and found another Deluxe product called Perfect Plastic Putty that gets good reviews. And this is close what I was after, it is water based and designed to go on painted surfaces (won’t damage acrylics), it’s very fine in structure, it's a single pack (no mixing), it dries quickly, and importantly it sands well to a hard polished finish for painting. The feathering at the edges is good, but not as good as you get from spray putty or multiple primer coats.

As you can see, below, even though the filled surface looked perfect before painting, once you get the finish coat back on and dry, you can still see remnants of the filled area. Those bright lights make it look worse than it seemed.

1732507544110.jpeg

At this point I was getting a bit deflated by the whole thing…but I really don’t like giving up! I decided to put it aside for a week or so, and did something else so that I could come back to it with fresh hands.

My last attempt would be…
  • sand back with 600 on a rigid board to make sure it was flat
  • slightly over-fill a larger area with the new filler to make sure I was getting those nasty edges covered
  • dry sand (the filler will dissolve otherwise) at 1000 grit and check it in bright sunlight…I want to get smoothly feathered edges
  • re-paint just the local area
  • when dry, wet sand the top coat to remove any remaining ‘edges’
  • repeat the re-paint/sand process, causing the top coat to act as a fine filler that is repeatedly feathered with each sand and re-coat.
I'm not finished yet, it's had two coats and is looking much better, so I'll show the final product in the next post.
 
Hello Pete, I have just realised you are 'down under'. Our son lives in Woy Woy, not that far away in ozzy terms. I shall be visiting again for the whole of February and first week in March in 2025. It is my annual visit and have been at least a dozen times already. He has a large model railway, but is full size for a sailing yacht.

I am 86 and reasonably active but wobble a bit now and again! Just had a cataract operation and the result has been incredible with clearness of vision and colours are so bright and defined it is like going back 40 years. The other one should be done before I travel as well.
The acrylic car paints in UK need to be sprayed with the finishing varnish to stabilise them as otherwise they remain soft.

Do you by chance read Model Boats magazine from the UK?

I find this web site is good but I am not really interested in the old ships of the line etc as I like working models. I have around 10 sail boats and yachts, with rather a lot of electric model boats. including a radio controlled clockwork model boat, scratch built before I was born.

This Mary Ann is my second one and has no number I am planning on rearranging the kit numbers for her and a new name. The other is a model of Lilla Dan, or at least she is built from those plans. As the hull is a plastic Graupner Elke fishing boat and the the full length over the bowsprit is 36 inches (900mm). They both have a working crew on board.
Regards
Roy

IMG_1826.JPG

IMG_1644.JPG
 
Hello Pete, I have just realised you are 'down under'. Our son lives in Woy Woy, not that far away in ozzy terms. I shall be visiting again for the whole of February and first week in March in 2025. It is my annual visit and have been at least a dozen times already. He has a large model railway, but is full size for a sailing yacht.

I am 86 and reasonably active but wobble a bit now and again! Just had a cataract operation and the result has been incredible with clearness of vision and colours are so bright and defined it is like going back 40 years. The other one should be done before I travel as well.
The acrylic car paints in UK need to be sprayed with the finishing varnish to stabilise them as otherwise they remain soft.

Do you by chance read Model Boats magazine from the UK?

I find this web site is good but I am not really interested in the old ships of the line etc as I like working models. I have around 10 sail boats and yachts, with rather a lot of electric model boats. including a radio controlled clockwork model boat, scratch built before I was born.

This Mary Ann is my second one and has no number I am planning on rearranging the kit numbers for her and a new name. The other is a model of Lilla Dan, or at least she is built from those plans. As the hull is a plastic Graupner Elke fishing boat and the the full length over the bowsprit is 36 inches (900mm). They both have a working crew on board.
Regards
Roy

Hi Roy,
They're both great looking models, if my Mary Ann finishes up as well as yours I'll be very happy. As it happens, I was travelling through Woy Woy just last weekend on the train to Sydney, it's a pretty area and Brisbane Water is not a lot different in look to Lake Macquarie, so it'll be a nice spot to spend some time at the end of your winter. You mentioned Model Boats magazine...I have subscribed in the past, but not at present, at one point we even had it available in the local library, but it seems that magazines are slowly fading away, except perhaps for a few specialists like that one.
 
Let's finish off the hull painting
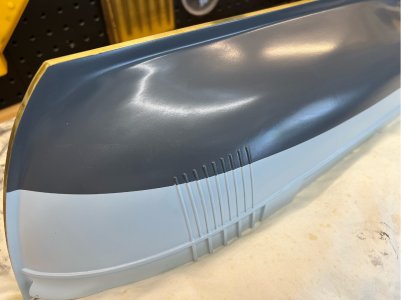
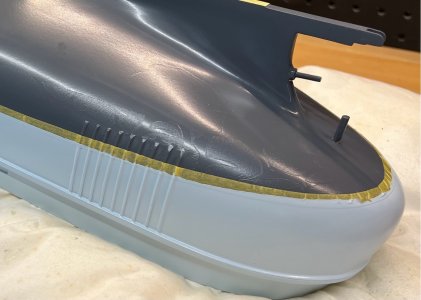
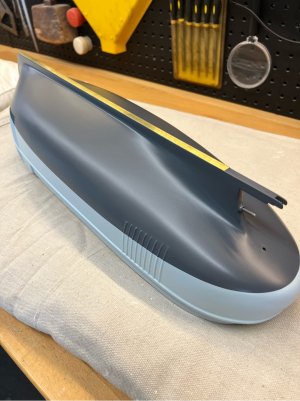
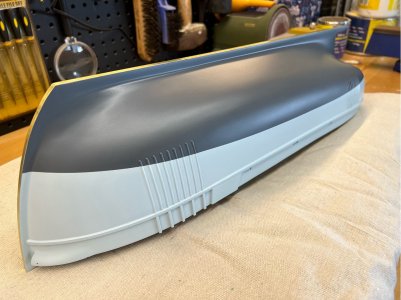
Hi, its’s been a while since I last posted. That’s mainly because the final phases of painting the hull have turned out to be a lot more trouble than I was expecting. As outlined a few posts back, I created my own problems by trying to be smart and using some spray putty over a partially finished acrylic finish. That caused some nasty etching, and it has taken quite a few subsequent coats of paint and rubbing back with wet & dry to get the lower hull paintwork back to a finish that I’m happy with. And what was the special skill required for this?…none, just persistence!

And now that I’m back to a sound, faired surface with the colour I want on the lower hull, I’m ready to have a go at the upper hull colour. The waterline was marked in accordance with the plans, with the usual technique of a pencil taped to the top of a suitably sized block of timber. The only tricks here were to make sure that the keel was inclined at the specified angle (a 5mm block under the bow and the stern on the table) and to make sure that the boat was kept level from side-to-side while moving boat or the marking block (a spirit level across the gunwales). I was happy with the line, so it was onto masking up the existing painted surface.

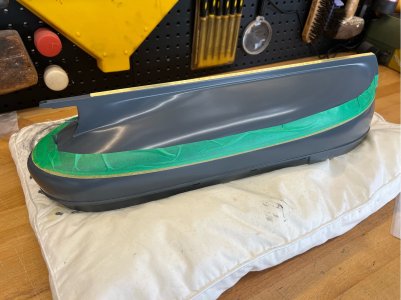
I had tried a few masking tapes on my sample scrap of wood, and ended up using Tamiya 6mm yellow tape to get a good line, with other products layered to give coverage. From testing, I knew the 6mm tape gave a good clean line with no bleeding and it goes around corners better than wider tapes, so it suited the continuous curve around and under the stern. It is a little tricky in that area getting both a smooth curve and also making sure that the masked shape is evenly balanced (in plan view) on both sides of the keel.

1735275833881.jpeg

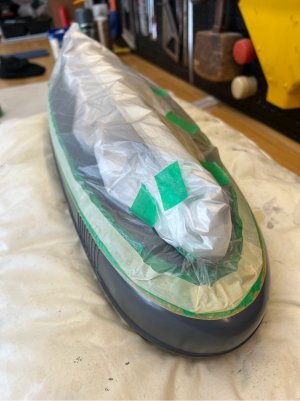
After getting the yellow tape set in place and burnished on the edge that will have the wet paint applied, I then added a layer of green Bear Samurai tape. This is my usual tape for any painting that I’m doing…its thin, gives a good edge and can be left in place for longer than the cheaper tapes. In this case I’m only using it as a protective layer to stick the final masking product, so I didn’t need to place it too carefully. The final product is a plastic film with a masking tape built in (used for automative spray jobs), but I’d had it for about 10 years, and I didn’t want its overly tacky tape directly on my relatively fresh paintwork.

Here it is ready to go…
1735275908111.jpeg

For the deck, I just taped it with 2” wide clear tape. The one I’m using is relatively stiff and it was happy to stick to the top edge of the gunwale and allow me to trim it to have a 2mm projection over the outside, without wanting to bend over and stick to the outside of the gunwale wall like the masking tape tended to do.

The first paint coat was done with the hull inverted so that I was spraying across the top of the edge of the masked area, rather than down into it…hoping that if I did a light first coat then it would seal against the tape rather than be forced under the edge and bleed. This was particularly important on the starboard side where the vertical rubbing rails are also being painted and the masking has to run across the middle of them…a fiddly job getting a good seal on those areas before starting.

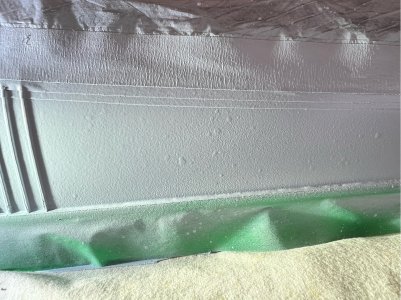
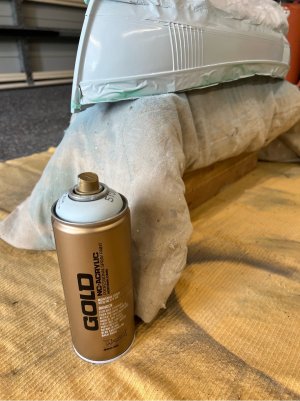
The paint I am using for this section is named ‘Polar Blue’ and is from the Montana Gold range of rattle spray cans. This range is a little unique in that it is designed for artists and is formulated to be ’low pressure’…apparently this gives a skilled artist more control in tight areas. It caused me no end of frustration. I just could not get a consistently good finish without some level of paint spatter (not a problem with any of the other paints being used).

Here is a particularly bad example, highlighted with a very bright light at a low angle, but you get the idea…

1735276035366.jpeg

It took many attempts and some testing on scrap to work out that I needed to use the ‘low pressure’ to my advantage. I’d been trying to ensure that I got maximum flow through the nozzle (warm can), kept the aperture clean between passes…all to no effect. It turns out that you need to go the other way…slow everything down, a light pressure on the nozzle, slow passes, build light coats to get a complete wet coating without spattering. It’s great stuff when you work it out. A simple wet & dry between coats to remove the prior spots and the job finished up nicely.

Here she is…the paint is still wet in this shot.

1735276118599.jpeg

So, drum roll…how did it finish up? Did we get a nice edge? Is there any overspray? The mask removal is almost as stressful as the painting!

I’m pleased to say that it finished up pretty well. The wet edge between the upper and lower surfaces came out straight and was nice and crisp. The sections across the vertical rubbing rails were also good. Even the tiny-tiny bit of bleed on the fore edge of first rail in the following pic was easily removed with wet and dry.

1735276206014.jpeg

But all was not completely well…the masking tape has reacted with the paint of the lower (grey) section. I thought that it might have been residual glue, but it isn’t. The adhesive somehow has a mild reaction to the paint and causes it to soften and leave a mark, like a watermark. Here is a good example (before the Tamiya tape had been removed)…

1735276273541.jpeg

While that was somewhat alarming, I had seen this before and I’d already done some testing on my scrap piece and I knew that the clear matt top coats can remove this. The entire lower section of the hull was wet & dry sanded with 2000 grit to get a consistently smooth surface and colour, and that also removed most of this ‘watermark’ effect.

So the next step was to add a few coats of Dulux Duramax Clear Matt Acrylic. I like using this product, it gives a consistent matt finish even after a few coats and it looks and feels good. It also finished off the watermark repair and I’m very happy with the final result.

1735276349053.jpeg

And the bow…

1735276375180.jpeg

I do realise that I’ve gone overboard with trying to get everything right with this painting exercise, but this model was always meant to be a learning exercise…and that it has been. I promise we’ll be turning the hull right-side up, and get back to some more interesting build content soon.
 
Hi very good finish do not forget to waterproof the inside hull as well otherwise dampness will get through and swell the wood and cause cracking of the paint. Within the Billing kit build there is a sealed off section at the bow which as a working model I would avoid.

When Norway was occupied during WW2 they insisted that all fishing boat hulls were painted white so they could be seen. Most of the fish they caught was exported into Germany and this was more limited than before. At this time when a boat went out fishing it was supposed to have a soldier on board.

On UK TV there is a film occasionaly shown called Suicide Mission, it is a simple plot type film and about the secret missions of WW2 between Norway and the UK. The boats featured are all of the Mary Ann type but the surprising thing is how very loud the single cylinder engine is as it can be heard from a long way away. So not sure how secret "The Shetland Express" was!


Consequently from 1939 through to 1945 the fishing stocks in the North Sea recovered from the previous over fishing.

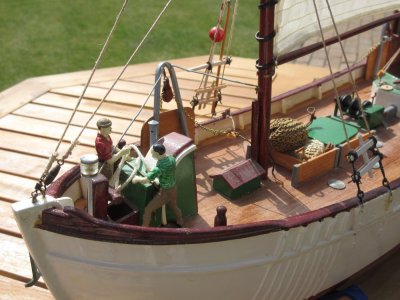
Although we modellers like to have nice tidy models they were far from it in practice with ropes and nets all over the deck. As far as I am aware there were 3 crew on board. This is my other Mary Ann, in this photo I have imagined them as a father and 2 sons, one is on the winch and the father and second son are on the trawl boards.
The access to the RC and battery are via a lift out section between the mast and bridge cabin. There is a small lift out section above the rudder for access to controls and attachment etc. There frequently seems to be a small rowing boat kept at the stern as well.

The red painted buoy lashed to the mast shrouds is part of the fishing system.
regards
Roy

IMG_2293.JPG
 
Last edited:
G'day Roy, thanks for dropping by for a look. Your suggestions are good ones, and I've already attended to them during the planking process. Although, in retrospect, I should have cut an internal hole in both the first and second bulkheads when I had the chance, so that they could get some ventilation...but I did cut temporary access in the deck to be able to fully seal the interiors with epoxy.

It's always interesting to read a bit about their history, so thanks for that...and I see that one of the streaming services here has the Suicide Mission movie available for rent, so I might look that up sometime.

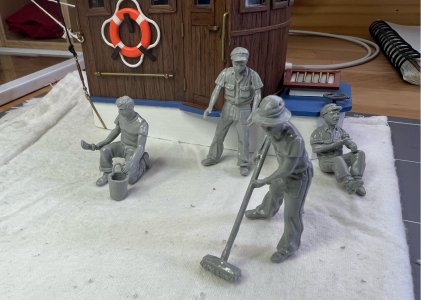
I've been building up some crew today...I have more than needed given that the skipper is already inside at the wheel, but I figure that I'll give different ones a try to see what works when I get the deck kitted out and the figures painted up.

1735362833133.jpeg
 
Preparation for the deck planking
Back to working with timber again…my happy place. The plywood main deck (a false deck) will be planked with mahogany strips, supplied in the kit. This timber is a nice rich colour and will look good when finished with a matte acrylic…even if it’s probably not very realistic for a boat that has been to sea for very long. These strips are a little under 5mm wide, so at 1:33 scale that is close to a 6-inch width which sounds appropriate for a boat of this size. I plan to do staggered-joins of a standard length, mainly to have a go at doing it - the strips are long enough to go full length of the deck. It seems like 18-20 feet would have been a typical plank length. And, although I don’t really need to be concerned about where the joins will be (because they aren’t going to be nailed down), I think it will look good to align them to the frame bulkheads as they show above deck level as the stanchions for the bulwark. The distance between 4 bulkheads is 168mm and that scales nicely to 18 foot 2.25 inches, so that is the length of the planks and I’ll be using a simple 1-2-3-4 pattern for the joins, starting from the centre of the deck. It almost sounds like I know what I’m doing there…but that all came from reading other guides and posts from this and other modelling sites, it’s such a great community for that.

One small disappointment is that the kit doesn’t come with a pre-cut washboard/margin plank (the board that sits next to the bulwark and around the stanchions), to give a nice straight edge to plank against). I have seen examples of this model where that area is not planked at all, and the false deck is just painted in the same colour of the inside of the bulwark. I did a test with some other similar planking I had…one side done as a simple curve inside of the stanchions, and the other side where the planks are cut in around the stanchions…after consultation, the team here at home prefer the later method. So, I’ll proceed with the planking cut in around the stanchions and the long ends shaped to the curvature of the deck at the bulwark/deck interface rather than trying to edge bend such a thin strip to match the curve.

In preparation for the decking, I have painted the inside of the bulwarks in white so that I don’t have to cut that in later and risk getting it on the decking boards. The very edge of the false deck has been painted a dark brown so that any minor gaps are not seen after the planks are laid. I’ve also painted the edges of all the raised deck coamings so that they don’t need to be cut-in later as well.

The planking will be started from the centreline of the deck. I was in two minds as to whether to put the first plank across the middle of the centreline, or to put one on either side. The false deck is made as two separate pieces of ply with a glued seam down the centreline, so in the end I decided on a plank on either side. I don’t expect to get any movement in the join along the false deck as it has been in place from the winter months through to now (mid-summer) with no cracking.

I’m going to use a white glue (WeldBond) for this job, so that any squeeze-out can be easily removed with a wet rag after placement and not leave stains or seal the timber from the final finishes. I also find WeldBond gives a good balance between a little time to move the timber into position but still has a reasonably fast grab time compared to other types of white or PVA glues, it also dries almost completely clear if it is visible.

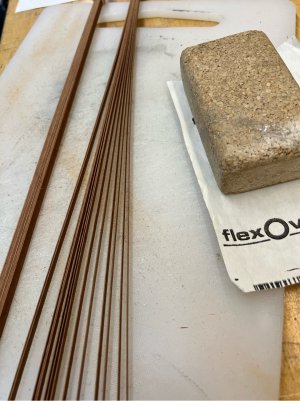
The veneer planks are well finished and dimensionally consistent, but I’ll do a little preparation before use. The edges have a very slightly feathered edge, so I want to lightly sand them prior to starting. I’m not keen to try doing that to individual planks that are about 0.5mm thick, so I bundled the planks into two lots, put a small rubber band around them and edge sanded them as a bundle, that works pretty well, is quick, and ensures they are all similar in width.

1737154931102.jpeg

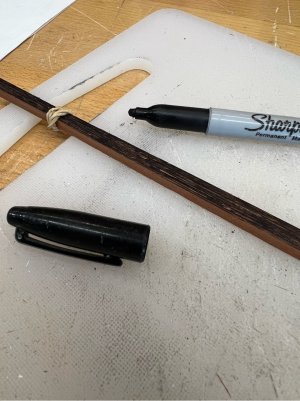
To simulate the caulking between the planks, the edges of each plank will be marked with a black Sharpie, that’s the technique that I’ve used on all other exposed timber planking in this build. It will only be applied to the edge that faces starboard and the end that faces the stern…it can look a little too dark if it is on both edges. The application of the Sharpie was also done while the planks were in small bundles…its quick and you don’t run off the edge like you can with a single plank. I also keep a ‘used’ pen which doesn’t have too much ink, and has a blunt tip for this job, so I don’t get the black bleeding into the timber grain. I’m not going to try to simulate nail heads in this build.

1737154951698.jpeg

Well, it looks like we're ready to get started...
 
Deck Planking
I’m ready to start adding the planking…here is the ‘before’ shot. The edges of the deck near the bulwarks and coamings have been painted in a dark timber stain so that I don’t get the white colour showing through any gaps.

1737155199043.jpeg

I’m laying planks from the centre out to the bulwarks and doing one on each side as I go. I was lucky with the custom forward hatch, I had chosen a width that was a nice even multiple of planks in width…most of it gets covered later in other deck build anyway. The plank pattern was started from the midline plank and is mirrored on each side…each plank starts one bulkhead further to the stern than its neighbour. I like the pattern. I also painted a thin line of stain under each edge to ensure you couldn’t see the light-coloured deck below.

1737155222395.jpeg

You need to be careful once you get to the stage where planks run the full length of the deck, in fact you need to be careful prior to that, because I found that in the section between the main coaming and the rudder access port I needed to reduce the width of a few planks very slightly to ensure that I got a nice finish against the plank that ran down the outer edge of the main coaming. You can’t see it when its finished, but you want any variances spread across as many planks as practical so that you don’t end up with a single narrowed plank.

1737155250099.jpeg

Here, we are getting to the tricky point, cutting in around the stanchions. I was expecting this to be more difficult than it was. Provided you have patience and a sharp knife (I use a craft scalpel) and you are willing to scrap and re-do anything that you’re not happy with, then you can get a pretty good finish. I took the attitude that in cases when something didn’t fit quite right…I knew it was only 5-10 minutes work to re-cut and shape it correctly, versus looking at something that will bother me for a lifetime. And any piece that was just slightly off is already a pretty close pattern, so re-cutting is fairly easy. I also tried to cut the difficult end of a plank first, because the other end is usually just a straight cut, so leave it as long as possible, to allow for an end re-cut, until you need to cut it to the correct length.

This shot also shows the quarter deck that was completed earlier in the build (post #87). I did plank all areas under the quarter deck, including the very tricky section behind the rudder access port.

1737155276793.jpeg

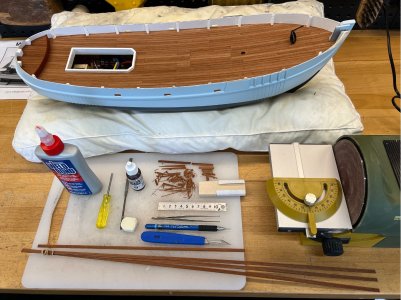
And here are a few pics of the finished product. This one also shows the tools I used and the leftover decking planks. I kept all offcuts and re-used what I could on the way through as I didn’t like the chances of being able to match the strips if I ran out. In the end I had just over 3 and half full planks left and lots of small bits, plus the sawdust churned out by the mini-sander. I found the powered sander made life much easier for getting to within 95% of where I wanted to be and finish off with a file and sanding board, it’s also great for quickly squaring the butt join ends.

1737155300046.jpeg

It all looks like it happens pretty quickly in a single post like this, but it probably took me a week from start to finish doing a bit of time here and there plus a couple of longer days when it was a little cooler in the workshop.

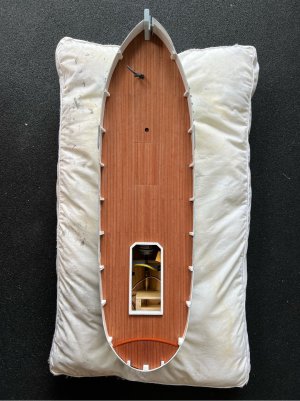
1737155324718.jpeg

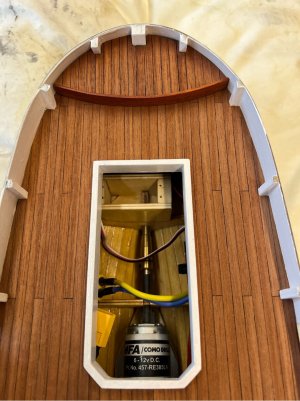
1737155339147.jpeg

The final finish (a sprayed matte acrylic) hasn’t been applied yet, I’ll do that after the next step. Which is…the capping rails and scupper covers to be installed
 
Sanding the deck
Before I get started on the capping rail, I thought that I probably should get the deck sanding out of the way, so that I don’t damage the rail later. I did ‘umm and ahh’ a bit about whether to sand it at all…I was thinking that a rougher look might look more workman-like, but I’m sure that with a bit of work in real-life, the decks wouldn’t have many square edges on the planks for very long. So, I gave it a sand with quite small block of mdf and 240 grit dry paper. It didn’t take long as the surface was pretty flat to start with, but it’s worth doing to remove the few splinters on some edges and to reduce and dull the edge marking of the planks that replicates the caulking. There are plenty of tricky spots to sand around, but I ended up wrapping a small strip of paper around the shoe of a painter’s trowel and that did a good job in those spots…easy to control.
1738990328055.jpeg

The Capping Rail
The kit provides four laser-cut 3-ply sections to fabricate the fore and aft sections of the capping rail / handrail. They then suggest completing the runs up each side with leftover planking timber to join the laser-cut ply sections. To my eye this is not a great solution for a component that gets seen every time you look at the boat…different thicknesses and different types of timber. I also found that the pre-cut curves didn’t match super well to the shape at the top my bulwark…the overhang varied around the hull, probably due to my build.

Anyway, I decided to make them from scratch from some sheet wood that I have in stock. I started with the kit sections as a template and altered the shape where it needed to be and shaped and then sanded away an afternoon until I was happy with the result. I also elected to replace the rails in the section between the end pieces, with similar section timber, so everything matches in size and colour.

I did try pre-bending the side rails by wetting them and clamping them to their respective bulwark sides overnight, but that didn’t really work…perhaps because it’s a relatively small bend, so they will just be glued to the shape needed. These rails are being finished with the same Sikkens Cetol Mahogany (an external decking oil) used in a few places. Then they will be sprayed with a clear matte finish along with the rest of the boat at the end.

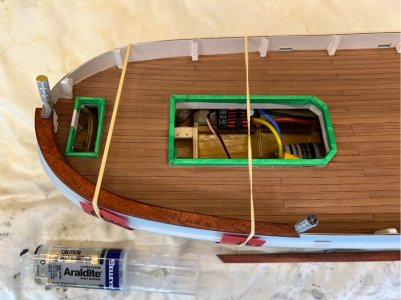
As mentioned, the rails need some subtle bending to match the shape of the bulwark top and stanchions, and I imagine that they will need to be able to take a bit of ‘weight’ given that they are so exposed and will get handled regularly, so I’ll be using a 5 min epoxy glue (Araldite’s ‘Ultra Clear’) along the top of the bulwark edge and atop the stanchions. It gives me a little time for some subtle repositioning once I’ve got the rail in place and it’s clamped in position, and it is reasonably easy to clean up the minor amount of squeeze-out. It also dries clear, so it won’t mark the exterior paint work.

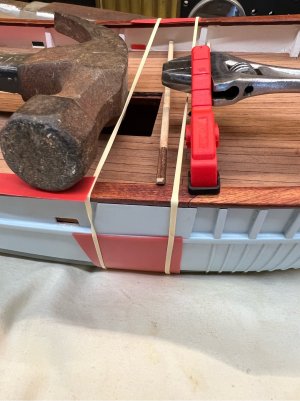
The downside is that the rail needs to be held in position, under light pressure for about 8hr (I leave it overnight). This is a tricky area to clamp because the bulwark is very thin compared to the rail and it needs to have a slight bend added to it to match the flowing sheer of the deck. After trying a few clamping options, I ended up using rubber bands for most of the effort, and a couple of screw-in planking clamps to locate each end and prevent movement while the epoxy sets. The clamp at the stern is holding the end edge down against the stanchion, while the clamp at the other end is simple acting as a spike to prevent the rail end being pulled in toward the centre of the hull. In this case, the rubber bands apply enough force it to set the small sheer curve needed. You can see that I added some plastic sheeting under the bands around the hull to make sure I didn’t get any pressure marks (as I did before). As it happens, I’ve found that the exterior paintwork is now much more robust after having had a couple of coats of clear acrylic added.
1738991008190.jpeg

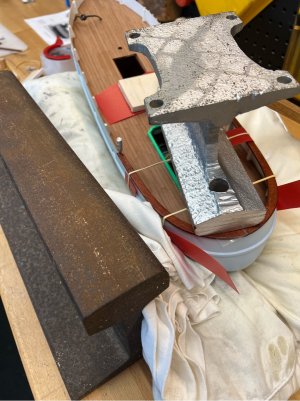
Because I’m using the epoxy glue, and I need to clamp it, I’m only doing a single section of rail each day. The other side of the stern rail is a little tricky because I can’t use the rear planking clamp this time…I’d have to put a hole in the timber of the rail, so I’ll just weight it down instead. You have to get a bit imaginative to find something that works…here I’ve used an inverted small anvil, balanced perfectly, with some protective timber and plastic to make sure I don’t mark anything. The screw-in clamp on the leading edge is again being used as a spike for the rail to pull against.
1738991094448.jpeg

When I unclamped this section the following morning, the new piece was perfect, but the stern-end of the other side had pulled up a little from the stanchion, so I used some thin CA in a hypodermic syringe to inject some glue between the ends of two pieces of railing and also under the first end. This was held in place for a while and has fixed the problem.

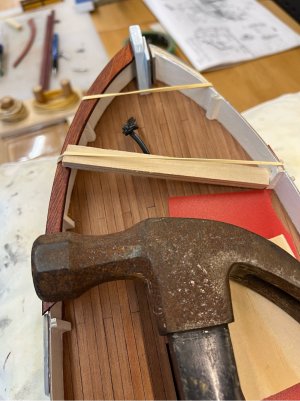
Next, I moved to the two shaped pieces at the bow. The two sides are different because the starboard side has to accommodate a gap that holds the pulley for the anchor chain and it also has to cover the area where the bulwark bulges out to prevent the anchor catching on the railing (I assume that is the reason for the bulge). The port side is fairly simple, I just made sure that the nose of the railing meets the bow stem at the same place that the other side will when it is added, and that the amount of external overhang is the same along the length of the bulwark. I’m using 2mm overhang all around…it’s not specified, but seems about right, it also means that where there are rubbing boards along the bulwark that they will sit flush, as you would expect. Again, I had to fashion some stays and weight for clamping. I found that short offcuts of wood with an appropriate step cut in each end allowed me to fit a temporary stay without it slipping out and then hold it all down with rubber bands. Same epoxy used here.
1738991276166.jpeg

The starboard side is similar, except you need to make sure that the railing is lined up with a gap for the anchor chain pulley, and with the offset for the bulge under the railing. Gluing and clamping was the same as for the port side. I had to do a little re-profiling of the bulwark and stanchions to make sure that the rail to lean into the boat a little

To join the fore and aft sections, I cut a couple of lengths of the same timber used to make the sections at each end. The joins at each end will use a simple plain scarf cut with the cut vertical (ie you see the diagonal when looking down from above). I’ve chosen to make each diagonal joint in opposite directions at each end, because they are easier to fit – the rail will not slip away from the side when I apply a little internal sideways force to put the edge bend in them. The railing on the starboard side is the same, with the joints cut in the opposite direction.
1738991503142.jpeg

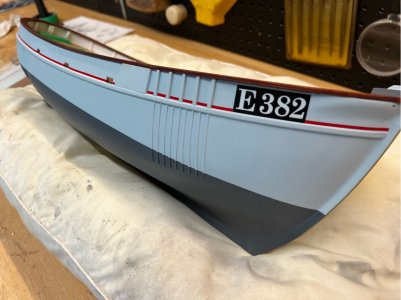
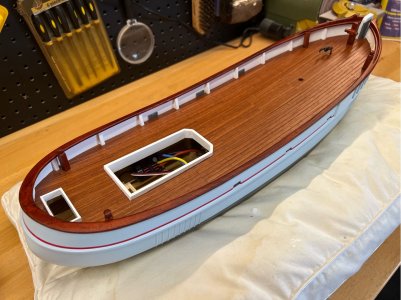
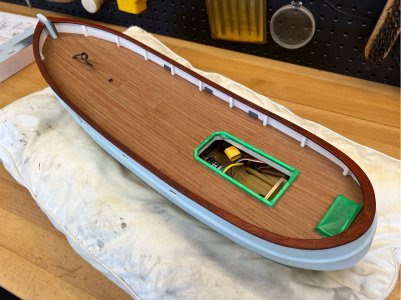
And here is the finished job. The extra mouldings on top of the forward sections have to be added yet - a simple gluing job. The joins in the cap rail required some minor sanding and re-finishing, but it has come up quite nicely and makes the hull look finished.
1738991566107.jpeg

All that remains to be done now, is to apply the external red stripe above the rubbing strake and then give the outer bulwark, cap railing, inner bulwark and deck a few coats of matte acrylic spray for protection, before starting the fit-out of the deck.
 
Monsters in the hold
When I went out to the workshop this morning the boat’s crew was complaining of monster spiders invading the hold…well, it was 5-6mm across, and that would scale to 165-200mm at 1:33 and I wouldn’t be too keen to enter a dark hold if I knew that was lurking in the shadows! But, I puff or two or air and he was shown the way out and re-settled into a more appropriate spot in the workshop. Back to work everyone…

The red stripe
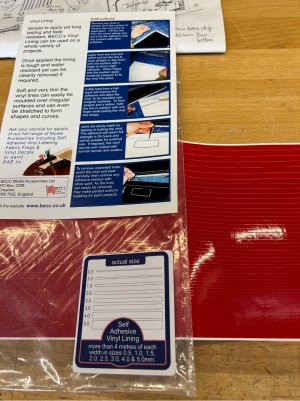
I decided that I would buy some red adhesive vinyl strip to do the stripe around the boat just above the rubbing strake. I didn’t fancy my skills at painting such an obvious and thin line by hand! The adhesive strip is from BECC Model Accessories (UK) and I got it through an online hobby store in AUS. It has a single sheet of adhesive vinyl, with strips precut at different widths…there is about 4m in length of each size. It’s very easy to use and apply. I did a test run of a piece of the vinyl stuck to my paint test board and then coated with my chosen matte acrylic to make sure it was going to be okay when it was sprayed…it passed. I find that if I remember ahead of time, then testing doesn’t take long and it’s nice to know that you’re not going to have to re-work an area that took a while to get right in the first place.

Here is the product I’m using…

1739678417725.jpeg

It comes as a folded sheet, which I have unfolded and left under some heavy books to flatten it out. It still has two lightly crimped areas along each strip from the folds, but I found that they pull out perfectly when the strip is applied under a little tension. Because of the length of the sheet, the longest individual piece is 580mm. I’m a bit lucky there as the longest single piece I need between separate sections is about 400mm.

As you can see in the photo above, the sheet has 8 different strip widths to choose from. The Billing ‘instructions’ don’t specify a width (in fact they don’t even mention the stripe), so I settled on 2.5mm. The product is very easy to cut and adheres well to the matte acrylic surface that it is being applied to. The only real trick was deciding what height to apply it above the rubbing strake…I have a gentle fillet in that area from all the coats of paint and it doesn’t look quite right if it is put across the curve of the fillet, so mine sits about a millimetre above the strake. I thought that the curve around the stern might be a bit tricky, but it turned out to be one of the easier areas to apply as you are working with a longer piece of vinyl and that makes it easier to lightly stretch a nice straight curve (that doesn’t sound quite right does it…a straight curve, but you know what I mean). A little tip that I found useful for the longer pieces…I cut the full length of vinyl strip, then laid it down with the sticky side up and put a narrow strip of plastic film over most of the length of the sticky section. That made it very easy to handle and the plastic can be pulled back as you proceed.

1739678486456.jpeg

So, I got all that on and trimmed up…and, well, something just didn’t look quite right. I thought it might have been the strength of the red colour (which will be tempered by the final matte coats), but no that’s not it, the colour is very similar to the picture on the box. I think the problem is that it is just a little too thick. I’ve revisited the Billing photos and other builds that I’ve found over time, and I think I should have used the 2mm, not 2.5mm. I know its only 0.5mm, but it’s surprising how such a small difference creates a different feel to the scale of the boat.

One of the good things about using adhesive vinyl is that it’s easy to strip off…so, I stripped one side and put the narrower strip on to see which I preferred. Yes, the narrow strip won, so both sides have now been re-lined (the photo above is the narrow strip). It was a bit of mucking around, but it’s another one of those things that would have annoyed me in the long run.

On the second run I also wrapped the vinyl into the scupper slots, it gives it a smoother looking finish, and a dab of thin CA (using a syringe) will make sure they don’t come un-stuck and peel back. The small timber scupper covers were then glued in place from inside the bulwarks.

1739678614310.jpeg
 
Samson post and bitts
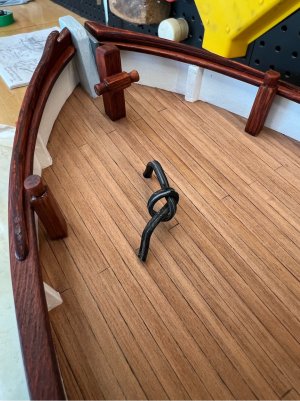
I decided to install these before sealing the deck. The Samson post is just for show, it’s a short piece of 8x8mm stock that only attaches to the deck rather than through and down to the keelson. It’s the same with the two bitts at each end of the boat. To make sure that these are not going to break free from the veneered decking boards when they get grabbed accidentally, I’m using short lengths of brass rod (K&S 1.18mm) glued into a 1mm hole, protruding about 5mm, under each post and then the post and rod are glued to the deck with the rod going through a corresponding hole in the deck. The rod was roughened in the areas being glued and I used WeldBond white glue…it seems to stick quite well to both the wood and brass rod. The wooden cross member on the samson post was also pinned in a similar way.
1739678759075.jpeg

Each bitt and the post had to be individually fitted to the deck…I’ve set the verticals to match the bulwark stanchions in the area they are fitted, so the base has to be adjusted for the deck angle. After gluing the pieces in place with small clamps holding the bitts against the capping rail, I then put a drop of thin CA between the rail and the bitt. It all feels nice and secure. All the parts were sanded and painted before gluing them in, because it was more convenient.

1739678811374.jpeg

1739678824342.jpeg

Next time will be the final sealing of the deck and I'll also add a coat to the sides to make sure that the vinyl stripe stays in place over time.
 
Small Deck Objects
There are a range of small objects to be made up from cut ply. Although the instructions are scant, some of these show as having wire protection overhead, presumably they are skylights for the fishermen working inside the hull. So, I made those up with 1mm brass wire. Later, after painting, I used canopy glue to add some diffused plastic sheeting underneath these bars so that you don’t see the deck underneath. In the case of the one shown below (it goes in front of the main mast), I’ll be added an LED underneath to show a light glow from below at night.

View attachment 438355

Here is a selection of objects before painting. I’ve been using pieces of aluminium angle to help keep everything square during gluing. I tend to build two lots of right-angled walls and then, when dry, glue those two lots together…rather than trying to get four walls to glue together squarely all at once…

View attachment 438356

The building below (I’m not sure if it is a companion way down to the hold or just storage, it sits up in front of the main mast) was my first attempt at bending some timber against its will…and it's ply. I did use some hot water soaking, but as others have advised, you need to be careful not to delaminate the ply.

View attachment 438357

The Billing drawings don’t show any detailing of the front, but the online photos of their box-front model does show some panelling, so I added similar. I’ll put some fittings (hinge, door handle etc) on after painting…

View attachment 438358

Next time I'll show you what I'm doing for the lighting.
This is the hatch down to the accomodation.
I fished commercially on this type of vessel out of Grimsby.
The top of the hatch used to fold over to give a larger access area on the wooden variants although some were later replaced with steel hatches for strength. The wooden ones could take damage in a heavy sea..
Overall the model is quite a good representation of the type although the trawl warp layout on the plan isn't feasible but hey ho.
Your model is coming along very nicely :)
 
Protection
Well, I was hoping today’s post would be a simple affair…along the lines of ”I sprayed on a bit of paint and it all looks good”, but it’s never that easy is it. At least for me, this is a hobby and I’m under no time pressure, so I’m trying to see the challenging things as me learning stuff. So, what happened…

As I’ve mentioned in a few places, I’m finishing everything with a rattle can matte acrylic spray (Dulux Duramax). It seems to be pretty tough, it is UV resistant, it goes on consistently, and I like the matte finish. I’ve decided to give the entire hull another coat because I’ve managed to get some glue fingerprints on the lower hull and I’d prefer to rub them back and recoat. It also means that I can protect the red vinyl stripe. So, the hull was masked off underneath the capping rail so that I could get a few coats of clear on the deck and the features already installed. This went well, I gave the deck a light sand with 320 grit after the first coat and gave it two more with a day in between each coat…all good.

1740202223301.jpeg

Then I masked the rail and deck, and the section of the lower hull, below the rubbing strake…mainly because I wanted to get two coats on over the red stripe, but only one more on the lower hull (every extra coat of clear finish takes something away from the base colours). So, I gave the upper sides a clear coat, looking great, but then a small fruit fly thinks it looks soo good it has to come over for a closer look! While it is swimming around in my clear acrylic, I think that I could save the day by carefully using some needle nose tweezers to remove it…lesson one for today, I think I would have been better off leaving it and then deal with it when dry. Parts of the fly came out, parts stayed put and I ended up with black powder from the fly through the paint and a small hole in the base colour. The solution to this issue was to let everything dry overnight, give the area a very light wet & dry to remove the remaining bits of insect and use a fine brush to add some of the spray can paint to the small area that was now lower than the main painted surface - that actually went better than I expected and I knew I still had another spray coat to come.

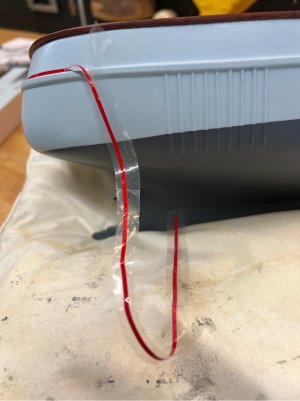
Here comes lesson two…I sprayed the clear on the upper sides again, to finish-off the problem above and make sure the red stripe was well protected. Only this time the vinyl stripe started to lift under the clear coats…I think it had probably started to do this in a limited way under the first coat, and then the second coat just softened everything up again and the edges curled over.

So why did the test paint go okay? I think it is because the test was on a flat piece of timber (same paint underneath) that dried relatively quickly, whereas the real-life example was in a right-angle fillet against the rubbing strake and the paint had pooled a little and was wet for a lot longer allowing the vinyl and its glues to soften and let go. As you might imagine, I was a little upset and this point and forgot to take any photos. Sleep on it, I said.

I knew I’d never be happy with the strip looking the way it was now, so I stripped it all off. The ‘learning’ here was that I’d be better off to finish the painting and then add the strip on top…even if it doesn’t last forever, it will be easy to remove and re-apply in future and it won’t leave a valley in the paint…as I now had. More sanding, 400/800 wet & dry, remove the valley in the clear coat, and any other imperfections then re-mask and spray with the light blue main colour before adding the clear again.

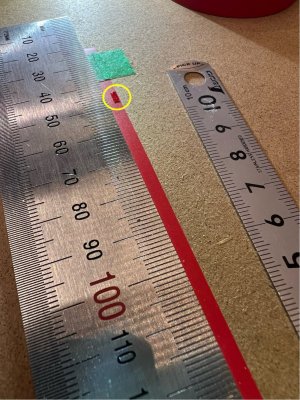
While all this was going on, I decided to have a look at automotive pinstriping because one of the reasons I had been putting matte clear over the current vinyl is because it has a very high gloss finish. If the stripe is going on last, then that gloss finish is going to look out of place against everything else being matte. I was a bit lucky (I guess red is a common pin stripe colour) but I found one that is a good colour and has a matte finish. It comes in a roll that is 9mm wide (the narrowest was 3mm…I need 2mm), so I have to slice it down to size with a sharp scalpel, but that isn’t too hard if you use the existing tape as measuring guide. It also has a back tape, so it is easy to cut and to apply.

Here I’m preparing to slice the new tape, old tape (in circle) used as a guide.
1740202361625.jpeg

That’s where I’m up to at the moment, I still have to do the last coat of clear and then apply the new red striping, so with a little bit of luck I’ll have a photo of the finished hull in next week’s instalment. Thanks for looking in.
 
Last edited:
Back
Top