Mayflower - Model Shipways- 5/32 scale

Joined
Jul 27, 2018
Messages
268
Points
278

Location
Maryland
I will restart the Mayflower build log. Looks like the prior log was lost in the server problem. I will post some of the thoughts from my first post but not sure I will recapture them all.
After reviewing the plans and instructions for the Mayflower I found them to be clear and well written. Once the building starts we will see how that works out. The laser cutting for the large, thick pieces of ply all look well done and clean. After a light sanding the char easily came off. The false keel and bulkheads all have reference lines etched in them to enable proper alignment of bulkheads as well as first plank later in build. This is a nice feature in the kit. First steps included adding rabbet strip to false keel and slight tapering of lower stern section into rabbet.
Bulkheads fit snug. They are pretty solid though. Initial build pics are attachedB101D17E-1CEC-45E0-8DD5-0E8DB61F6B22.jpeg622EF42E-4C86-4A68-8A3C-0D8B6603E583.jpeg10CC12A8-3FDA-4746-A05F-7B7090DF5CD9.jpeg
 
Next up was fairing sides and hull, adding the false decks and doing first and second planking on the counter and lower stern. The initial plank lines are determined by temporarily attaching the side templates and marking the lines on the bulkheads. There reference lines etched on false deck and bulkheads to assist in both these steps.
That’s all for now. I think I have added back lost pics. Work will slow down now until next week when planking will resume. FAA89F56-D8B4-4F04-9D4B-3B523CE377D1.jpegEA080939-CC53-42A2-842B-94AAEE488880.jpegEC00E3E8-7A3A-49CE-AF35-0F3CA7A0DA6B.jpeg
 
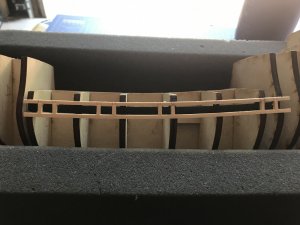
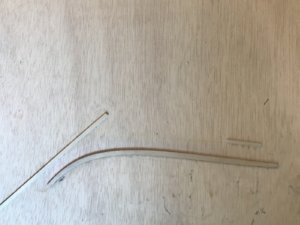
Made some good progress over the past 10 days or so. I finished the first planking of the hull. After some serious wood filler added more sanding needed to get it ready for final planking down the road a bit. Also finished planking of three of the decks. The half deck and beakhead will be done later in build. Started the deck by adding the hatches and grating for main deck, simulated deck nails with a pencil. I used a colonial maple on hatches and golden oak on the deck. Now working on the bulkheads. The great deck and poop deck are installed in the pic with staining left to do on poop deck. There are 5 bulkheads that need to be installed before side templates are attached. The instructions for the kit are very specific and well detailed with photos. So far it is coming together per plans fairly well. A few things to consider for those looking to build this ship. I would suggest adding balsa blocks to the front two bulkheads to enable an easier run of the planks. The bow has a significant curve to it so the blocks would help. I did not do this and it was a challenge to get the planking to lay correctly. Doing a good job on fairing is really important anytime but particularly in this area. Two Jigs to prebend the planking at the bow and to enable spiling are detailed in the instructions. There is a spiling guide included in the kit that works very well. I have included a pic of this guide. Soaking would for 5 mins was all that was needed. D6F1BA49-8964-4213-B21E-1C576BD33946.jpeg94C45063-0E60-40D3-A972-5A62BD4BABBB.jpeg9B649E7B-4FE8-4426-8BD7-EC0B83E0636E.jpeg
 
Not sure what happened to my post from earlier this week. Over the past weekend I made some good progress. I finished all the bulkhead sides, added all the stanchions and preplanking throughout the ship

106542

106543


E35D93FE-7813-40B7-95BD-B3BDE5957BB3.jpeg

106544

and finished the planking on the upper stern. The lines on the side templates are for planking the upper half of the ship. One mistake I needed to correct was to tear out the hatch on the forecastle deck. I made it too large because I followed the plans outline assuming the lines were the inside edge of the hatch, they are not. They represent the outside lines. Oh well. The windows are modeled by using white pinstriping supplied in the kit attached to a piece of clear acetate. The appropriate sized diamond shape is provided in the instructions. The window frame is represented by a wider pinstripe. This is a straight forward way to simulate the windows. A couple of the thinner pinstripes strayed a bit during gluing and trying to adjust them post install would be a high risk move that I chose not to attempt.
 

Attachments

  • 2947FA81-8BC3-48EA-914F-CD28A1DDC0D6.jpeg
    2947FA81-8BC3-48EA-914F-CD28A1DDC0D6.jpeg
    196.6 KB · Views: 14
  • AD63F381-B639-4EFC-A039-BF334765B4F6.jpeg
    AD63F381-B639-4EFC-A039-BF334765B4F6.jpeg
    187.6 KB · Views: 13
  • 5318EA09-DD83-4842-8F53-78CA6F720F33.jpeg
    5318EA09-DD83-4842-8F53-78CA6F720F33.jpeg
    146 KB · Views: 16
  • 2947FA81-8BC3-48EA-914F-CD28A1DDC0D6.jpg
    2947FA81-8BC3-48EA-914F-CD28A1DDC0D6.jpg
    275 KB · Views: 14
Hello Barry, A few weeks back our forum (software) moved to a new platform: bigger and faster. As a result of this move, while in transition we lost some of the data with no option to recover. :( This is unfortunate, we apologize for the inconvenience. Things happen. We would like to ask you re-post some of the missing posts if you don't mind obviously :)
 
Hello Barry, A few weeks back our forum (software) moved to a new platform: bigger and faster. As a result of this move, while in transition we lost some of the data with no option to recover. :( This is unfortunate, we apologize for the inconvenience. Things happen. We would like to ask you re-post some of the missing posts if you don't mind obviously :)
Jim, the post that disappeared was from this week. Well past the platform issue. I did repost the log entry as best I could remember it. Hopefully this was more due to something I did wrong than more platform issues.
 
Jim, the post that disappeared was from this week. Well past the platform issue. I did repost the log entry as best I could remember it. Hopefully this was more due to something I did wrong than more platform issues.
I hope this was a single\user issue as we have no other reports.

Thank you,
 
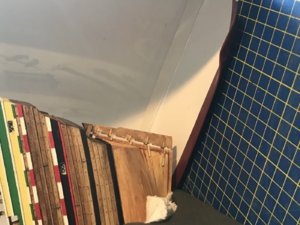
Busy weekend on the Mayflower. Planked the upper sides, added the upper/lower wales and other moldings throughout the ship and of course did some painting. I painted all the moldings in their base colors before attaching them. The wales are black and the upper moldings are either a base of white or red. I then taped the three moldings that have the alternating pattern and added the green or red onto the white base. I went back and forth on the pattern of the alternating colors. In doing some research I have seen the moldings with no highlighting, offsetting alternating colors and stacked colors. The research provided in the kit regarding the black, yellow, green, red and white colors seems to be the most accurate. The Mayflower was a merchant vessel so it would not have been decorated extensively. Next up was the port lids. Given the scale, these are small pieces with lots going on:two brass strips and an eyelet on each. Then they need to be secured to the ship. I used the kit instructions to do this work but I would say in retrospect there is probably a better way to construct the port lids when they are being shown in the closed position. Another learning experience as I say.
C20720F5-2852-49C1-9AD5-A9A92FEBAF1A.jpeg81D140B9-0FE8-4B5D-832C-BE6FC334544B.jpeg2A10D739-971C-498B-9119-B62FBFD94722.jpeg13506767-ABB6-414B-981D-2063FB559BA6.jpeg36711B5F-0C99-4EA3-88A8-AE6A16354660.jpeg62A9B79C-64FF-4695-8D3E-D9D900DE0037.jpeg
 
Did some more work over the past couple of days. I added the capstan, used the one provided in the kit(painted to simulate wood) rather than building one from wood; completed the extension of the half deck, added related waterways, hatched and planked and stained it; and lastly painted the hull by priming in white then using an ivory paint and finishing it with a very diluted brown to add some aging and wear. That’s probably it until next week when I plan to start the beakhead. 0B15A1B6-E720-44CF-9D72-1E0A9F05CA65.jpeg8F7E3F1A-5FE0-4213-9ACD-2A18AFB2CFF6.jpeg1D7E6656-331B-4816-B632-D6D775F29C5F.jpeg
 
F1B1468D-32AD-412F-923D-96D351281AA4.jpegCCCAEE43-3B14-4D58-AB3F-64BB3C0258F1.jpegE4371C4B-EDBA-4258-AA4A-75F50DFB66BA.jpegI thought I had posted updates since my last post. Hmm. Well I’ll post my work since the post above. There is quite a bit here so I’ll put them in a few posts. I added all the parts for the beakhead and attached the rudder as well. The beakhead needed to be trimmed a bit to fit my ship but there was plenty of excess material on the templates to allow for this. The beakhead assembly requires lots of cutting and fitting. All was well laid out in the instructions so this went well. The rudder instructions were also excellent as far as the sequencing of the assembly. I know this rudder is fairly straightforward but the ideas provided made this go better for me than prior projects. All parts fit well in both assemblies. So far the kit is very good.
 
Last edited:
1E86EB0E-5714-41A3-A388-C9C375258AB8.jpeg9208E62F-48AF-4CAA-B3BE-38DBB11B5777.jpeg3D424DCD-D4C1-4602-A4BC-2DF3BF73166F.jpeg164B1968-7F44-487D-93C4-3A4D6F05B104.jpegDeck Fittings
This area consists of 8 levels, 14 pin rails, 3 ladders, a hand rail and a second hand rail with bell belfry(bell is supplied in kit), 2 pumps, and 2 knight heads
I decided to use the kit supplied knight heads and kevels. but make the two pumps from scratch. All other parts are made from scratch as well. The plans provided good guidance and the plans were very clear on locations of all items. I painted the kevels and knight heads, blackened the bell and stained all other structures same color as deck(Golden Oak). The templates provided for the steps to the poop deck and half deck were spot on. All fit well. I started some of these items over the past weekend and finished them up yesterday.
 
Last edited:
I started working on the channels, channel knees and ship’s small boat. These are the last components required to complete before moving to the masts. The small boat is made by stacking 7 layers of siding and then sanding the edges of the offsets to form the boat’s shape. Lots of detail work inside for stanchions and seating. I shaped a couple of oars as well. The plans suggest adding 3 planks on each side of the boat in a clinker style. I gave it a shot. Channels went on easily per plans. Next is a coat of poly then it will be on to masts. 9EFA7D81-A0F5-4FBA-B01D-3EF3B072CC7C.jpegB9A1CE34-25A9-4BE3-BF67-6EB29A2F2BE0.jpeg517F693B-46C0-4227-A7AE-2224E670DDB9.jpeg553B153F-5F09-419C-A3AB-5D252C9E8E62.jpeg
 
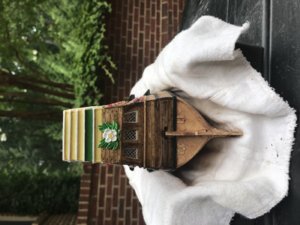
Just a couple of items to update. I lashed the small boat using eyebolts turned into hooks and seized to the line. Per instructions I used one hook per line and seized the knot on the other side. Also added the Mayflower emblem to the stern and gave the ship a coat of matte poly. Working on the masts now. Next update will show how these come out. 4C7CF735-5535-46DA-B3E5-9F5B0F3DD254.jpegEF698F7D-C2E5-4E8C-B405-C9DBD9676525.jpeg71CBA47D-A113-4746-B11D-B92908CE46D5.jpeg18F872F8-727D-4FED-B065-E1639E407741.jpeg
 
Still waiting for a few items to start rigging. In the meantime I opened up my Viking longship to poke around it and it sucked me in a bit. So I started a log for it. I only plan to work on this until all the Mayflower items are secured.
 
Back
Top