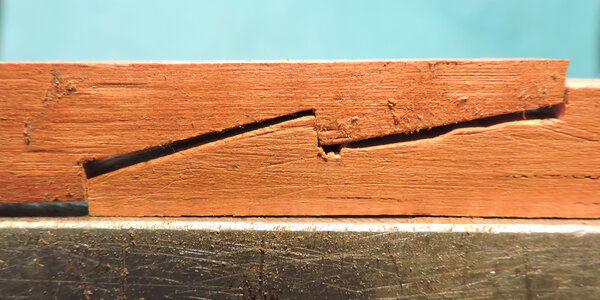
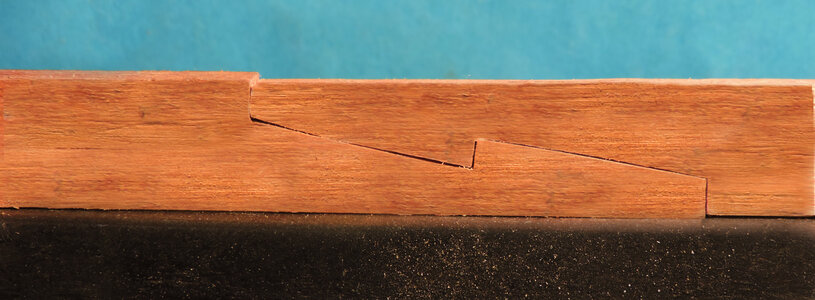
How do the plank on frame builders do milling/material removal without a mill ? Especially where it has to be very accurate. Example, keel rabbets for frames. Other wood removal tasks ? Saw and chisels, knives ? Curious about how you guys get around this.
-
LUCZORAMA SHIPWRECK SCAVENGER HUNT GIVEAWAY. 4 Weeks of Fun • 1 Legendary Prize ((OcCre’s Fram Ship)) • Global Crew Welcome!
**VIEW THREAD HERE**
You are using an out of date browser. It may not display this or other websites correctly.
You should upgrade or use an alternative browser.
You should upgrade or use an alternative browser.
- Joined
- Dec 1, 2016
- Messages
- 5,956
- Points
- 728

hook scarf
If your cutting a hook scarf for something like the deck clamp shown above or a caprail or railing where only one side will show then you can make the cuts with a slight bevel so the side showing will fit snug which was done in posts. When cutting a hook scarf in something like a keel or joining two timbers where both sides will show then care has to be taken that the joinery of the surfaces are flat and square. One way to accomplish this is to use a mill and machine the joinery. This is not really cheating because it takes skill as a machinist to cut a perfect joint, however you do not develop the skill of using a knife or the feel of cutting wood. Another thing to consider is the $700.00 to $900.00 investment in a mill as apposed to the less than $75.00 investment in a box of 100 scalpels and a small vice. Once you mastered the sill of a scalpel and the method the results are equal to the best machined joinery. I do not have a list of hints and tips for cutting joinery so i will just describe in detail how i go about the task.
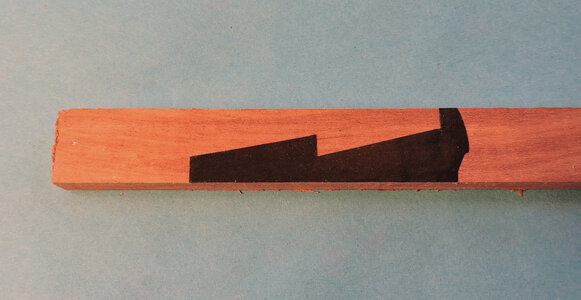
To begin, a piece of electrical tape is used where the scarf will be cut. I use the electrical tape because it gives me a clear and sharp edge.
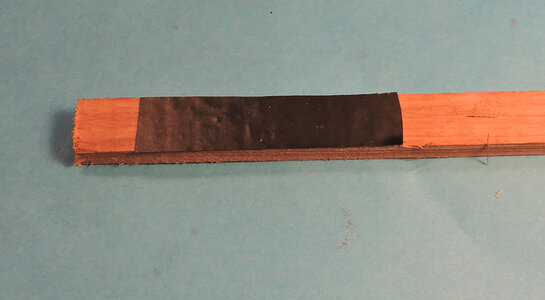
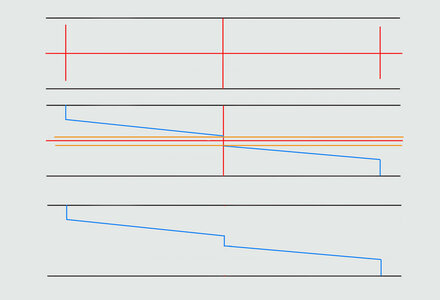
You can draw the scarf freehand or actually draw it out. On the electrical tape i use pin points to mark out the lines and a scalpel to cut out the shape of the scarf. For clarity i will go through the steps in a drawing. I like drawing the scarf out because it gives me a nice even looking shape. To start i will mark the center of the timber and the center of the scarf like shown in the first sketch. Next two lines are drawn on either side of the horizontal center for the length of the hook and two lines equal distance from the vertical center. Finally the lines are connected for the shape of the hook scarf.
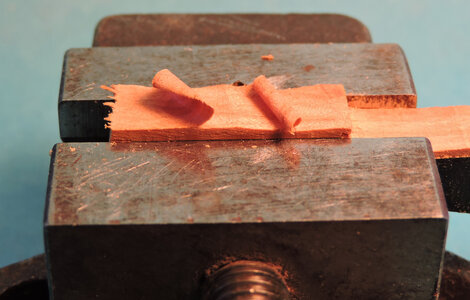
Once the shape of the scarf is cut out of the electrical tape i will rough cut the scarf with a scroll saw. Using a scalpel i shave down the surface until it is level with the top of the vice.
Before removing the piece from the vice i check the surface to make sure it is flat and even.
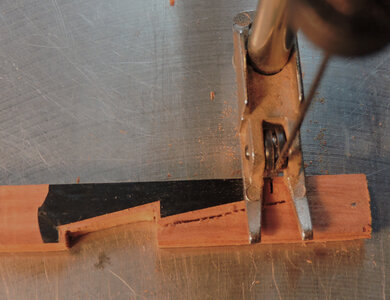
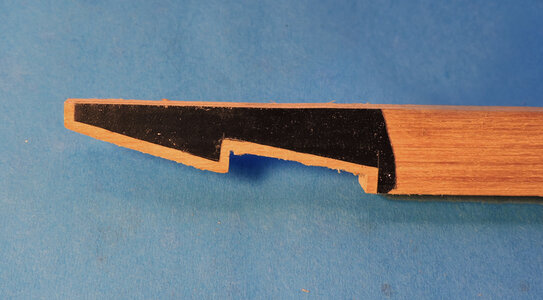
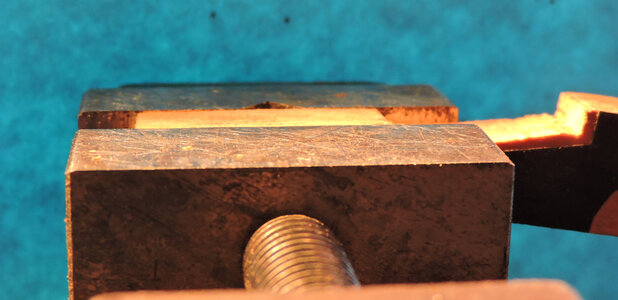
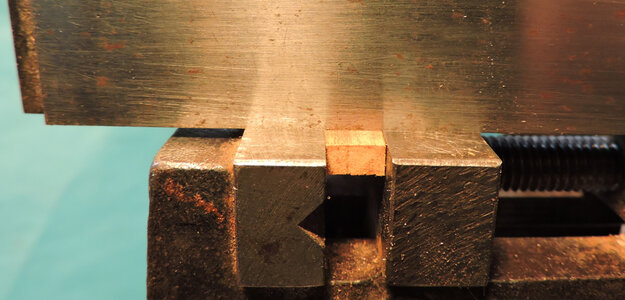
Finally the finished surface is flat and even.
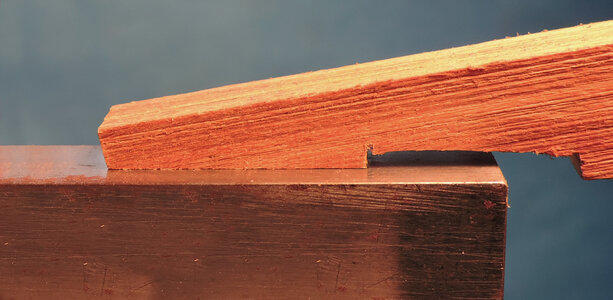
If your cutting a hook scarf for something like the deck clamp shown above or a caprail or railing where only one side will show then you can make the cuts with a slight bevel so the side showing will fit snug which was done in posts. When cutting a hook scarf in something like a keel or joining two timbers where both sides will show then care has to be taken that the joinery of the surfaces are flat and square. One way to accomplish this is to use a mill and machine the joinery. This is not really cheating because it takes skill as a machinist to cut a perfect joint, however you do not develop the skill of using a knife or the feel of cutting wood. Another thing to consider is the $700.00 to $900.00 investment in a mill as apposed to the less than $75.00 investment in a box of 100 scalpels and a small vice. Once you mastered the sill of a scalpel and the method the results are equal to the best machined joinery. I do not have a list of hints and tips for cutting joinery so i will just describe in detail how i go about the task.
To begin, a piece of electrical tape is used where the scarf will be cut. I use the electrical tape because it gives me a clear and sharp edge.

You can draw the scarf freehand or actually draw it out. On the electrical tape i use pin points to mark out the lines and a scalpel to cut out the shape of the scarf. For clarity i will go through the steps in a drawing. I like drawing the scarf out because it gives me a nice even looking shape. To start i will mark the center of the timber and the center of the scarf like shown in the first sketch. Next two lines are drawn on either side of the horizontal center for the length of the hook and two lines equal distance from the vertical center. Finally the lines are connected for the shape of the hook scarf.

Once the shape of the scarf is cut out of the electrical tape i will rough cut the scarf with a scroll saw. Using a scalpel i shave down the surface until it is level with the top of the vice.
Before removing the piece from the vice i check the surface to make sure it is flat and even.


Finally the finished surface is flat and even.

- Joined
- Dec 1, 2016
- Messages
- 5,956
- Points
- 728

for the second surface the same is done and the piece is clamped in the vice even with the tape edge and i begin to shave down the surface.
I will take big cuts and hog out the extra wood.
As i get close to the finished surface i take small shavings until the blade glides along the top of the vice. This way i know the surface of the wood if flat and even from side to side.
Finally the finished surface is flat and even.
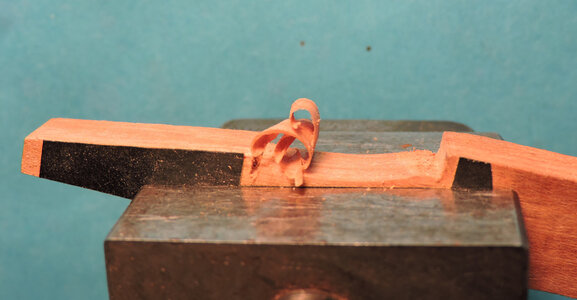
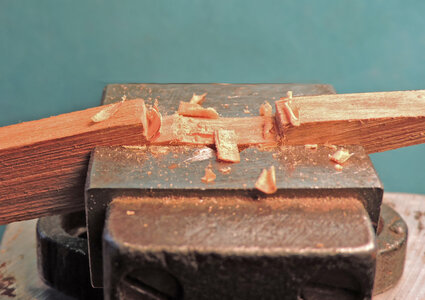
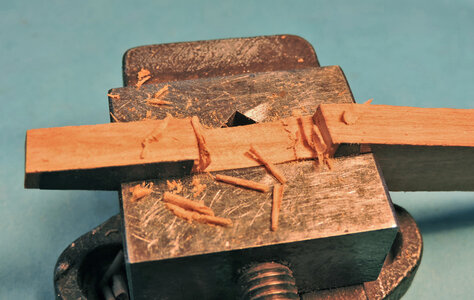
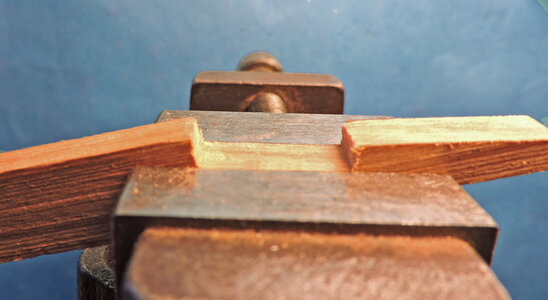
I will take big cuts and hog out the extra wood.
As i get close to the finished surface i take small shavings until the blade glides along the top of the vice. This way i know the surface of the wood if flat and even from side to side.
Finally the finished surface is flat and even.


- Joined
- Dec 1, 2016
- Messages
- 5,956
- Points
- 728

finishing of the horizontal surfaces
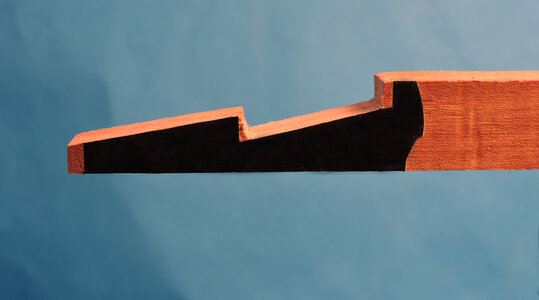
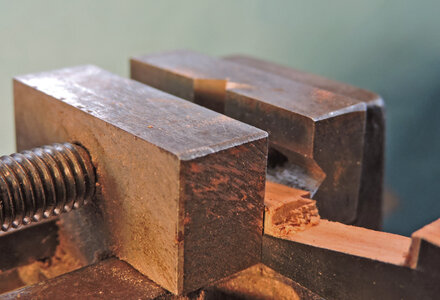
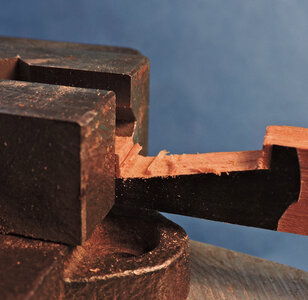
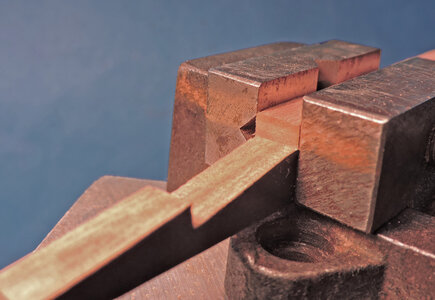
For the hook part of the scarf the same is done and the piece is clamped in the side of the vice. Be sure the piece is sitting on the bottom of the vice to insure once the two parts of the scarf are together the timber will sit flat.
Cutting the end grain is a lot harder than shaving along the grain. This is the reason i use scalpels because they are extremely sharp. Exact-O blade also will do the job but always use a new sharp blade for each surface you cut. The blades are not wasted because you can use them for less critical cutting. Cutting the end grain i take shallow cuts producing very thin shavings. It will take a few cuts but slowly creep up to the surface of the vice.
This is not a rush job, make each cut deliberate and inspect your work after every other cut. The cutting is not straight down, the cuts are more of a slicing from side to side. The final surface will be perfectly square and flat.


- Joined
- Dec 1, 2016
- Messages
- 5,956
- Points
- 728

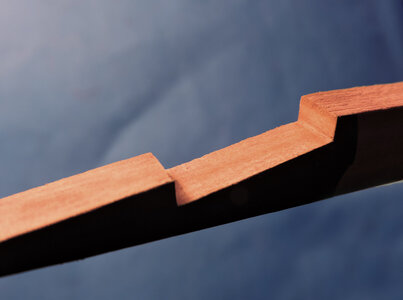
Finally all the surfaces are cut. The goal in cutting the first half of the hook scarf is to make sure all the surfaces are flat. The horizontal ends are at a 90 degree to the bottom edge, this is important because when the second half is being cut and fit you will want it to slide straight down along the end surfaces. If these ends were slightly at an angle you will get a gap at the top or bottom when the two halves are put together.

- Joined
- Dec 1, 2016
- Messages
- 5,956
- Points
- 728

coming up next an exact copy of what was just made and the step by step process of fitting the scarf together.
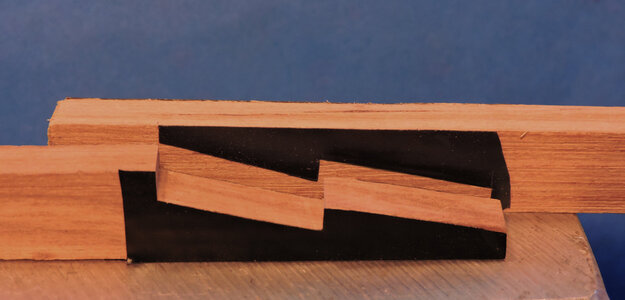
The second part of the hook scarf is set up basically the same as the first by using a piece of electrical tape. the two pieces are clamped together and the shape is traced on the second piece. from the photo you can see the second part of a scarf is an exact mirror image of the first.
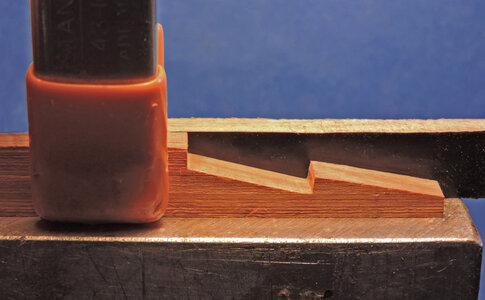
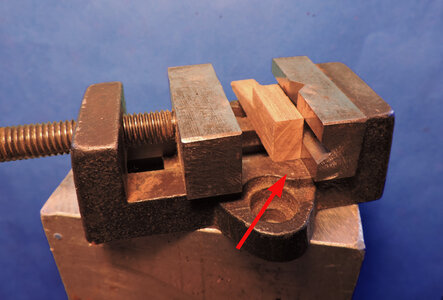
Like before the first step is to rough cut the scarf. Once that is done i will skip cut the horizontals so they are at a 90 degree to the base. The base i refer to is the bottom of the vice pointed to by the red arrow.
When i skip cut that is cutting the high spots off a surface or lining up a surface as in this case i am lining up the horizontal to a 90 degree.
the black tape edge is the final surface so i moved the piece out to the blue line to even out the surface and square it up, i will also do this to the other two horizontal surfaces. with a very sharp blade i will take fine cuts until i hit the vice surface.
The second part of the hook scarf is set up basically the same as the first by using a piece of electrical tape. the two pieces are clamped together and the shape is traced on the second piece. from the photo you can see the second part of a scarf is an exact mirror image of the first.


Like before the first step is to rough cut the scarf. Once that is done i will skip cut the horizontals so they are at a 90 degree to the base. The base i refer to is the bottom of the vice pointed to by the red arrow.

When i skip cut that is cutting the high spots off a surface or lining up a surface as in this case i am lining up the horizontal to a 90 degree.
the black tape edge is the final surface so i moved the piece out to the blue line to even out the surface and square it up, i will also do this to the other two horizontal surfaces. with a very sharp blade i will take fine cuts until i hit the vice surface.

- Joined
- Dec 1, 2016
- Messages
- 5,956
- Points
- 728

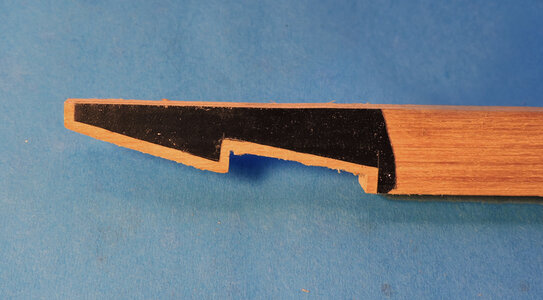
Once the horizontals are true square i start to fit the original half on to the second piece. As you can see by the slim amount of wood at the tape ends i am still a little tight with the fit. I will put the piece back in the vice and take another thin slice. At this point you can use a file or sanding block to remove the extra wood. One possible issue with filing the ends freehand is you might tend to rock the file and take more off the edges than the middle, or file it out of square. On the other hand the work is so close to finishing it only takes a few passed with a file.
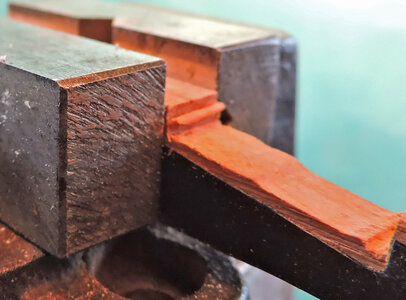
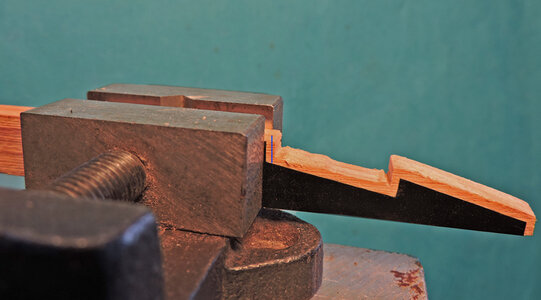
So far so good the ends are tight so now i will continue to shave down the lower surfaces and creep downward until the top vertical meets the blue line,
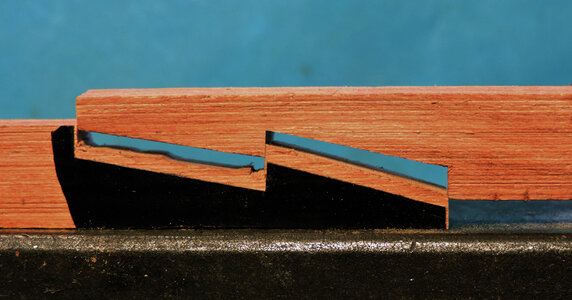
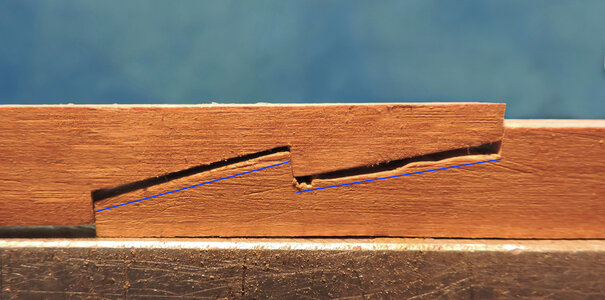
DONE!
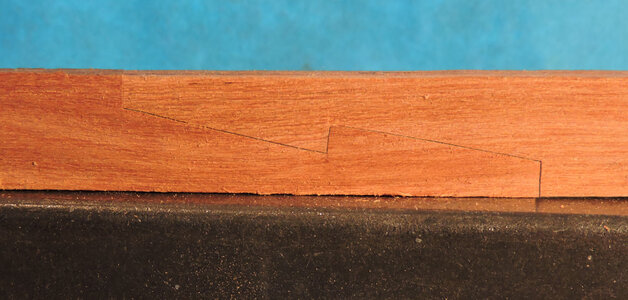


So far so good the ends are tight so now i will continue to shave down the lower surfaces and creep downward until the top vertical meets the blue line,


DONE!

- Joined
- Dec 1, 2016
- Messages
- 5,956
- Points
- 728

- Joined
- Dec 1, 2016
- Messages
- 5,956
- Points
- 728

As you are cutting down the horizontals, which is not really horizontal but more like angles, you notice the gap is not even. The vertical edges lock the two pieces together so all you can do is go straight down. This happens when the piece is not tightly clamped in the vice and the pressure from cutting moves the piece ever so slightly, you slightly missed when cutting the tape line, or you left one very thin slice on one end when shaving down the surface. Remember in the photos everything looks BIG. Actually with micro photography we are looking so close the crooked gap may be only .009 thousandths of an inch out of whack. Not to panic take a file and file down the bottom surface at the inside of the scarf next to the hook or clamp it back in the vice and adjust the angle.
In this photo the problem is simply not shaving down the surface and leaving a bump. Again don't panic this is so close a quick swipe with a small file will fix it.
The time to panic is when you realize these final adjustments are taking wood away and if you look at the ends of the scarf the timbers no longer line up. The more you try to adjust the scarf the more out of line the top and bottom become. This problem is caused by the material you start with. Lets say your timber measurement is .250 x .375 and it is cut to a finish of say .005 oversize. This teeny tiny margin is all the margin of error you have to build your entire model. So cutting, fitting, fabrication of parts and finishing all have to fall within the .005 or you might end up small. To avoid this never ever cut and mill the material you plan on using to a finish the trick is to "dimension" it or as the old timers would say cut it proud. Finish comes after fabrication not before.
final recap
1. it looks easier than it is. It may take some practice and a few tries so don't give up if you mess it up the first 10 times.
2 select a wood that is workable with hand tools, fruitwoods are the best. If you are a beginner at this type of wood work start with softer woods like Basswood or Poplar to learn how to do it, then progress to the finer and harder fruitwoods.
3 Use very sharp blades, once you feel resistance to the cutting force get a new blade. Practice the technique of cutting very thin slices of wood.
4 learn how to use a knife, this sounds simple but there is more to it. The direction of a cut, how you hold the tool, pressure of a cut etc.
Thanks Dave @Dave Stevens (Lumberyard) for this practicum with very instructive pictures!
Regards, Peter
Regards, Peter
Thanks Dave. Yes ok. These scarfs might just be better off hand cut and especially hand fit and finished. I have about every tool there is except a mill. I have a lot of experience with different materials and wood but not wooden ship building. Joints like these where there’s a few to be done here and there on a build are one thing. When there’s repetitive joints to cut I’m sure the mill is faster and easier. Question being is it worth it or will it simply make it so much easier one would not want to live without it ? I’m going to be starting a Blandford cross section with a few months so trying to get myself set up for success.
Fantastic handwork! I am still not sure how this joint can get perfect using knifes. Seems too much efforts. I got my set of Proxxon drilling set and I do all milling on it as required. This is of course just mini millwork and drilling only for small scale building. Not suitable for everyday full scale jobs. All stuff I think cost about 300$.
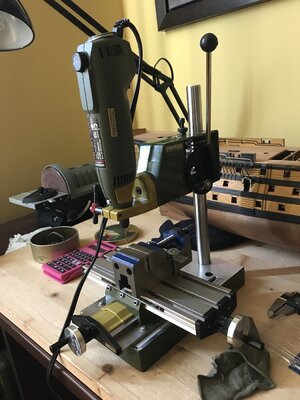 of wood
 of wood
Last edited:
Definitely not an easy joint. That tape is a great way to Mark it too. I was thinking chisels but I guess in these scales a scalpel or exacto is all we need.
- Joined
- Dec 1, 2016
- Messages
- 5,956
- Points
- 728

When there’s repetitive joints to cut I’m sure the mill is faster and easier. Question being is it worth it or will it simply make it so much easier one would not want to live without it ? I’m going to be starting a Blandford cross section with a few months so trying to get myself set up for success.
to mill or not to mill depends on the person. I for one have a mill and i cut my joinery by hand because i am in to hurry and i like carving., for me it it the joy of using a knife. But i have also built models using lasers, mills, lathes, all sorts of sanders and power tools and there is satisfaction in doing it that way. So it comes down to how mush room in your shop, do you want to spend the money on a mill.
taking on a project from scratch guarantees success because you can make a part over and over until it's right.
bottom line
you don't need a mill to succeed you can do perfect joinery with just a knife and a vice but it's how you want to personally build.
Fantastic Dave, I always wondered how this was done. Thank you very much !!!
yes thanks Dave. Ill think about it. Thanks for the tutorial and we wouldn't stop you from posting more ! !When there’s repetitive joints to cut I’m sure the mill is faster and easier. Question being is it worth it or will it simply make it so much easier one would not want to live without it ? I’m going to be starting a Blandford cross section with a few months so trying to get myself set up for success.
to mill or not to mill depends on the person. I for one have a mill and i cut my joinery by hand because i am in to hurry and i like carving., for me it it the joy of using a knife. But i have also built models using lasers, mills, lathes, all sorts of sanders and power tools and there is satisfaction in doing it that way. So it comes down to how mush room in your shop, do you want to spend the money on a mill.
taking on a project from scratch guarantees success because you can make a part over and over until it's right.
bottom line
you don't need a mill to succeed you can do perfect joinery with just a knife and a vice but it's how you want to personally build.
- Joined
- Dec 1, 2016
- Messages
- 5,956
- Points
- 728

Fantastic handwork! I am still not sure how this joint can get perfect using knifes
it does take a little practice but once you get the hang of it it goes quite fast.
yes thanks Dave. Ill think about it. Thanks for the tutorial and we wouldn't stop you from posting more ! !
i got more on file
cutting a rabbit, moldings, joinery, setting up for tapering planking, hand made tools and jigs.
i have a collection of chisels of all sizes down to micro size. What i found was once the chisel edge gets dull you have to keep sharpening it. I use a chain saw a lot in the lumber business and i discovered a new chain is really sharp and cuts so nice. Once it gets dull you can sharpen the chain but you never get that original from the factory sharpness. Same with chisels you really got to be good at getting a fine cutting edge, so i use scalpels when they get dull i toss it and use a new one always having the original very sharp cutting edge.


