J, after reviewing several demo's we are going to opt for your first recommendation. We found some great black metal paint/finish that works well.

-

SUBSCRIBE TO SHIPS IN SCALE TODAY!
The beloved Ships in Scale Magazine is back and charting a new course for 2026!
Discover new skills, new techniques, and new inspirations in every issue.
NOTE THAT OUR NEXT ISSUE WILL BE July/August 2026 -

Win a Free Custom Engraved Brass Coin!!!
As a way to introduce our brass coins to the community, we will raffle off a free coin during the month of August. Follow link ABOVE for instructions for entering.
You are using an out of date browser. It may not display this or other websites correctly.
You should upgrade or use an alternative browser.
You should upgrade or use an alternative browser.
Montanes by OcCre 1:70
- Thread starter Scott Shilling
- Start date
- Watchers 27

Hello all - weekly update.
Spent a lot of time trying to figure out how to read and understand the instructions! Up to now I have been able to rely on a combination of drawings and pictures.
Going forward things a much more cryptic.
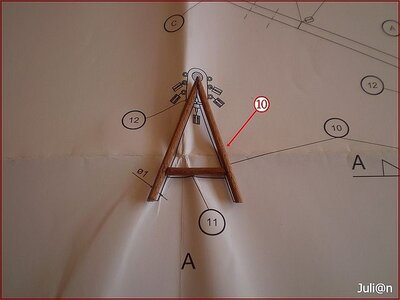
My focus during the week was just the bowsprit. Mostly because it seems the easiest of the masts. I have three hand held drills and of course the widest they go is about 9mm's. So the bigger dowel rods won't fit. The smaller dowel rods fit fine so sanding them down is not an issue.
For the thicker dowel rod I whittled down one of the ends to get it to fit. The only issue here is ya gotta get it centered or when you spin it the rod will wobble. After a few tries I got it to work just fine.
OcCre needs to upgrade their laser cut walnut bits. What they did was take a cheap piece of plywood and dipped it in some walnut stain. Not even worth trying to work with it. So I hiked it over to the local hobby story and purchased a nice quarter inch slab of real walnut.
I am using red chestnut to stain the masts and we plan on leaving the brass rings brass. The original intent was to paint them metallic black per jbradford's suggestion but we found that the brass seemed to go better with the stain. I took my time with the rings and glued them I put the seam on the bottom, but I think I did a good enough job to be confident that on the vertical masts the ring seam won't be overly noticeable.
Next is placing all of the blocks. Sheesh. A bunch of them. and I am not overly happy with what happens to the threads after the CA glue is applied. Turns the thread rock hard.
I did a lot of the work outside because the CA glue fumes tear me up.


Spent a lot of time trying to figure out how to read and understand the instructions! Up to now I have been able to rely on a combination of drawings and pictures.
Going forward things a much more cryptic.
My focus during the week was just the bowsprit. Mostly because it seems the easiest of the masts. I have three hand held drills and of course the widest they go is about 9mm's. So the bigger dowel rods won't fit. The smaller dowel rods fit fine so sanding them down is not an issue.
For the thicker dowel rod I whittled down one of the ends to get it to fit. The only issue here is ya gotta get it centered or when you spin it the rod will wobble. After a few tries I got it to work just fine.
OcCre needs to upgrade their laser cut walnut bits. What they did was take a cheap piece of plywood and dipped it in some walnut stain. Not even worth trying to work with it. So I hiked it over to the local hobby story and purchased a nice quarter inch slab of real walnut.
I am using red chestnut to stain the masts and we plan on leaving the brass rings brass. The original intent was to paint them metallic black per jbradford's suggestion but we found that the brass seemed to go better with the stain. I took my time with the rings and glued them I put the seam on the bottom, but I think I did a good enough job to be confident that on the vertical masts the ring seam won't be overly noticeable.
Next is placing all of the blocks. Sheesh. A bunch of them. and I am not overly happy with what happens to the threads after the CA glue is applied. Turns the thread rock hard.
I did a lot of the work outside because the CA glue fumes tear me up.
Weekly update continued.
Once I got the bowsprit finished it was time to attached it to the boat. It fit just fine and, thankfully, straight. So I went ahead and attached to two lines on the bottom and the "lashing" just behind the little dude. I learned a lesson on this. Make sure that the deadeyes are lined up before you apply the glue.
I'll now focus on building the masts. I figure it will take me a month or so get finish them.
DOES ANYONE HAVE A SERVE-O-MATIC they can sell me. I don't plan on seizing to the extent that Merik does but I do want use the technique on a lot of the standing rigging.
Have a happy 4th everyone

With regards to serving the lines, have a look at Domonoff machines. Their link is on the face page of the forum in vendors links.

Lovely view of the third fairway...fourth?

Looks good until now- I do not fully agree with you, about the bowsprit is the easiest of the masts. Wait until all Standing Riggen is Done- miss to TWO -to Starboard and Two to Backboard with its deadeyes-to to make the bowsprit straight. Then Later on the Two yards, which will complicate your work- only standing rigging. later on the running rigging- here depending with or without sails- so have fun. will add some pics. I have many more noyWith regards to serving the lines, have a look at Domonoff machines. Their link is on the face page of the forum in vendors links.
t only the Bowsprit, but standing and running riggen of each mast- just ask.
Attachments
-
 1372-- BOWSPRYD MODEL.jpg42.3 KB · Views: 11
 -
 1380--BOWSPRYD MODEL.jpg84.6 KB · Views: 11
 -
 1430--BOWSPRYD.jpg84 KB · Views: 11
 -
 1434-BOWSPRYD.jpg29.9 KB · Views: 11
 -
 1441-BOWSPRYD- BOM RIGNING.jpg46.6 KB · Views: 11
 -
 1442-- BOWSPRYD.jpg107.7 KB · Views: 11
 -
 1443--BOWSPRYD -STANDING GOGS.jpg45.9 KB · Views: 11
 -
 26628411.jpg125.1 KB · Views: 11
 -
 BOWSPRIT.jpg33.8 KB · Views: 11
Yet another noob challenge. Let me first describe the issues between the instructions and reality. Then I'll describe my solution.
Working on the Foremast. I measured and cut the mast to size, then carefully sanded it from 12mm to 9mm at the top. Next task was to punch out the walnut top piece (this I plan on replacing) and cut the top of the mast to fit in the square hole on this.


At this point I decided to build the underframe of the platform just to see how it fit. That's when I spotted and understood the next conundrum. One of the things you are supposed to do at this point is to make the upper part of the mast square. The upper section of the mast is current 9mm. So once you square it up it will be about 7mm wide with the corner to corner measuring at 9mm. The instructions ( 264 ) have the square part of the mast at 9mm wide with the cross section being more like 13mm !!!!! LOL. The underframe is set for the larger scale. So clearly the upper part of the mast is going to be tooooo skinny. And, the upper little square thing for the walnut piece is 9mm cross and 7mm wide.


So here is the plan. I am going to go ahead and finish squaring up the top section of the mast. I'll also discard the cheap plywood walnut cap and replace it with a solid piece. But instead of making the top square hole the same size I'll instead make it 2mm smaller. I'll then resize the top of the mast to fit this.
Then on the underframe of the platform I will add a shim of 1x3 limewood (deck planking) to make the slot smaller. Doing some math it should now fit the square part of the mast.
So as El Capi subtilty suggested "Just shut up and get on with it". So I will - give me a day or two and I will post the results of my little work around.
BTW - we are on the 5th fairway.

Working on the Foremast. I measured and cut the mast to size, then carefully sanded it from 12mm to 9mm at the top. Next task was to punch out the walnut top piece (this I plan on replacing) and cut the top of the mast to fit in the square hole on this.
At this point I decided to build the underframe of the platform just to see how it fit. That's when I spotted and understood the next conundrum. One of the things you are supposed to do at this point is to make the upper part of the mast square. The upper section of the mast is current 9mm. So once you square it up it will be about 7mm wide with the corner to corner measuring at 9mm. The instructions ( 264 ) have the square part of the mast at 9mm wide with the cross section being more like 13mm !!!!! LOL. The underframe is set for the larger scale. So clearly the upper part of the mast is going to be tooooo skinny. And, the upper little square thing for the walnut piece is 9mm cross and 7mm wide.
So here is the plan. I am going to go ahead and finish squaring up the top section of the mast. I'll also discard the cheap plywood walnut cap and replace it with a solid piece. But instead of making the top square hole the same size I'll instead make it 2mm smaller. I'll then resize the top of the mast to fit this.
Then on the underframe of the platform I will add a shim of 1x3 limewood (deck planking) to make the slot smaller. Doing some math it should now fit the square part of the mast.
So as El Capi subtilty suggested "Just shut up and get on with it". So I will - give me a day or two and I will post the results of my little work around.
BTW - we are on the 5th fairway.
The folks at Model Expo need a class in right sizing. LOL

Exactly. Obviously not rational use of paper 
They got a good deal on 11x14 pouches...
Weekly update. Learning how to build masts.
Got the bowsprit (sans yards) done last week. This week was spent playing around with the foremast and trying to get my brain wrapped around the instructions. I managed to get the bulk of it completed and my mistakes sorted out, mostly. The platform was pretty straight forward and I'm pretty happy with the ribs. I was pretty freaked out about angling them down but with a sharp blade it was not overly difficult.
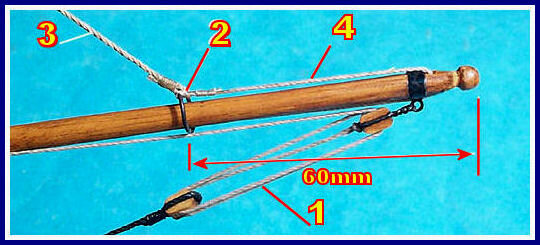
The instructions actually call for 8 2X2mm strips of wood to be attached to the square section of the lower mast just above the platform. I dry fitted a couple on one side to see what it looked like (pic 3 below). I cannot imagine putting 8 of these all the way around. So I am skipping this and leaving them off. The instructions also called for a 1X8mm wide walnut plank right down the front of the lower part of the mast. I went ahead and cut it and glued it on. Then did all off the wrapping. I looks ok but the bottom looked out of place. With the addition of a couple of nails it looks better.
The two upper sections were not overly difficult, although I still have some decorative sapelli to attach on the upper sections. Still trying to decide whether or not to seize the rat lines and other lines. I am leaning towards no as I won't be entering the model in any competitions. If I decide to do another I certainly will. I wrapped a 0.8mm line around the mast section and it seems fine (pic 4) I have a plan.
Over the next several days I will finish the mast and get all of the blocks tied on.
Below are some pics of the foremast build.


Got the bowsprit (sans yards) done last week. This week was spent playing around with the foremast and trying to get my brain wrapped around the instructions. I managed to get the bulk of it completed and my mistakes sorted out, mostly. The platform was pretty straight forward and I'm pretty happy with the ribs. I was pretty freaked out about angling them down but with a sharp blade it was not overly difficult.
The instructions actually call for 8 2X2mm strips of wood to be attached to the square section of the lower mast just above the platform. I dry fitted a couple on one side to see what it looked like (pic 3 below). I cannot imagine putting 8 of these all the way around. So I am skipping this and leaving them off. The instructions also called for a 1X8mm wide walnut plank right down the front of the lower part of the mast. I went ahead and cut it and glued it on. Then did all off the wrapping. I looks ok but the bottom looked out of place. With the addition of a couple of nails it looks better.
The two upper sections were not overly difficult, although I still have some decorative sapelli to attach on the upper sections. Still trying to decide whether or not to seize the rat lines and other lines. I am leaning towards no as I won't be entering the model in any competitions. If I decide to do another I certainly will. I wrapped a 0.8mm line around the mast section and it seems fine (pic 4) I have a plan.
Over the next several days I will finish the mast and get all of the blocks tied on.
Below are some pics of the foremast build.
Hi. Well done mostly,Weekly update. Learning how to build masts.
Got the bowsprit (sans yards) done last week. This week was spent playing around with the foremast and trying to get my brain wrapped around the instructions. I managed to get the bulk of it completed and my mistakes sorted out, mostly. The platform was pretty straight forward and I'm pretty happy with the ribs. I was pretty freaked out about angling them down but with a sharp blade it was not overly difficult.
The instructions actually call for 8 2X2mm strips of wood to be attached to the square section of the lower mast just above the platform. I dry fitted a couple on one side to see what it looked like (pic 3 below). I cannot imagine putting 8 of these all the way around. So I am skipping this and leaving them off. The instructions also called for a 1X8mm wide walnut plank right down the front of the lower part of the mast. I went ahead and cut it and glued it on. Then did all off the wrapping. I looks ok but the bottom looked out of place. With the addition of a couple of nails it looks better.
The two upper sections were not overly difficult, although I still have some decorative sapelli to attach on the upper sections. Still trying to decide whether or not to seize the rat lines and other lines. I am leaning towards no as I won't be entering the model in any competitions. If I decide to do another I certainly will. I wrapped a 0.8mm line around the mast section and it seems fine (pic 4) I have a plan.
Over the next several days I will finish the mast and get all of the blocks tied on.
Below are some pics of the foremast build.
View attachment 243401View attachment 243402View attachment 243403View attachment 243404View attachment 243405View attachment 243406View attachment 243407
hope for you, that You have NOT glued the Platform and uppermost fast, as you will have HEAVY PROBLEMS with the through lines, as they will go around the main lower mast in a very specific way. Rule of Rigge1Th all through on all lower mast -before adding the platform and other parts. Do all lower mast this way. After that, you can then start building up the other pars of each mast -except the forestay of the main lower mast.


.jpg")
.jpg")

Weekly update. Masts Masts Masts.
Sheesh - what a lot of work! I did not finish up the foremast until Wednesday last week. I took me about 2 full weeks to get it completed. Instead of building all three masts at the same time I decided to essentially "learn" on the foremast. Best to make all mistakes on just one mast. Folks I learned a lot. And the pictures that El Capi posted above are wonderful.
Here is a small list of fowl ups.
This week I will work on the standing rigging of the foremast and continue working on the main mast. To ire of the experts on this board. I decided not to seize the shrouds.
Pics below:


Sheesh - what a lot of work! I did not finish up the foremast until Wednesday last week. I took me about 2 full weeks to get it completed. Instead of building all three masts at the same time I decided to essentially "learn" on the foremast. Best to make all mistakes on just one mast. Folks I learned a lot. And the pictures that El Capi posted above are wonderful.
Here is a small list of fowl ups.
- the top section of the lower mast part is too thin. In hind site I should have left it the original size. I just finished the lower section of the main mast and left it thicker and it worked out well.
- Believe it or not it was not plum ! I think this was due to my earlier frame bend and twist issue. To correct it I just shaved off some of the lower part of the mast (the unseen part), its fine now.
- On the first 6 blocks I realized that I was putting them on upside down. I tried several methods to attach blocks to the mast. The only issue I have is the CA glue. I try sooooo hard to apply the smallest amount but I still soak the string. Oh well.
- The sequence of things could have been better. On the other masts I will wait until I have all of the staining and varnishing done Before attaching the line wraps.
- The platforms went together well and they look great. What worried me a lot on these was the ribs. they needed to be angled down from the outside to the inside. With a new blade and some 60 sandpaper they went together pretty easily. although I must have 6 hours invested in each platform.
- The solution to get the mast plum worked well
- Using the drill to size the masts went well.
- Using white paint to mark a drill bit instead of tape. This made it a ton easier to attached the back brace of the platform.
This week I will work on the standing rigging of the foremast and continue working on the main mast. To ire of the experts on this board. I decided not to seize the shrouds.
Pics below:
It looks great. I myself would gave made the ribs a little thinner. pic 2-3-homemade. the last picture is very good too, with not too many ribsWeekly update. Masts Masts Masts.
Sheesh - what a lot of work! I did not finish up the foremast until Wednesday last week. I took me about 2 full weeks to get it completed. Instead of building all three masts at the same time I decided to essentially "learn" on the foremast. Best to make all mistakes on just one mast. Folks I learned a lot. And the pictures that El Capi posted above are wonderful.
Here is a small list of fowl ups.
Here is what went reasonably well.
- the top section of the lower mast part is too thin. In hind site I should have left it the original size. I just finished the lower section of the main mast and left it thicker and it worked out well.
- Believe it or not it was not plum ! I think this was due to my earlier frame bend and twist issue. To correct it I just shaved off some of the lower part of the mast (the unseen part), its fine now.
- On the first 6 blocks I realized that I was putting them on upside down. I tried several methods to attach blocks to the mast. The only issue I have is the CA glue. I try sooooo hard to apply the smallest amount but I still soak the string. Oh well.
- The sequence of things could have been better. On the other masts I will wait until I have all of the staining and varnishing done Before attaching the line wraps.
Right now I am at a bit of a standstill. OcCre did not send the correct amount of brass strips. The kit is supposed to have 31 strips but only sent 13 of them. I ordered more from the Very Slow model expo outfit.
- The platforms went together well and they look great. What worried me a lot on these was the ribs. they needed to be angled down from the outside to the inside. With a new blade and some 60 sandpaper they went together pretty easily. although I must have 6 hours invested in each platform.
- The solution to get the mast plum worked well
- Using the drill to size the masts went well.
- Using white paint to mark a drill bit instead of tape. This made it a ton easier to attached the back brace of the platform.
This week I will work on the standing rigging of the foremast and continue working on the main mast. To ire of the experts on this board. I decided not to seize the shrouds.
Pics below:
View attachment 245111View attachment 245112View attachment 245113View attachment 245114
View attachment 245114View attachment 245115View attachment 245117


the first pic is from where I was born in DenmarkIt looks great. I myself would gave made the ribs a little thinner. pic 2-3-homemade. the last picture is very good too, with not too many ribs
Nice work Dad!Weekly update. Learning how to build masts.
Got the bowsprit (sans yards) done last week. This week was spent playing around with the foremast and trying to get my brain wrapped around the instructions. I managed to get the bulk of it completed and my mistakes sorted out, mostly. The platform was pretty straight forward and I'm pretty happy with the ribs. I was pretty freaked out about angling them down but with a sharp blade it was not overly difficult.
The instructions actually call for 8 2X2mm strips of wood to be attached to the square section of the lower mast just above the platform. I dry fitted a couple on one side to see what it looked like (pic 3 below). I cannot imagine putting 8 of these all the way around. So I am skipping this and leaving them off. The instructions also called for a 1X8mm wide walnut plank right down the front of the lower part of the mast. I went ahead and cut it and glued it on. Then did all off the wrapping. I looks ok but the bottom looked out of place. With the addition of a couple of nails it looks better.
The two upper sections were not overly difficult, although I still have some decorative sapelli to attach on the upper sections. Still trying to decide whether or not to seize the rat lines and other lines. I am leaning towards no as I won't be entering the model in any competitions. If I decide to do another I certainly will. I wrapped a 0.8mm line around the mast section and it seems fine (pic 4) I have a plan.
Over the next several days I will finish the mast and get all of the blocks tied on.
Below are some pics of the foremast build.
View attachment 243401View attachment 243402View attachment 243403View attachment 243404View attachment 243405View attachment 243406View attachment 243407
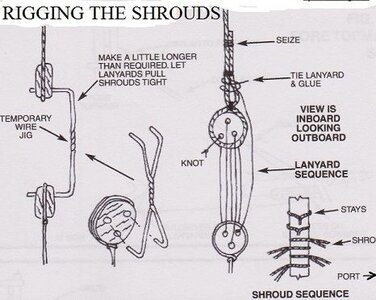
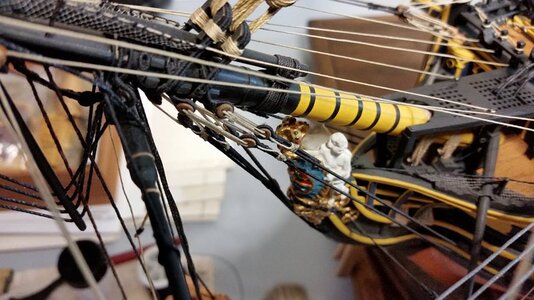
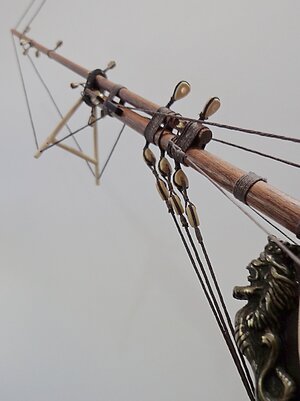
Update. Started Rigging and dealing with a conundrum.
I decided to attach the shrouds using this method: Pic just below. Got this from El Capi. Indeed I did this and let the shrouds just hang.

Next task was to attach these to the dead eyes below. I was screwing around using a needle threader and it worked just fine but very fiddly. So about midway through I decided to retry the CA glue approach to make a needle with the thread itself. But this time I worked hard to make it as thin as possible. It worked and made threading the deadeyes much easier.

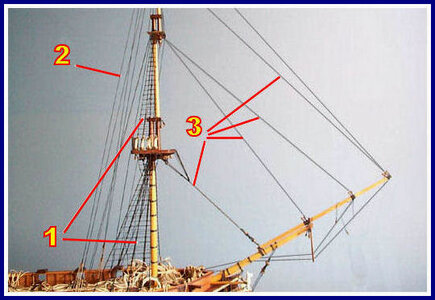
Now, here is the conundrum. When using the above approach to connect the shrouds they come down in pairs instead of being evenly separated. John Aliprantis (youtuber) warned of this but I disregarded the warning. Sure enough I have the shrouds coming down in pairs.

So, I'll finish the foremast with this technique (as I have already attached all of the shrouds) but the main mast and mizzen mast I'll do a different approach that prevents this. If someone can show me what I did wrong here let me know. To fix this I think I'll flip the boat over then widen the shrouds at the top and hit them with plenty of CA to keep them separated. All of this will be just under the platform so it won't be visible.
I am still waiting for the brass strips ordered from Model Expo. So to keep myself busy I'll continue with the standing rigging on the foremast.
Good fun stuff.
I decided to attach the shrouds using this method: Pic just below. Got this from El Capi. Indeed I did this and let the shrouds just hang.
Next task was to attach these to the dead eyes below. I was screwing around using a needle threader and it worked just fine but very fiddly. So about midway through I decided to retry the CA glue approach to make a needle with the thread itself. But this time I worked hard to make it as thin as possible. It worked and made threading the deadeyes much easier.
Now, here is the conundrum. When using the above approach to connect the shrouds they come down in pairs instead of being evenly separated. John Aliprantis (youtuber) warned of this but I disregarded the warning. Sure enough I have the shrouds coming down in pairs.
So, I'll finish the foremast with this technique (as I have already attached all of the shrouds) but the main mast and mizzen mast I'll do a different approach that prevents this. If someone can show me what I did wrong here let me know. To fix this I think I'll flip the boat over then widen the shrouds at the top and hit them with plenty of CA to keep them separated. All of this will be just under the platform so it won't be visible.
I am still waiting for the brass strips ordered from Model Expo. So to keep myself busy I'll continue with the standing rigging on the foremast.
Good fun stuff.
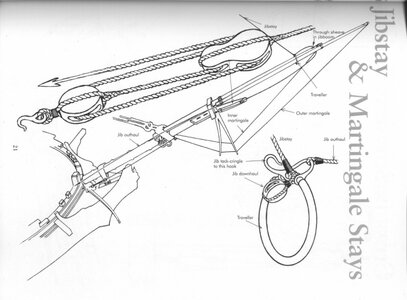
You are doing right. The 1TH through - forward -is alone. All the rest comes in par, so are absolutely correct. the 1Tn forward was many times seized, as the mail lower sail came in contact with the shroud. the rest is only on top and above the deadeyes.. the attached fig is the best way the align correct the distance between the deadeyes -completely parallel. it is two pieces of wire twisted or by heat set together. you will only have to measure the distance correctly. I did one par for each one and mast- added the shroud around the deadeyes- be sure that the strange is egual. I started with the 1Th one, to set to have the right angel (sleight forward, the from behind. Always on both sides at the time. so you will have to run around the ship a few times, that is why I warned not to insert the bowsprit at this moment (to avoid an accident with myUpdate. Started Rigging and dealing with a conundrum.
I decided to attach the shrouds using this method: Pic just below. Got this from El Capi. Indeed I did this and let the shrouds just hang.
View attachment 245394
Next task was to attach these to the dead eyes below. I was screwing around using a needle threader and it worked just fine but very fiddly. So about midway through I decided to retry the CA glue approach to make a needle with the thread itself. But this time I worked hard to make it as thin as possible. It worked and made threading the deadeyes much easier.
View attachment 245395
Now, here is the conundrum. When using the above approach to connect the shrouds they come down in pairs instead of being evenly separated. John Aliprantis (youtuber) warned of this but I disregarded the warning. Sure enough I have the shrouds coming down in pairs.
View attachment 245397
So, I'll finish the foremast with this technique (as I have already attached all of the shrouds) but the main mast and mizzen mast I'll do a different approach that prevents this. If someone can show me what I did wrong here let me know. To fix this I think I'll flip the boat over then widen the shrouds at the top and hit them with plenty of CA to keep them separated. All of this will be just under the platform so it won't be visible.
I am still waiting for the brass strips ordered from Model Expo. So to keep myself busy I'll continue with the standing rigging on the foremast.
Good fun stuff.
 Belly). there are other methods, but I was happy with mine
you can let these util stay until you will make the food ropes-remember 1/3 thick of the shrouds
going through your pic better, I see you have aligned the deadeyes very well and correct- bravo sailor