Montanes by OcCre 1:70

Wow. Thanks Jamie. Certainly an interesting history.

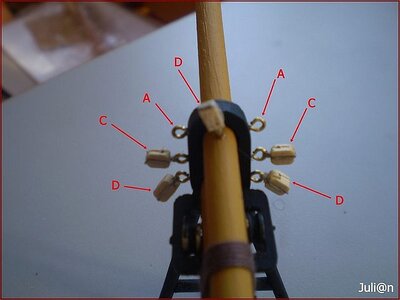
My hunt for eye pins continues. Here in the US these things seemed to be called "Eye Pins". If you do searches on Eyelets you end up getting a variety of things including Eyelet screws. Even the smallest Eyelet Screws are way way too big.

As I continued searching I stumbled onto Eye Pins at jewelry craft stores. So a quick trip to Joann's Fabrics and I found some. They are still a bit too big but might be workable. See pic below.

I also called most all of the Hobby shops here in the Denver area only to be told they do not carry them anymore.

And then a miracle happened. Over on the model expo site I did a search on just "eye". I got 21 pages of results. On page 12 I found them. They are called "Jackstay Eyebolts". A few sizes to choose from so I will measure and order some.

Jackstay Eyebolts - interesting.

Here is the link https://modelexpo-online.com/search.asp?keyword=jackstay+

eye pins.jpg
 
Lift Raft started. Should be done over the weekend. This evening I'll get it prepped for the planks and, according to the directions, paint the ribs brown.

By the way. I purchased some semi gloss polyurethane and used some to touch up our garage workbench. It seems more the "semi" gloss as it's pretty shiny.

Seems a lot of the finished models are high gloss. but I am not sure what most folks feel about it.

Thoughts on semi gloss vs satin??


Lift Raft pic 1.jpgLift Raft pic 2.jpgLift Raft pic 3.jpg
 
Hi Scottola
Congratulations on overcoming the problem.
It's good to see another Montanes here. :)
I think bend and twist problems are not your fault.
OCCRE puts 4 crosbeams.
In my opinion there must be two instead of four.
They are for to prevent the model from bend and twist. So they have to be long enough from stern to stem.
In my model I didnt use OCCRE supplied ones.
I prepared two 15x15mm crosbeams and used on the model.

This is my Montanes several months ago. You can see the crosbeam on this photo.

View attachment 202305

Maybe you want to look at my building log :


If you want to ask a question about the model, you can do so without hesitation.

Best Regards.
Hi there I’m new to model ship making. Just starting to plank the hull but having problems with the planks sitting level as I move down the hull.Is there a pattern to planking as I’ve seen many photos of the planking pattern any advice would be helpful especially close up pictures of the planking so I can see where and when I can apply the planks many thanks
 
Hi there I’m new to model ship making. Just starting to plank the hull but having problems with the planks sitting level as I move down the hull.Is there a pattern to planking as I’ve seen many photos of the planking pattern any advice would be helpful especially close up pictures of the planking so I can see where and when I can apply the planks many thanks
i have seen you for some time now. As you may know, I have build 2 Montanes. One as per instruction and the 2Nd one modified Not only with stern and bow fillers, but all free space between bulkhead up to the lower deck. gunport was changed to. then the planking -all gunports open-NO DUMMY GUN here you now had to do a lot of gun carriage, not only for the lover deck but the rest, with different size according to the pipe calibre. I modified the Galleries -See Mirek- all windows and doors of metal-from the kit - was changes (out of scale) guns rigged the oriental way, nat as in the kit the britich way. The same goes for the CAPS on the lower mast- in the kit the British to the Oriental one -Mirik did that too. This KIT is quite old. I bought the 1Th one in 1982 in Madrid, and as far I can see, no change since then. The VIRGEN of PILAR does not have some of these mistakes
 
Sutty, thanks for the question. There are soooo many ways to do planking. Books have been written on the subject. The SOS platform is loaded with what I call one percenters, the best of the best modelers. The approach that I took worked for me but I am sure made some of the experts cringe. The end result seems nice.

These folks are very helpful for sure. I looked around and could not find your build. If you don't have one I suggest you go ahead and start one. That's the best way to garner advice.

You'll never get the planks to lay down perfectly when coming around a bend. Expect the planks to "stair step" a bit. You can avoid this by beveling the edge of the plank. I personally found this to be .... challenging, as parts of the plank needed to be beveled and other parts needed to remain flat and I had a tendency to over do it. The approach that I took greatly reduces the need to bevel. If I do another model I'll give this approach a full go.

For your stair steps. Once you are done just sand them off. You'll be happy with the result.

Here is a link to a youtuber demoing his approach to planking.

Hope this helps.
 
I think you are doing a fabulous job Scott. I am interested in this ship, but currently have too many waiting for drydock space.
Here are a few sites with ship fittings.
 
Sutty, thanks for the question. There are soooo many ways to do planking. Books have been written on the subject. The SOS platform is loaded with what I call one percenters, the best of the best modelers. The approach that I took worked for me but I am sure made some of the experts cringe. The end result seems nice.

These folks are very helpful for sure. I looked around and could not find your build. If you don't have one I suggest you go ahead and start one. That's the best way to garner advice.

You'll never get the planks to lay down perfectly when coming around a bend. Expect the planks to "stair step" a bit. You can avoid this by beveling the edge of the plank. I personally found this to be .... challenging, as parts of the plank needed to be beveled and other parts needed to remain flat and I had a tendency to over do it. The approach that I took greatly reduces the need to bevel. If I do another model I'll give this approach a full go.

For your stair steps. Once you are done just sand them off. You'll be happy with the result.

Here is a link to a youtuber demoing his approach to planking.

Hope this helps.
This may be the last message from me to you. You are the Builder and on the Wheel, so I can not say more. only the Vidio could not be much worse. No you will not find any full build of mine, as I gave up Building 2915 -before I was a member here. Anyway, I have never published my build. what I do now is to try to help with 50 Years of experience in building from kit. it good sides-dew- and bad side many. In my building time I used the "Simple hull planking for a beginner.-on the attached click on the text and it will open. there are much more and more complicated, but any starts with 2-4 planks below the main deck and then 2-4 planks on the bottom- following the real keel. this after 1Th having measured midship, how men planks you need. for it will be the same amount but cut according to the measuring. toward the stern fewer problems-
with this I cannot say ANY MORE THAN FOLLOW THE VIDIO-GOOD LUCK. I will anyway RETIRE soon
 

Attachments

  • 220-plankingprojectbeginners.pdf
    1.9 MB · Views: 20
Hi there I’m new to model ship making. Just starting to plank the hull but having problems with the planks sitting level as I move down the hull.Is there a pattern to planking as I’ve seen many photos of the planking pattern any advice would be helpful especially close up pictures of the planking so I can see where and when I can apply the planks many thanks
look at this booklet in PDF format. Only click on the Text and it will open up. To me, it was the bible for many years.
 

Attachments

  • 220-plankingprojectbeginners.pdf
    1.9 MB · Views: 16
i have seen you for some time now. As you may know, I have build 2 Montanes. One as per instruction and the 2Nd one modified Not only with stern and bow fillers, but all free space between bulkhead up to the lower deck. gunport was changed to. then the planking -all gunports open-NO DUMMY GUN here you now had to do a lot of gun carriage, not only for the lover deck but the rest, with different size according to the pipe calibre. I modified the Galleries -See Mirek- all windows and doors of metal-from the kit - was changes (out of scale) guns rigged the oriental way, nat as in the kit the britich way. The same goes for the CAPS on the lower mast- in the kit the British to the Oriental one -Mirik did that too. This KIT is quite old. I bought the 1Th one in 1982 in Madrid, and as far I can see, no change since then. The VIRGEN of PILAR does not have some of these mistakes
Hi there. Would bow and stern fillers make my life easier
 
This may be the last message from me to you. You are the Builder and on the Wheel, so I can not say more. only the Vidio could not be much worse. No you will not find any full build of mine, as I gave up Building 2915 -before I was a member here. Anyway, I have never published my build. what I do now is to try to help with 50 Years of experience in building from kit. it good sides-dew- and bad side many. In my building time I used the "Simple hull planking for a beginner.-on the attached click on the text and it will open. there are much more and more complicated, but any starts with 2-4 planks below the main deck and then 2-4 planks on the bottom- following the real keel. this after 1Th having measured midship, how men planks you need. for it will be the same amount but cut according to the measuring. toward the stern fewer problems-
with this I cannot say ANY MORE THAN FOLLOW THE VIDIO-GOOD LUCK. I will anyway RETIRE soon
Thank you for help.
 
Hello everyone, time for my weekly update.

But, before I get started. El Capi, I hope you don't abandon me. When I talked about posting a build I meant Sutty, not you. I am getting ready to start the rigging (very intimating) and was very much looking forward to your guidance.

Here is my report.

I have completed my second milestone, finished the boat part of the boat :).!!! (warts and all) The first milestone was completing the planking. Next big milestone is the bowsprit, making the masts and the lower part of the standing rigging. Each mast has three sections. I'll build them all but I won't glue them together. Otherwise the standing rigging becomes much much harder.

Seems the week was mostly dedicated to the life boat. It came out..... ok. The benches ended up too low, I guess the Montanes sailors had really short legs. LOL

I did a test with both satin finish and a semi gloss finish. At first the semi gloss was very very glossy (when wet). After it dried it was certainly shiny but not overly so. It also really brought out the color of the various woods. My wife and I discussed the various looks and decided to go with the semi gloss. The test section was the top aft deck. There is a pic below.

I have a couple things to fix and work on but they are not overly important. I am ready to move onto the next phase.

Below are some pics.

Jun 27 - completed view.jpgJun 27 - getting our little dude painted..jpgJun 27 - life boat complete.jpgJun 27 - semi gloss section..jpgJun 27 - view of the bow.jpgJun 27 Aft view of officers quarters - chains completed.jpg
 

Attachments

  • Jun 27 - view from the back.jpg
    Jun 27 - view from the back.jpg
    91 KB · Views: 6
Hello everyone, time for my weekly update.

But, before I get started. El Capi, I hope you don't abandon me. When I talked about posting a build I meant Sutty, not you. I am getting ready to start the rigging (very intimating) and was very much looking forward to your guidance.

Here is my report.

I have completed my second milestone, finished the boat part of the boat :).!!! (warts and all) The first milestone was completing the planking. Next big milestone is the bowsprit, making the masts and the lower part of the standing rigging. Each mast has three sections. I'll build them all but I won't glue them together. Otherwise the standing rigging becomes much much harder.

Seems the week was mostly dedicated to the life boat. It came out..... ok. The benches ended up too low, I guess the Montanes sailors had really short legs. LOL

I did a test with both satin finish and a semi gloss finish. At first the semi gloss was very very glossy (when wet). After it dried it was certainly shiny but not overly so. It also really brought out the color of the various woods. My wife and I discussed the various looks and decided to go with the semi gloss. The test section was the top aft deck. There is a pic below.

I have a couple things to fix and work on but they are not overly important. I am ready to move onto the next phase.

Below are some pics.

View attachment 241108View attachment 241109View attachment 241110View attachment 241112View attachment 241114View attachment 241115
Do to my accident, I am a little down. I will NOT stop helping does who ask me, but little by little my flow maybe less in the future.
Do you have an Idea where to start.? You must start inserting the inner part of the Bowsprit and set it fast with its Standing Riggen. The the 3 Lower Masts. Add the Trougfh first, then the Foresatays.
 
Sutty, thanks for the question. There are soooo many ways to do planking. Books have been written on the subject. The SOS platform is loaded with what I call one percenters, the best of the best modelers. The approach that I took worked for me but I am sure made some of the experts cringe. The end result seems nice.

These folks are very helpful for sure. I looked around and could not find your build. If you don't have one I suggest you go ahead and start one. That's the best way to garner advice.

You'll never get the planks to lay down perfectly when coming around a bend. Expect the planks to "stair step" a bit. You can avoid this by beveling the edge of the plank. I personally found this to be .... challenging, as parts of the plank needed to be beveled and other parts needed to remain flat and I had a tendency to over do it. The approach that I took greatly reduces the need to bevel. If I do another model I'll give this approach a full go.

For your stair steps. Once you are done just sand them off. You'll be happy with the result.

Here is a link to a youtuber demoing his approach to planking.

Hope this helps.
Thank you. I have seen a few of the you tube videos. I looking at using bow and stern fillers.
 
Here are some Pic of the Bowsprit and its Riggen. Do NOT - for your own safe specially if you have a Beer Bely like -as you may easelt break the outer part
 

Attachments

  • 817- machos.jpg
    817- machos.jpg
    134.3 KB · Views: 16
  • 1439--RUNNING RID.jpg
    1439--RUNNING RID.jpg
    64.3 KB · Views: 13
  • 1429--BOVSPRYD RIGNING BOM 15.jpg
    1429--BOVSPRYD RIGNING BOM 15.jpg
    29.9 KB · Views: 16
  • BOWSPRIT.jpg
    BOWSPRIT.jpg
    33.8 KB · Views: 15
Hello Scottola. Wonderful work! She is looking fantastic isn't she? A few passing comments: 1. I see your wife is helping with the painting. I have packaged up some metal decorative pieces from my Vasa and they should arrive at your house sometime this week. Have her finish those up for me and return them at her convenience... 2. I see that you have taken over the kitchen table for your build. Any wife who allows that is a treasure! So on second thought just send HER to me and I'll put her to work.

Keep up the good work - you're going to end up with a fine ship model.
 
Paul, LOL - yeah she is quite talented. One, she is a talented painter (sold several paintings) and Two, I wanted her to have some skin in the game. All painting happens on the kitchen table as there is more lite there. Most of the work is still done in the basement TV room. Or outside.

El Capi - Step one will be the bowsprit. I'll start this tonight.
 
Whoa!! Reviewing the plans and the pictures for the masts etc. The material provided in the kit for masts and yards looks like balsa. So we'll need to stain accordingly. We'll play around with our red mahogany and red chestnut so see which works best. The next thing I see is that the metal rings are black. What is the trick to turn the brass black?? I'd rather not just paint them.

Thanks
 
Back
Top