MSW USS Constitution

Good morning Jack. I had to play some catch up with your latest modelling endeavor. What a cool ship to build. So far so good and she is looking great. Excuse the pun but I love the gratings on her. Cheers Grant
thank you, sir.
It is definitely a challenge. A lot of fabrication, which I am not used to doing, but I am learning.
 
Good morning Jack. I had to play some catch up with your latest modelling endeavor. What a cool ship to build. So far so good and she is looking great. Excuse the pun but I love the gratings on her. Cheers Grant
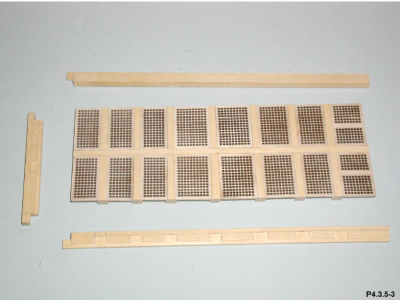
For the large one, the practicum shows how to frame each hatch as shown in the following photo. I am wondering if the extra effort will give a much better result. I have to think about that one


1731416508438.png
 
I am wondering if the extra effort will give a much better result. I have to think about that one

It’s a cost vs benefit analysis every time. I’m very inconsistent. One day I’ll go the extra mile and the next I’ll do it the easy way. The odd thing is that I never regret doing my best but sometimes a quick fix job catches in my mind like a hangnail. ;)
 
It’s a cost vs benefit analysis every time. I’m very inconsistent. One day I’ll go the extra mile and the next I’ll do it the easy way. The odd thing is that I never regret doing my best but sometimes a quick fix job catches in my mind like a hangnail. ;)
The thing is am I shortchanging myself if I don`t do that. Anyways I`ll continue on with the planking and at some point I`ll make a decision.
 
Progressing on replanking of deck. Much happier with the filler blocks. They make it easier to support the planking and the hatches. I may continue the blocks right to the sides. Not sure yet if I will or not.


View attachment 483718
The wood looks so nice as is, maybe a piss coat of store-bought amber shellac (Zinsser brand comes to mind) cut 50-50 with denatured alcohol (stove fuel)
will suffice with a very light sanding after. The color, while not like the present-day ship (which is probably nothing like that of the ship in 1812-15 anyway) will be very pleasing and believable with a minimum of hassle and guaranteed success. Remember, in that era the off-duty watch was kept busy on their hands and knees holy stoning the decks with bible sized blocks of pumice stone to keep the deck surface clean and the early 19th c. version of "non-skid".
 
Last edited:
Progress continues on the main hatchway. I cut out all the gratings, I made the coamings, and I have started gluing the pieces together. Fortunately I have 123 blocks which help keep things square. It is not an easy thing to assemble and you can't do too much at the same time because you need to let the glue dry. I can glue together about 3 pieces without too much difficulty. Once the two rows of gratings have been made, I then have to assemble them and complete the framing as shown in a previous post.

mainHatchway.jpg
 
An I right in thinking that the ship’s boats will be stowed on top of this? If so, a lot might be unseen when finished.
you are correct but I still want to do the complicated main hatch and compare it to the simplified version. I am in no hurry to finish this boat. I think what's important is to taper the framing around the hatches to give that finished look and to make sure everything is square.

1731675162884.png
 
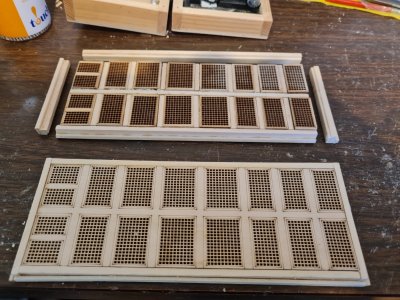
I have to sand and finish the main hatch, complicated version, but here is what both implementations look like so far:

View attachment 484262

Which one do you prefer?

The bottom one looks very neat. I assume it came like that, ready-made by computer controlled laser. It certainly looks like it. It’s almost as ‘accurate’ as plastic would be. It’s obviously cut from one piece of wood and therefore, unless you paint it, looks unreal to me. If you paint it, it might as well be plastic. Every time you build with this sort of component, it will look the same as this one. Accurate but artificial. I must admit though that it’s very good and in a small scale like this it’s almost impossible to better it. I’d give it seven out of ten.

The top one is irregular in places. It’s definitely made from individual pieces of wood. Clearly it’s been made by a human. It has soul and it has flaws. Some say that it’s the flaws that add the soul. Every time you build something like this, your skills will improve until you can build accurately with soul. On the other hand those flaws might irritate you when it’s all finished and on display. I’d give it seven out of ten.

It’s a tricky decision.

It might help to think about whether the majority of the pleasure of your hobby lies in the building stage or in the owning of the finished model?

Personally, I prefer to make a flawed model that is perhaps a bit better than the last one so I keep trying to do it the hard way EXCEPT when the energy and time required to do that is lacking in which case I’ll take the easy option and thank you very much, kit makers and your computers!

In this particular case, and as I’m feeling right now… I have no idea what I’d do! I am fascinated to see which way you will go.
 
it will depend on what the sanded version will look like. I chose this model on purpose because there is a lot of human building involved. It is proving to be a challenge, but that's ok I like that.

In regards to imperfections, I sort of like that look. Of course I stil have some sanding to do to make things more even, but I can't sand too much either otherwise the sandpaper will go right through the gratings. I am leaning towards the imperfections version as it looks more real, I think

Honestly for me it's all about the journey. If I could get rid of some of the models that I have, I would.

If you make another attempt at building, you might try doing it upside down with the gratings flat on a mirror or a piece of glass. That way you’ll get a flatter top surface.
 
Hi
Nice work with the gratings, I have found with this kit is nothing is straightforward and parts take longer to build than I expected.

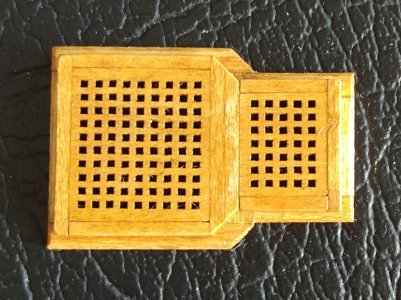
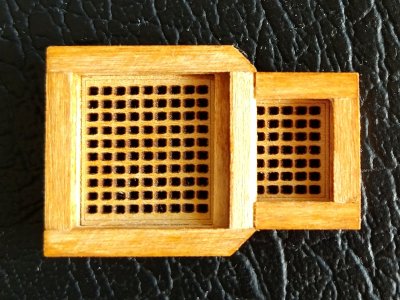
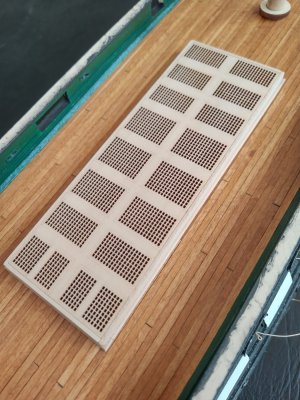
I found the laser cut gratings look better mounted upside down.

IMG_20241116_162231.jpg
From the underside the holes are smaller and the corners are sharper.

IMG_20241116_162343.jpg
This is the top surface the hole quality is not as good.

IMG_20240406_145854.jpg
The man hatches had to be mounted top side up to keep the lines around the gratings. They don't look as good but with the boat on top its not to noticeable.

Tony
 
I sanded down the complicated main hatchway and here is what it looks like compared to the other model. Truth be told I am a little disappointed with it. I thought there would be a major difference between the two. Ok, it's not perfect, but they look fairly similar. Maybe needs a little more sanding but I am close to finishing it.

MainHatch.jpg
 
Back
Top