• LUCZORAMA SHIPWRECK SCAVENGER HUNT GIVEAWAY. 4 Weeks of Fun • 1 Legendary Prize ((OcCre’s Fram Ship)) • Global Crew Welcome!
    **VIEW THREAD HERE**

MSW USS Constitution

Joined
Oct 9, 2020
Messages
2,073
Points
488

Welcome aboard my build log of the USS Constition. I welcome comments and glad to have you on board.
It is the hardest build I have ever done. I would even call this a scratch build because of the amount of construction that there is to do.

I know that there are several build logs of the Constitution and I had planned to only start mine when I was putting on the sails, but I decided I would start now. I will post pics when I finish the sanding stage of the hull. There really isn't much to see right now.

As I am close to finish the planking of the hull, I am thinking forward about the following:
(i) What color to paint the deck
(ii) Whether I should copper the hull with copper metallic paint or add copper tape.

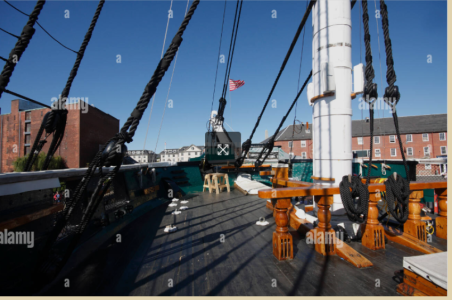
The pictures that I have seen of the deck show a sort of greyish color.
I really like the color of the deck furnishing. I am going to call that a caramel color.
No rivets in my boat and no trunnels. As someone put it the Constitution is a bit of a Jackolope because it has gone through so many transformations over the years. Therefore I plan on doing some kit bashing too, well as much as my abilities allow me to do.

1729637774105.png
 
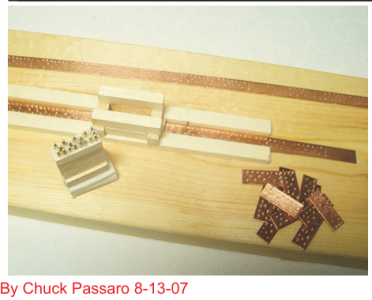
Well I looked into how many plates I would need to copper plate my boat. I estimated about 3300 would be needed of the 6x12 plates. It turns out to be too expensive for my taste, so I will either finish with the paint or use the copper tape and emboss my own patterns. For this I will need to build some sort of jig. I will probably use the one that is recommended in the Brig Syren. More to come...

1729698349028.png
 
Hey Jack ,
Another idea for you is to buy thin copper foil and cut it and then use the jig ,it will be be much cheaper from buing ready made ones ,but also i think more impressive than the tape, but it's require more work.

Waiting to see first update :)

Cheers
 
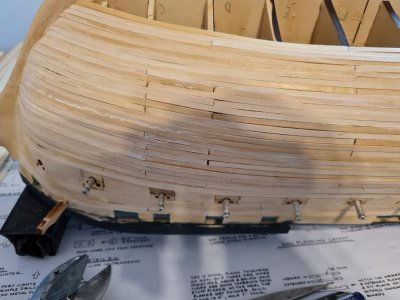
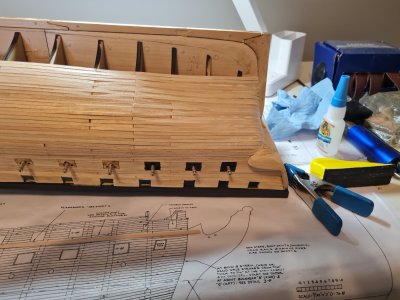
the pics below show the portside bow and stern sections of the ship. There is some sand to do and I am comfortable saying that the hull will look a lot better when I am done sanding. Notice that I did not taper any of the planks. Instead I bent the planks in 2 directions. This is something that I wanted to try as i hate tapering the planks. I do ask myself the question, though, that if I had done the traditional way of tapering the planks if that would have given a better result? I wanted to test this this compound bending. The planks were not to thick or wide and the wood easily softened in water without have to soak the planks for a very long time; 10 minutes max.

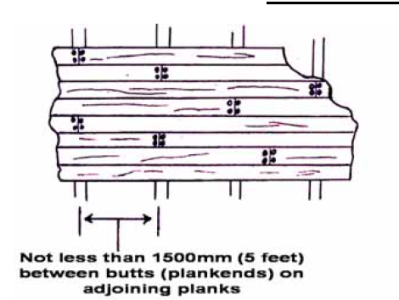
Also to note that I will be filling in the gap in the butt joints. Interestingly enough when I applied the wet planks, the gaps were not as wide as after the planks dried, so there is definitely some shrinkage that occured. No worries, We will fix that too. There are a couple of rules that exist which I would like to mention below:

-Planks were not less that 5 ft long.
-The there should be 3 planks between butt joints that are similar in postition.

I think there is an error in the below diagram, though as there is a butt joint that does not sit on top of a bulkhead. That makes no sense.

1729778958917.png


Bulkhead O was not faired enough, as can be seen in the second pic. Again I can sand this off too, allthough I am wondering if I shouldn't perform surgery on the patient; ie. cut away some of the planking and resand the bulkhead. Not sure yet.

pic1.jpg

pic2.jpg
 
Last edited:
Jack,

A couple of thoughts regarding coppering of your model:

First. Skip the embossed “rivets”. Copper sheathing was light gauge, fastened to the hull with flat head copper nails. The flat head was necessary to avoid punching a hole in the sheathing. Keep in mind that looking at the model at a distance of 1 ft is equivalent to looking at the real ship at a distance of 96ft (at 1:96 scale) 64ft (at 1:64 scale) etc. At these distances the nail heads would be invisible. The heavily embossed copper plates sold by kit manufacturers are just marketing hype and in this case result in a less accurate model.

Second. Real copper poses some problems. First Is the difficulty of securing it to the hull. Nothing could be more discouraging than finding the sheathing peeling on a finished model. I am suspicious of all pressure sensitive adhesives and contact cement also poses longevity problems along with off gassing within the confines of a display case.

The other issue involves finish. Much ink has been spilled regarding the “correct” finish for copper sheathing. Thoughts range from shiny bright to heavily weathered. I personally consider that shiny new copper does not produce a scale appearance. Like scaling down paint colors with a touch of grey, shiny bright copper also needs to be scaled down.

All of these concerns could be solved, and $$ or ££ saved by simulating copper with paper. Paper is easily and securely fastened to the wooden hull with easy to use PVA glues. You could first paint it with your copper paint, scaled down with a little grey. Once glued to the hull, it can then be lightly sprayed with different colors for weathering effects. Paper can be fragile, but is easily reinforced by first coating it with shellac. Shellac will not react with either the PVA glue or acrylic or enamel paint.

Roger
 
Jack,

A couple of thoughts regarding coppering of your model:

First. Skip the embossed “rivets”. Copper sheathing was light gauge, fastened to the hull with flat head copper nails. The flat head was necessary to avoid punching a hole in the sheathing. Keep in mind that looking at the model at a distance of 1 ft is equivalent to looking at the real ship at a distance of 96ft (at 1:96 scale) 64ft (at 1:64 scale) etc. at these distances the nail heads would be invisible. The heavily embossed copper plates sold by kit manufacturers are just marketing hype and in this case result in a less accurate model.

Second. Real copper poses some problems. First Is the difficulty of securing it to the hull. Nothing could be more discouraging than finding the sheathing peeling on a finished model. I am suspicious of all pressure sensitive adhesives and contact cement also poses longevity problems along with off gassing within the confines of a display case.

The other issue involves finish. Much ink has been spilled regarding the “correct” finish for copper sheathing. Thoughts range from shiny bright to heavily weathered. I personally consider that shiny new copper does not produce a scale appearance. Like scaling down paint colors with a touch of grey, shiny bright copper also needs to be scaled down.

All of these concerns could be solved, and $$ or ££ saved by simulating copper with paper. Paper is easily and securely fastened to the wooden hull with easy to use PVA glues. You could first paint it with your copper paint, scaled down with a little grey, once glued to the hull, it can then be lightly sprayed for weathering effects. Paper can be fragile, but is easily reinforced by first coating it with shellac. Shellac will not react with either the PVA glue or acrylic or enamel paint.

Roger
Interesting thoughts. I like your perspective.
 
Jack,

A couple of thoughts regarding coppering of your model:

First. Skip the embossed “rivets”. Copper sheathing was light gauge, fastened to the hull with flat head copper nails. The flat head was necessary to avoid punching a hole in the sheathing. Keep in mind that looking at the model at a distance of 1 ft is equivalent to looking at the real ship at a distance of 96ft (at 1:96 scale) 64ft (at 1:64 scale) etc. At these distances the nail heads would be invisible. The heavily embossed copper plates sold by kit manufacturers are just marketing hype and in this case result in a less accurate model.

Second. Real copper poses some problems. First Is the difficulty of securing it to the hull. Nothing could be more discouraging than finding the sheathing peeling on a finished model. I am suspicious of all pressure sensitive adhesives and contact cement also poses longevity problems along with off gassing within the confines of a display case.

The other issue involves finish. Much ink has been spilled regarding the “correct” finish for copper sheathing. Thoughts range from shiny bright to heavily weathered. I personally consider that shiny new copper does not produce a scale appearance. Like scaling down paint colors with a touch of grey, shiny bright copper also needs to be scaled down.

All of these concerns could be solved, and $$ or ££ saved by simulating copper with paper. Paper is easily and securely fastened to the wooden hull with easy to use PVA glues. You could first paint it with your copper paint, scaled down with a little grey. Once glued to the hull, it can then be lightly sprayed with different colors for weathering effects. Paper can be fragile, but is easily reinforced by first coating it with shellac. Shellac will not react with either the PVA glue or acrylic or enamel paint.

Roger
in regards tp the paper, do you cut it in strips or tiles?
 
Yes, the PVA glues readily bond paper to wood. The PVA glues also allow adjustment before they grab. They also cure. I’m not sure that the pressure sensitive adhesives really ever cure, so will continue to be chemically active within an enclosed case. The PVA glues do contain water so can wrinkle paper. Spraying or painting them with shellac avoids this problem. Shellac does not seem to effect adhesion.

Roger
 
I’m not sure that the pressure sensitive adhesives really ever cure, so will continue to be chemically active within an enclosed case.

Only a few and generally expensive and specialised contact adhesives actually 'cure' in the sense that the polymers cross-link to make something stronger and harder. Like - for example- the way liquid epoxies cure to form a tough solid. Contact adhesives are usually made from polymers dissolved in a solvent, like sugar dissolves in water. The solvent can take a long time to evaporate, especially when trapped between relatively impervious surfaces like varnished wood and copper plates. I think in general it is best to allow plenty of time in a warm place for solvents to vanish into thin air before putting them into a sealed glass case.
 
All of these concerns could be solved, and $$ or ££ saved by simulating copper with paper. Paper is easily and securely fastened to the wooden hull with easy to use PVA glues. You could first paint it with your copper paint, scaled down with a little grey. Once glued to the hull, it can then be lightly sprayed with different colors for weathering effects. Paper can be fragile, but is easily reinforced by first coating it with shellac. Shellac will not react with either the PVA glue or acrylic or enamel paint.
I never thought of paper, but you can buy paper in craft stores in copper and other metallic finishes, so that might work too.
 
Well I looked into how many plates I would need to copper plate my boat. I estimated about 3300 would be needed of the 6x12 plates. It turns out to be too expensive for my taste, so I will either finish with the paint or use the copper tape and emboss my own patterns. For this I will need to build some sort of jig. I will probably use the one that is recommended in the Brig Syren. More to come...

View attachment 479629
Jack...I built one of these jigs for my Syren project. It worked great! However it is slow and laborious. I used copper tape with the adhesive backing. Peeling away the cut, finished, and embossed pieces was the most difficult part. The copper look initially is very shiny. Two years later it has dulled and tarnished in appearance and still sticking to the hull. I was happy with the results.
 
Welcome aboard my build log of the USS Constition. I welcome comments and glad to have you on board.
It is the hardest build I have ever done. I would even call this a scratch build because of the amount of construction that there is to do.

I know that there are several build logs of the Constitution and I had planned to only start mine when I was putting on the sails, but I decided I would start now. I will post pics when I finish the sanding stage of the hull. There really isn't much to see right now.

As I am close to finish the planking of the hull, I am thinking forward about the following:
(i) What color to paint the deck
(ii) Whether I should copper the hull with copper metallic paint or add copper tape.

The pictures that I have seen of the deck show a sort of greyish color.
I really like the color of the deck furnishing. I am going to call that a caramel color.
No rivets in my boat and no trunnels. As someone put it the Constitution is a bit of a Jackolope because it has gone through so many transformations over the years. Therefore I plan on doing some kit bashing too, well as much as my abilities allow me to do.


View attachment 479495
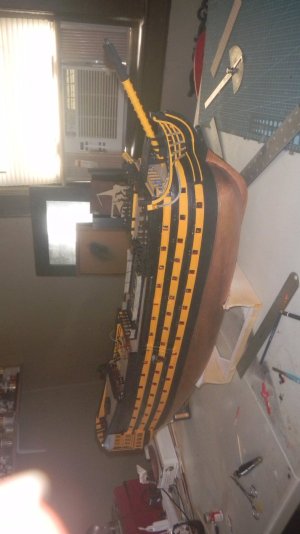
Mine, Mamoli, came with green wood tiles, I just dry brushed some copper over those. As has been said, at a distance, can you really tell? And for Victory, I put aside the tiles I bought, & went with tape, for time's sake.

thumbnail_imageh.jpg

DSCN0772.JPG
 
Mine, Mamoli, came with green wood tiles, I just dry brushed some copper over those. As has been said, at a distance, can you really tell? And for Victory, I put aside the tiles I bought, & went with tape, for time's sake.

View attachment 480311

View attachment 480312

Enjay49, I think your green/copper hull on the Constitution looks incredibly realistic, one of the best I've seen. Very convincing!
 
Back
Top