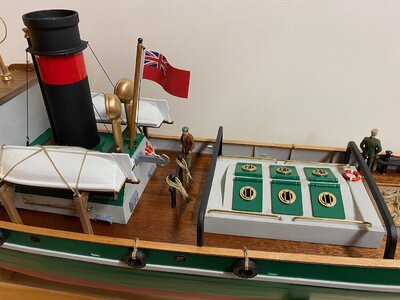
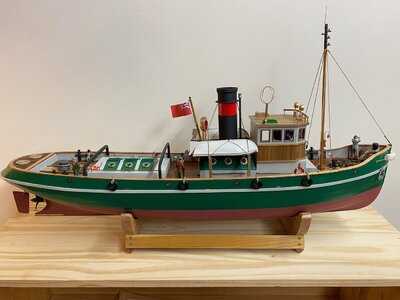
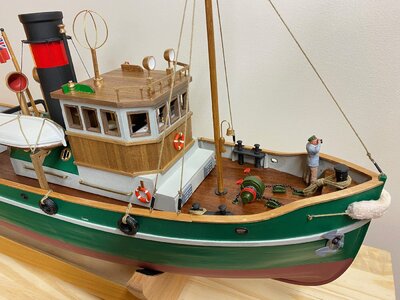
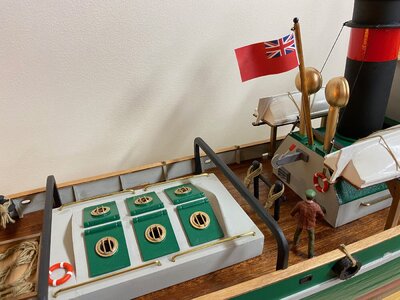
My take on the OcCre Ulises tugboat

Joined
Aug 16, 2020
Messages
65
Points
88

Location
Haslett, Michigan
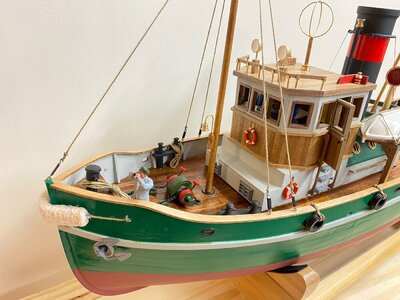
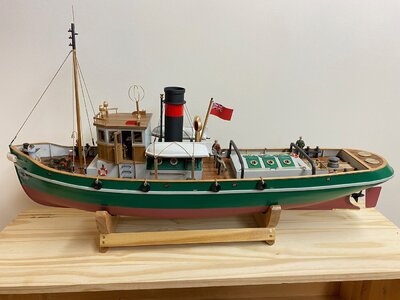
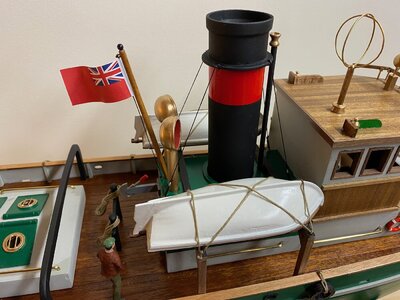
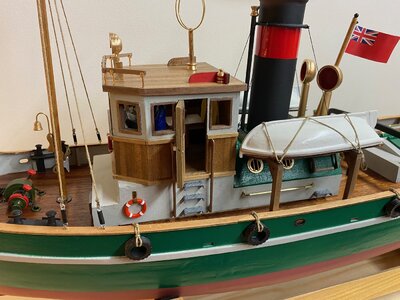
I recently completed the Ulises after working on it throughout the COVID fall-winter-spring of 2020-21. I thought all in all the kit was excellent. But I made some minor revisions as follows:
1. During planking of the hull I used nails on only a few critical places. Otherwise the planks were attached with medium cyanacrylate (CA) glue. Worked fine.
2. I used epoxy resin to waterproof the interior of the hull and epoxy plus 2.3 oz fiberglass cloth on the exterior. I wanted the strength of fiberglass plus the waterproofing.
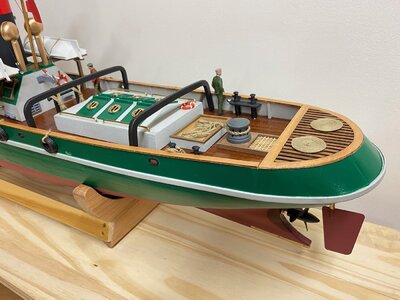
3. I did not to replicate the recommended color scheme. Most everyone seems to want to do that, but I wanted something different. I chose Model Master green gloss and light gull gray and Mission Models anti-fouling red for the lower hull, all applied with an air brush.
4. My major problem with the kit was the cheap-looking funnel. It looked the like the core of a roll of toilet paper. I found a plastic drain extension at the local hardware store and used it instead.
5. I eliminated the frilly rope rail at the bow. This is a working tug and I think it looked silly.
6. I ordered a set of 6 seamen from Shapeways.com and painted them with Model Master enamels and acrylics. I did not want my tug to be a "ghost boat" with no crew.
7. I do not like the name Ulises. So the nameplate (not yet attached) has not been affixed. My wife suggested the name "Pandemic" because that's when the boat was built. I will use it.
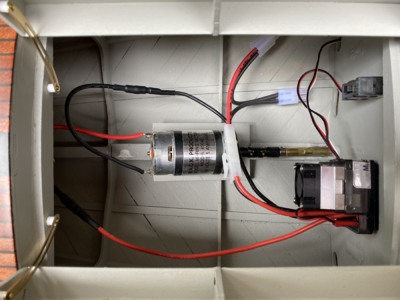
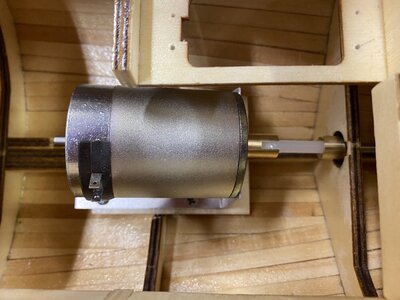
8. Lastly, to add a bit of realism to the boat on the water I bought a smoke generation system from HarborModels.com. I am currently installing it in the forward part of the hull.

I have not yet had the boat on the water. But once I get the smoke generation system installed it will be good to go! I will add some photos when the tug sails.
IMG_0493.jpegIMG_0494.jpegIMG_0496.jpegIMG_0512.jpegIMG_0513.jpegIMG_0514.jpegIMG_0516.jpegIMG_0518.jpegIMG_0519.jpeg
6
 
Last edited:
Sometimes you have to learn the hard way. I used Mission Models anti-fouling red paint of the lower hull of this boat. I had not used this brand of paint before. WARNING: DRY PAINT FROM THIS COMPANY IS NOT WATER PROOF EVEN THOUGH IT CLAIMS TO BE "PERMANENT." When I put the tug in the water for the first time the paint immediately began to soften and it came off on my hands when I lifted the boat from the water. What a mess. I had to completely strip the lower hull and start painting it over. The lesson learned: only use paints that you KNOW are waterproof. I will use Rust-Oleum spray can enamel that I have used before when I repaint the hull.
 
Sometimes you have to learn the hard way. I used Mission Models anti-fouling red paint of the lower hull of this boat. I had not used this brand of paint before. WARNING: DRY PAINT FROM THIS COMPANY IS NOT WATER PROOF EVEN THOUGH IT CLAIMS TO BE "PERMANENT." When I put the tug in the water for the first time the paint immediately began to soften and it came off on my hands when I lifted the boat from the water. What a mess. I had to completely strip the lower hull and start painting it over. The lesson learned: only use paints that you KNOW are waterproof. I will use Rust-Oleum spray can enamel that I have used before when I repaint the hull.
Sorry to hear abou this mess - hope you can "restore" her .....
 
Excellent tutorial over this model! It made me wanting to build it. It looks beautiful on your pictures! Please show us some more pictures of the earlier building stages.

Thank you for sharing this unique expirience with us.

Christos
 
Very nice looking tug.
You did an excellent job with the paint job.
Every time I see a fellow modeler posting pictures and building logs about any kind of tugs I just drooled over them.
I like then so much I just recently bought the Mantua Anteo.
33C71AF1-80DD-4AC2-8B7C-A8F35342B20F.jpeg
 
Excellent tutorial over this model! It made me wanting to build it. It looks beautiful on your pictures! Please show us some more pictures of the earlier building stages.

Thank you for sharing this unique expirience with us.

Christos
I just completed the OcCre Ulises. Here is a pdf of my build log.
 

Attachments

  • Ulises tugboat build.pdf
    6.5 MB · Views: 346
Thank you for the fine pdf, much appreciated!

You did a great work and you edited a first class instructions set... oh yes, undoubtedly am going to try my luck on this model, though it looks not easy, in particular for someone like myself who has experience only with static models.

All the best and stay safe
Christos
 
I just completed the OcCre Ulises. Here is a pdf of my build log.
This a very good document with your building log - very interesting.
So we can really hope, that you will show us your next project directly here also in a log - please
 
I just completed the OcCre Ulises. Here is a pdf of my build log.
Thank you for the excellent build log. Ulises is only my second wood model build and I was quite nervous at how to approach the planking at the stern. Your pdf helped me through :)
 
Hi, I am about to build the Ulises and found your excellent log. This will be a great help for me. This is my first RC project and only my second boat, having recently completed the RCMP St. Roch by Billings Boats. There will be some totally new things for me such as waterproofing, choice of paints and of course setting it up for the motorizing and controls. I hope you won't mind if I occasionally ask you questions and seek out your advice!
 
Like you, Ulises is my second build and @TheDonMI's build log is excellent.

I followed his advice and fitted the prop. shaft earlier than on the Occre build instructions. I also noted that DonMi had problems getting a good rudder movement towards the end of the build.

As this was an area I had no experience in I decided to do a dry fit of the propeller, rudder, servo, motor, etc. whilst I had full below deck access. It was a good move as the prop shaft didn't line up vertically with the motor shaft and the occre prop shaft was out of spec as it did not go through the bushes or fit the universal joint on the motor shaft ( occre supplied replacements) . So doing it all early meant I had good access to adjust the prop shaft angle and no requirement to repaint - just a bit more filler.

Getting the rudder linkage right was a real pain and with the help of others on SoS and moving away from the supplied bowden cable, I think I've got something that gives pretty much full rudder movement with no slap. (Photos are on SoS if they are of any use to you - just replace the current nuts with locknuts.)

My next challenge will be the waterproofing which, like you, will be another first for me - fibreglassing.

Hope this helps
 
Having built several RC electric powered boats I think the OcCre Ulises kit is a good one. As in most kits, a few diversions from the printed instructions can serve you well. I think your decision to assemble the prop, rudder, servo etc. early was a good one. Better to get the bugs worked out early in the build than wait until the boat is nearly finished. I hope the rest of your build is successful!
 
Like you, Ulises is my second build and @TheDonMI's build log is excellent.

I followed his advice and fitted the prop. shaft earlier than on the Occre build instructions. I also noted that DonMi had problems getting a good rudder movement towards the end of the build.

As this was an area I had no experience in I decided to do a dry fit of the propeller, rudder, servo, motor, etc. whilst I had full below deck access. It was a good move as the prop shaft didn't line up vertically with the motor shaft and the occre prop shaft was out of spec as it did not go through the bushes or fit the universal joint on the motor shaft ( occre supplied replacements) . So doing it all early meant I had good access to adjust the prop shaft angle and no requirement to repaint - just a bit more filler.

Getting the rudder linkage right was a real pain and with the help of others on SoS and moving away from the supplied bowden cable, I think I've got something that gives pretty much full rudder movement with no slap. (Photos are on SoS if they are of any use to you - just replace the current nuts with locknuts.)

My next challenge will be the waterproofing which, like you, will be another first for me - fibreglassing.

Hope this helps
Hi RobFJ, Thanks for this very useful advice. I'm still just learning the lingo of the motor stuff - bowden cable, universal joint, etc.. Can you let me know what specific motor parts and pieces - controller types, motor type, propellor, etc. you bought for your boat. I'm just now looking online, and there seems to be a heck of a lot of stuff out there! There's a local hobby shop I may have to get to.. They seem to have lots of things in stock, but if I go in there for help, I want to be able to "talk the talk" a bit better.
 
Hi Carleroo,

I cheated and asked the model shop who sold me the occre kit to make up the rc kit for me (Cornwall Model Boats) :). A bowden cable (just like a mountain bike brake cable) was supplied to connect the rudder servo to the rudder arm but there was no way it was going to work (angles were too tight) so I went for push rods. Apart from that everything supplied seems fine and it all works together.

Here are the line items from CWB order so you should be able to find out more about each of them from their website. I also bought some 2mm rods and a pack of rod connectors from another model shop to replace the bowden cable.

HTH


CMBRCP15 Marine Radio Control 2.4ghz 1 £89.46 £89.46 Package Set inc Servo Batteries Charger & 15A ESC
M457RE540/1 MFA RE-540/1 3 -Pole DC Motor 1 £7.07 £7.07 Inc Mount
WBULCON30 Motor Cables with Bullet 1 £1.58 £1.58 Connector 30A
MA5000 Universal Joint - Red 1 £2.10 £2.10
MA5520 Plain Coupling Insert 3.2mm 1 £1.93 £1.93
MA5570 Plain Coupling Insert 4mm 1 £1.93 £1.93
CA107 Nipple Link (2) 1 £1.85 £1.85
 
Carleroo--I know your request was addressed to RobFJ, if I may weigh in here's what I use in my Ulises.
  • 6 volt brushless boat motor. Pretty standard and available from various manufacturers.
  • Dynamite 60A brushed waterproof electronic speed control
  • Futaba R203GF-3 3-channel S-FMSS receiver
  • Futaba T3PRKA 3-channel FHSS transmitter. Any multichannel FHSS transmitter; e.g. the type used for model airplanes, also should work.
  • Futaba S3001 ball bearing servo
  • 7.2V 3300 mAh 6C NiMH rechargeable flat battery. I always have several of these fully charged on hand.
  • The motor to prop shaft connection can be of several kinds, e.g., a "dog bone" connector or a single- or double-joint universal connector (see photos). I prefer the later although I had one fail on another boat.
  • Any equivalent component will work, depending on what is available in your area. I think a visit to your local hobby shop is a good idea.
tempImageEIYxLX.pngE2FCF4AD-39B7-47D9-8324-1310F4C67DAF_1_201_a.jpeg
Double-joint universal connector (upper photo), "dog bone" connector (lower photo)
 
Carleroo--I know your request was addressed to RobFJ, if I may weigh in here's what I use in my Ulises.
  • 6 volt brushless boat motor. Pretty standard and available from various manufacturers.
  • Dynamite 60A brushed waterproof electronic speed control
  • Futaba R203GF-3 3-channel S-FMSS receiver
  • Futaba T3PRKA 3-channel FHSS transmitter. Any multichannel FHSS transmitter; e.g. the type used for model airplanes, also should work.
  • Futaba S3001 ball bearing servo
  • 7.2V 3300 mAh 6C NiMH rechargeable flat battery. I always have several of these fully charged on hand.
  • The motor to prop shaft connection can be of several kinds, e.g., a "dog bone" connector or a single- or double-joint universal connector (see photos). I prefer the later although I had one fail on another boat.
  • Any equivalent component will work, depending on what is available in your area. I think a visit to your local hobby shop is a good idea.
View attachment 285383View attachment 285384
Double-joint universal connector (upper photo), "dog bone" connector (lower photo)
Thanks to taking the time to share this information. It's just what I need!! Did you use any of the hardware that comes with the Ulises kit, e.g. propeller, rudder, etc..?
 
I used both the rudder, prop, and drive shaft. But I had to drill out the bushings to 4.5 mm because the fit was too tight. I need to put a bit more weight aft because the prop cavitates.
 
Back
Top