
How are the bushings and the propeller shaft related? The bushing, I gather from your log photo is a tube. Does one fit inside the other? I've been looking at your log photos, and the metal tube that protrudes from the hull at the stern - is that the bushing or the propeller shaft tube? Sorry to be so ignorant...I used both the rudder, prop, and drive shaft. But I had to drill out the bushings to 4.5 mm because the fit was too tight. I need to put a bit more weight aft because the prop cavitates.

-

SUBSCRIBE TO SHIPS IN SCALE TODAY!
The beloved Ships in Scale Magazine is back and charting a new course for 2026!
Discover new skills, new techniques, and new inspirations in every issue.
NOTE THAT OUR NEXT ISSUE WILL BE MARCH/APRIL 2026 -

Win a Free Custom Engraved Brass Coin!!!
As a way to introduce our brass coins to the community, we will raffle off a free coin during the month of August. Follow link ABOVE for instructions for entering.
You are using an out of date browser. It may not display this or other websites correctly.
You should upgrade or use an alternative browser.
You should upgrade or use an alternative browser.
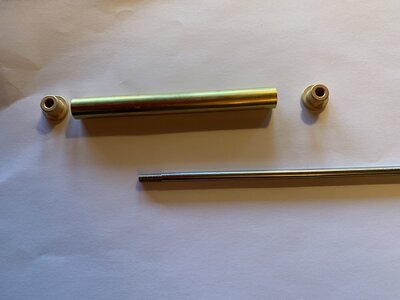
Ignore my last question. I think I figured it out. The propeller shaft runs through the tube and the bushings are the caps at the end of the tube to hold the shaft in place? Is that correct. If that's the case, the bushings don't seem to fit easily into the tube. Is this where you had to hammer them in?How are the bushings and the propeller shaft related? The bushing, I gather from your log photo is a tube. Does one fit inside the other? I've been looking at your log photos, and the metal tube that protrudes from the hull at the stern - is that the bushing or the propeller shaft tube? Sorry to be so ignorant...
Attachments

Ignore my last question - later on in this thread. I think I figured it out -what the bushing is and how it related to the tube . The propeller shaft runs through the tube and the bushings are the caps at the end of the tube to hold the shaft in place? Is that correct. If that's the case, the bushings don't seem to fit easily into the tube. Is this where you had to hammer them in?Ask questions and seek advice anytime you want. I'd be happy to help. Good luck with the Ulises build. It is a nice kit!
Attachments
Given the challenges of fitting the various placing and pieces of the motor and shaft after the hull is constructed, I'm thinking that I will maybe do some of the holes and connections (tube, bushings) before assembling the bulwarks, except maybe the bulwark at the stern that has the hole through which the shaft connects. Any thoughts - RobFJ and TheDonMI?

How did your trip to the hobby store turn out?
Hi Don, The trip went well. I was lucky to spend over 2 hours with the "boat guy". He helped me understand how everything was connected, pick out various parts - your list was helpful - and he gave me some suggestions around placing the various components plus a tutorial and demonstration of how to use the controller. I did have to replace the drive shaft, tube and bushings, since in my attempt to previously drill open up the bushing holes to make them a bit wider, I went too far and created too large a gap. But I now have the battery, motor, Futaba controller, servo, etc.. I am going back to the shop tomorrow to pick up a new propeller, since the new prop shaft requires the fitting of a different propeller.
I will wait until I get all the parts and plan their location and placement before I start building the hull. So in the meantime I have been building some of the other components including the lifeboats, wheelhouse and various other deck fittings.
Thanks for your help and I will be asking you more questions as I proceed. Cheers,
Carl
Carl--Great to hear that your trip to the Hobby store went well. Good luck with the rest of your build and keep me/us in the loop. Don
Will do! Thanks!! BTW, what are you working on?Carl--Great to hear that your trip to the Hobby store went well. Good luck with the rest of your build and keep me/us in the loop. Don
I am currently about halfway through the build of the Dumas Myrtle Corey paddlewheel towboat. It is a challenging model in several ways, but I am making steady progress. I have posted a build log on this site if you want to check it out.
I also have an OcCre Polaris schooner on the shelf, although I haven't started it yet. I have never built a sailing ship, so I elected to start small. I have been through the tutorial videos that OcCre posts on their web site so I know what I am in for. The rigging of the sails will be something I have not tackled before.
Don
I'll check out your build log.I am currently about halfway through the build of the Dumas Myrtle Corey paddlewheel towboat. It is a challenging model in several ways, but I am making steady progress. I have posted a build log on this site if you want to check it out.
I also have an OcCre Polaris schooner on the shelf, although I haven't started it yet. I have never built a sailing ship, so I elected to start small. I have been through the tutorial videos that OcCre posts on their web site so I know what I am in for. The rigging of the sails will be something I have not tackled before.
Don
I love sailing ships, and I have built a number in the past. By "past" I mean almost 40 years ago! I would love to make a sailing ship, but the rigging can be a challenge, especially for the full-rigged ships with a lot of ratlines, deadeyes, etc.. For me, the particular issue is that I have a slight benign tremor in my hands which makes it difficult to manage very fine knots, etc.. I have no trouble with dealing with small parts, but because much of the assembly is on a work surface I can often brace my hand on the worktable. But with the rigging, it often requires a free hand, so I have tended to avoid the more complex ships. I did make the RCMP St. Roch, because it had a minimum of rigging, but even then I kept flubbing things. But a glass or two of red wine helps, as long as it's just a glass or two.
")
Hi Don (and any others reading this..) I think I have sorted out all the RC stuff. I even created a "dry installation" before adding the hull planks and everything seems to work OK. I am now in the process of planking the hull. I know I have to waterproof it. I understand that I add a coat of epoxy resin to the inside, and also epoxy resin and fiberglass to the outside once I have sanded it and filled in the cracks. Do you have any tips or sources for help on how to properly prepare the hull? All I know is that I apply the fiberglass sheeting, then paint over it with epoxy resin??
I suppose everyone has their own take on fiberglassing. Here is mine.
1.Right out of the bottles epoxy resin is too thick. So I dilute it about 6:1 with ethanol or xylene. I use West System epoxy (available at a local marine store), but I would also use their pumps to get the right proportion of resin and hardener. I have also used Zap Z-Poxy that I bought online, which is mixed 1:1 resin and hardener. Make sure the resin-hardener-ethanol/xylene are well mixed. You should have plenty of time to work with the epoxy before it sets up.
2. Drape the fiberglass cloth over the hull, making sure there is plenty of overhang. Then brush the mixed resin over the cloth, making sure that the cloth is thoroughly soaked and free of wrinkles. This step may take a while. But avoid a thick coat of resin because it will run like crazy. This is the tricky part. You can treat a half inch or so of the overhang with resin, which makes it easy to trim later. You can patch in cloth/resin in difficult spots, because after trimming, sanding, and additional coats of resin the seams will disappear. I use a cheap throwaway brush or an old one I can part with.
3. When the resin is well set after a day trim the overhang with a heavy scissors and coarse grit sandpaper.The sandpaper cuts through the hardened resin very nicely. Then lightly wet sand the hull. Be sure you don't sand through the cloth! Make sure any seams and runs are sanded down. In Ulises I installed the keel after this step.
4. Apply additional coats of resin to get a smooth surface. I have used two additional coats or until the weave of the cloth disappers. l learned the hard way to wait about 15 minutes or so after the hull is completely treated (just before the resin begins to harden) to brush out the whole hull again to eliminate pockmarks and runs, which inevitably begin to form.
5. Wet sand between coats with 220 grit to get a smooth surface, again avoiding sanding through the underlying cloth.
6. IF everything goes well you should end with a nice, smooth waterproof hull that is ready for priming and painting. That "IF" is a big one! It took me several iterations of fiberglassing before I developed a technique that I was satisfied with.
GOOD LUCK!
The hull after fiberglass cloth has been treated with resin and set. Note the overhang that was cut off and trimmed with sandpaper.The keel was attached with epoxy adhesive after this step. The brown streaks are wood filler applied before fiberglassing.
Last edited:


The fleece I use is fiberglass and can be cut with scissors or torn by hand. It is only 0,14 mm thick and is immediately inserted into the first epoxy coating and again thinly overcoated with epoxy.

Thicker fiberglass is used for recreational boat repairs. Sanding is only done with respiratory prtection. If you sand in your workshop then please only by hand and with repiratory protection and always clean everything from the white sanding dust.
Best regards
Thomas
Good point Thomas about toxic epoxy sanding dust. That's why I always use wet sanding with epoxy resin, which eliminates the toxic dust. But only use sandpaper made for wet sanding.
THANKS!! This is exactly what I was looking for. Regards, Carl
This is how your hull should look after the third coat of epoxy resin and before the final wet sanding. Then it will be ready to prime and paint.

Thanks. Maybe a stupid question: For wet sanding, tI presume I dampen the paper designed for wet sanding? Or di I wet the hull surface?
I wet the paper, throroughly. But as sanding dust accumulates on the paper I have to frequently rinse it clean. So have a dish of water handy. When the hull is sanded to the smoothness you want make sure to rinse it clean with a damp cloth or paper towel.
- Joined
- Oct 17, 2020
- Messages
- 1,759
- Points
- 488

Good evening try to put some laundry soap on top of the paper after wet, see how the surface is smoothedI wet the paper, throroughly. But as sanding dust accumulates on the paper I have to frequently rinse it clean. So have a dish of water handy. When the hull is sanded to the smoothness you want make sure to rinse it clean with a damp cloth or paper towel.
Another question: did you mask the bulwarks (blue masking tape) before the process of fiberglassing and adding the epoxy? 