Yes the cap rail just needs to be aligned properly, and I didn’t paint the bottom of the cap knowing that side wouldn’t show anyway, but it was pre-shaped so good to go. So I’ll just need to scour off some paint on the dirt itself where the cap will sit. Thanks!Scrape off the paint. it will be covered anyway.
Is it the shape you need it to be before you install it?
-

Win a Free Custom Engraved Brass Coin!!!
As a way to introduce our brass coins to the community, we will raffle off a free coin during the month of August. Follow link ABOVE for instructions for entering.
You are using an out of date browser. It may not display this or other websites correctly.
You should upgrade or use an alternative browser.
You should upgrade or use an alternative browser.
Newbie mistake - Lowell Grand Banks Dory
- Thread starter Don Graves
- Start date
- Watchers 15
That’s an interesting alternative. Thank you for the suggestion.You could try pinning it using short pieces of brass wire and kept in place with a medium super glue followed with an accelerator. Work from one end to the other.
That’s the part that scares me since I have 2 layers of paint there and I know tolerances are tight. Lesson learned about reading further ahead in the instructions. Had I been thinking clearly, I would have not painted the top edge of the hull that would be covered anyway by the cap. Ah well…yet another lesson learned!I would scrape off what you can. Sand lightly and use medium setting CA
Cheers mates. After a painful evening of scraping I got the cap rail in place. Thanks! All that is left are the becketts and thole pins and I’m done. Unfortunately I wasn’t given a dowel rod for the pins….i was given extremely fragile square stock. Not sure I can sand it to shape but I’ll try. If not, then toothpicks it is! (unless Hobby Lobby has some dowels that will work. I think it’s 3/64 or something.)
Photos for progress! So excited for my first project nearing completion!
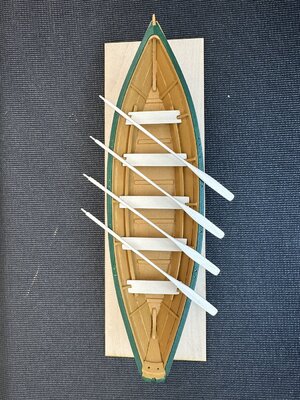
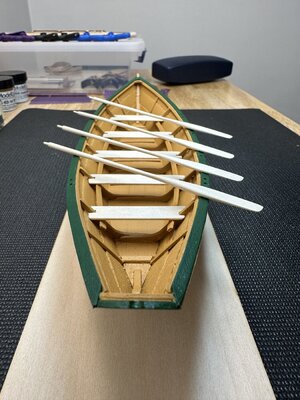
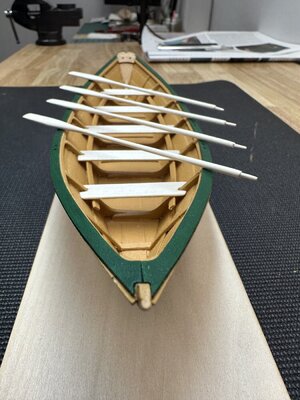
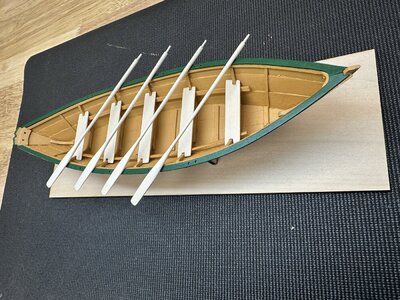
Photos for progress! So excited for my first project nearing completion!


If you are concerned about their strength, you can get some brass rod.Cheers mates. After a painful evening of scraping I got the cap rail in place. Thanks! All that is left are the becketts and thole pins and I’m done. Unfortunately I wasn’t given a dowel rod for the pins….i was given extremely fragile square stock. Not sure I can sand it to shape but I’ll try. If not, then toothpicks it is! (unless Hobby Lobby has some dowels that will work. I think it’s 3/64 or something.)
Photos for progress! So excited for my first project nearing completion!
View attachment 408546View attachment 408547View attachment 408548View attachment 408549
Your Dory looks wonderful!
Thank you for the idea!If you are concerned about their strength, you can get some brass rod.
Thank you! Been nervous working through this but definitely a confidence booster successfully completing the first build. Hoping to complete the final touches by the weekend and call it done.Very nicely done!! I used toothpicks on the one I did, yours is much better than mine..
Thank you! Lots of help from folks here in the forums.Your Dory looks wonderful!
Thole pins done. Just took my time with some 400 grit sandpaper and rounded off the square stock that I was given. Now for the becketts which I just can’t seem to figure out how to get the larger rope that was provided into the smaller holes. Hopefully I don’t need to drill them out a little larger. Open for tips here. Tried taping the rope ends to pass through. No luck. Tried glue to stiffen…nope.
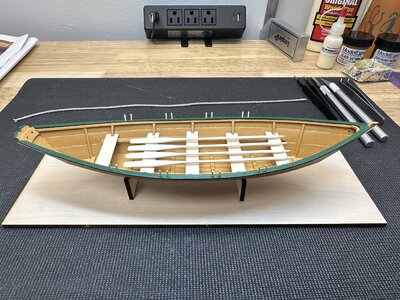
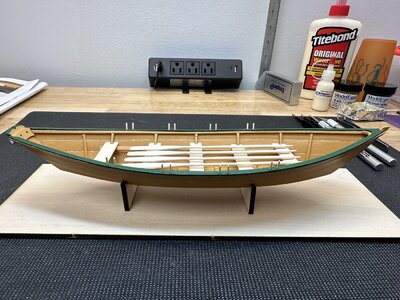


My wife works with a woman named Dory, she doesn't look half as good as your dory..
Is the supplied rope close to scale? Maybe go to a slightly smaller rope? CA glue the tips then trim at an angle with a knife. Don't use too much glue as it may wick up the rope.Thole pins done. Just took my time with some 400 grit sandpaper and rounded off the square stock that I was given. Now for the becketts which I just can’t seem to figure out how to get the larger rope that was provided into the smaller holes. Hopefully I don’t need to drill them out a little larger. Open for tips here. Tried taping the rope ends to pass through. No luck. Tried glue to stiffen…nope.
View attachment 408839View attachment 408840
Half mm bigger drill bit, then if necessary, a half mm smaller rope. You won't over-shoot your scale with these steps 
I’m not entirely convinced the rope is to scale but maybe? I think it’s a bit too lose of a blend of 3 strands and seems very thick as a result. It’s nice stuff, but definitely won’t fit through the holes even when I twist it tight.Is the supplied rope close to scale? Maybe go to a slightly smaller rope? CA glue the tips then trim at an angle with a knife. Don't use too much glue as it may wick up the rope.
I do have CA glue but I’m not comfortable using it yet. Perhaps I’ll give it a try.
Thanks for the tip! I’ll have to tuck that nugget of info away for the future.Half mm bigger drill bit, then if necessary, a half mm smaller rope. You won't over-shoot your scale with these steps
I made the holes a little bigger, twisted and glued the ends of the rope. When the rope dried I cut the end at a bias pushed it through then grabbed the other end with a tweezers. You can use a pair of hemostats if you have them also. Remember you only have to do one end this way, just thread it twice.
Thank you. I’m probably going to go this route unless I magically find smaller diameter rope nearby (but none of the hobby shops here carry that stuff so…).I made the holes a little bigger, twisted and glued the ends of the rope. When the rope dried I cut the end at a bias pushed it through then grabbed the other end with a tweezers. You can use a pair of hemostats if you have them also. Remember you only have to do one end this way, just thread it twice.
I would try Michael's or hobby lobby for small diameter thread or roping. Try their jewelry making and sewing section. Beware you will probably come out with many more items especially tools!Thank you. I’m probably going to go this route unless I magically find smaller diameter rope nearby (but none of the hobby shops here carry that stuff so…).
Thanks for the heads up! Maybe I’ll swing by Hobby Lobby today if I get this other stuff done. I wanted to look for a display case anyway.I would try Michael's or hobby lobby for small diameter thread or roping. Try their jewelry making and sewing section. Beware you will probably come out with many more items especially tools!


