• LUCZORAMA SHIPWRECK SCAVENGER HUNT GIVEAWAY. 4 Weeks of Fun • 1 Legendary Prize ((OcCre’s Fram Ship)) • Global Crew Welcome!
    **VIEW THREAD HERE**

NHI Kolibri N-3, scale 1:48, scratch build

I guess I still owe you all an explanation on the registrations on my hummingbird.
On the LH OBD tank the registration is PH-DMS, PH is used for all things flying and registered in the Netherlands. DMS are my father's initials: Dirk Marten Swart. On the RH OBD tank the registration is PH-IDB, where IDB are my Admiral's initials: Isabella de Bruin. My father's initials since he was part of the design team and my Admiral's initials because a) she's the love of my life and b) she allows me to spend an inordinate amount of time in my hangar.
Before anyone start I can't have two registrations for the same aircraft; I invoke AL-FI rights on this one...
I can only copy with great respect what you wrote in my Balder-log:
“An hommage to people close to your heart; this alone elevates this build to another level.”❤️
And Al-FI is here fully allowed.
Regards, Peter
 
Last edited:
Your feedback was the final trigger for me to move away from the dark blue...

Thanks Paul!

High praise coming from you: highly appreciated.

This first strap is exactly what I'm aiming for and it's another acquired handicraft: never too old to learn something new...

It sure is an interesting project: not nearly enough information to build it. Regardless, it's a real fun project.

That's exactly where I copied this technique from


I guess I still owe you all an explanation on the registrations on my hummingbird.
On the LH OBD tank the registration is PH-DMS, PH is used for all things flying and registered in the Netherlands. DMS are my father's initials: Dirk Marten Swart. On the RH OBD tank the registration is PH-IDB, where IDB are my Admiral's initials: Isabella de Bruin. My father's initials since he was part of the design team and my Admiral's initials because a) she's the love of my life and b) she allows me to spend an inordinate amount of time in my hangar.
Before anyone start I can't have two registrations for the same aircraft; I invoke AL-FI rights on this one...
You know what I always say…it’s your model and your choice. When it’s done, you will see it daily for years to come…we won’t. ;) So satisfy Johan first…or maybe the admiral first and Johan second! ROTF
 
After fiddling around with making seatbelts and adding those to the seats, I could proclaim succes on the seats and I was able to install the seats at their appropriate position on the model.
As mentioned before, I used masking tape for the belts and hand formed fittings for the various hardware parts.
The belts themselves were finished in an olive like color and the fittings were made from brass wire and were hand formed. No finish has been applied to the brass hardware.

After completion of te seats they were attached to the airframe.
The RH seat sits more outboard than the LH seat, this is because the collective control on the RH side sits between the torsion box and the seat, on the LH side it's not an issue; the collective sits outboard of the seat. (The collective is always controlled by the pilot's left hand and the cyclic always by the pilot's right hand.)

With still some minor details to tend to, I now have to really start to worry about the details of the rotor head and the tail rotor.
While I do have a general idea of what I want, there are quite some details to be addressed, TBC.

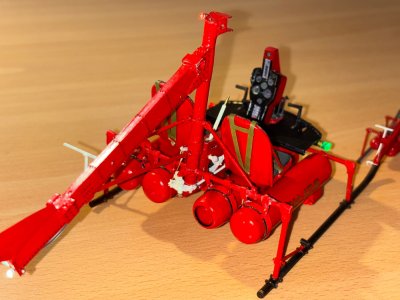
View looking forward, showing the the orientation of the harnesses, lights are switched on for the picture:
IMG_1133.jpeg

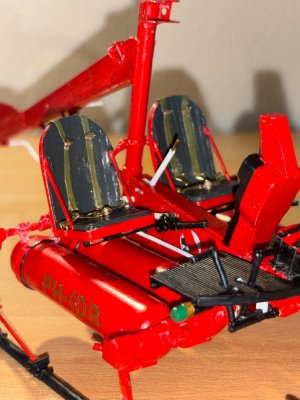
View looking aft on the captain's seat, the collectieve can be clearly seen between the torsion box and the seat:
IMG_1132.jpeg

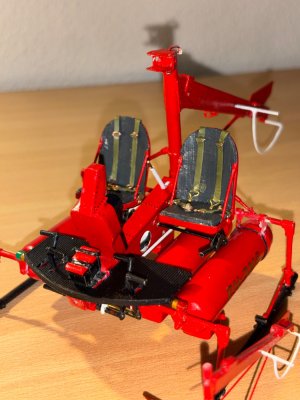
View looking aft, with the LH seat in sight, as well as the collective, left of the seat:
IMG_1131.jpeg
 
After fiddling around with making seatbelts and adding those to the seats, I could proclaim succes on the seats and I was able to install the seats at their appropriate position on the model.
As mentioned before, I used masking tape for the belts and hand formed fittings for the various hardware parts.
The belts themselves were finished in an olive like color and the fittings were made from brass wire and were hand formed. No finish has been applied to the brass hardware.

After completion of te seats they were attached to the airframe.
The RH seat sits more outboard than the LH seat, this is because the collective control on the RH side sits between the torsion box and the seat, on the LH side it's not an issue; the collective sits outboard of the seat. (The collective is always controlled by the pilot's left hand and the cyclic always by the pilot's right hand.)

With still some minor details to tend to, I now have to really start to worry about the details of the rotor head and the tail rotor.
While I do have a general idea of what I want, there are quite some details to be addressed, TBC.

View looking forward, showing the the orientation of the harnesses, lights are switched on for the picture:
View attachment 531898

View looking aft on the captain's seat, the collectieve can be clearly seen between the torsion box and the seat:
View attachment 531899

View looking aft, with the LH seat in sight, as well as the collective, left of the seat:
View attachment 531900
Just wonderful modeling! Aren't you happy you increased the scale!?!
 
After fiddling around with making seatbelts and adding those to the seats, I could proclaim succes on the seats and I was able to install the seats at their appropriate position on the model.
As mentioned before, I used masking tape for the belts and hand formed fittings for the various hardware parts.
The belts themselves were finished in an olive like color and the fittings were made from brass wire and were hand formed. No finish has been applied to the brass hardware.

After completion of te seats they were attached to the airframe.
The RH seat sits more outboard than the LH seat, this is because the collective control on the RH side sits between the torsion box and the seat, on the LH side it's not an issue; the collective sits outboard of the seat. (The collective is always controlled by the pilot's left hand and the cyclic always by the pilot's right hand.)

With still some minor details to tend to, I now have to really start to worry about the details of the rotor head and the tail rotor.
While I do have a general idea of what I want, there are quite some details to be addressed, TBC.

View looking forward, showing the the orientation of the harnesses, lights are switched on for the picture:
View attachment 531898

View looking aft on the captain's seat, the collectieve can be clearly seen between the torsion box and the seat:
View attachment 531899

View looking aft, with the LH seat in sight, as well as the collective, left of the seat:
View attachment 531900
That’s looking great, Johan. Nicely detailed realistic view!
Regards, Peter
 
Back
Top