-

Win a Free Custom Engraved Brass Coin!!!
As a way to introduce our brass coins to the community, we will raffle off a free coin during the month of August. Follow link ABOVE for instructions for entering.
-

PRE-ORDER SHIPS IN SCALE TODAY!
The beloved Ships in Scale Magazine is back and charting a new course for 2026!
Discover new skills, new techniques, and new inspirations in every issue.
NOTE THAT OUR FIRST ISSUE WILL BE JAN/FEB 2026
You are using an out of date browser. It may not display this or other websites correctly.
You should upgrade or use an alternative browser.
You should upgrade or use an alternative browser.
Nikitin San Bartolome 1584 A.D. (Kit #35)
- Thread starter Pathfinder65
- Start date
- Watchers 85
Good morning Jan. Yep I also think the redo is going to work. Cheers GrantIt’s raining again, still?
A couple of hours spent in the shipyard filing, fitting, sanding, filing the first opening for the main deck gunport frames.
View attachment 389629
I was extremely careful with this bit, since the wall planking is DIY. But I think my “Do-Over” is going to work.
Only three more openings to go. One more on the Starboard side an two on the Port.
Jan
As I finish up the hull fairing, I wondered about the cannon port assemblies. Part 41 is intended as a back stop for one cannon port, but there are several other cannon ports with no backstop at all. What is supposed to stop the assembly from falling inside during assembly until it is glued in place? Or do I just need to be very careful at all times?! I will leave them out until the last minute, but I still see the chance for a real issue if I push one in too far! Any thoughts?
I am leaving the cannon port assemblies out until I finish sanding, filling and fixing the voids in the hull planking . I build all the assemblies and dry fitted them to their various locations on the hull before I started any planking. I numbered them as Port or Starboard and noted the numbers on the build plans. Each assembly seems to be unique to it's location, so I think they should be the last thing placed after the hull is finished and ready to be painted.As I finish up the hull fairing, I wondered about the cannon port assemblies. Part 41 is intended as a back stop for one cannon port, but there are several other cannon ports with no backstop at all. What is supposed to stop the assembly from falling inside during assembly until it is glued in place? Or do I just need to be very careful at all times?! I will leave them out until the last minute, but I still see the chance for a real issue if I push one in too far! Any thoughts?
Jan
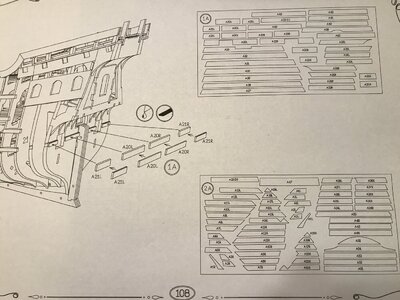
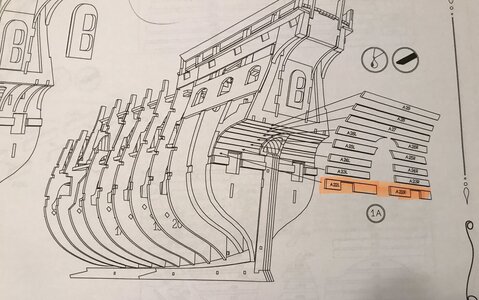
Thanks for the reply. As I move on to the stern planking, I see that I have 3 sets of 21L, 20L, 20R and 20R. Is the stern wale intended to be 3 layers thick, despite the instructions (and video) only showing 2 layers (p. 109)? I also have parts A22-2R and A22-2R with no purpose. Did you use them? Sorry to bother you, but I know that you are past this point so I wanted your opinion. Thanks for your thoughts.
Sorry to answer so late. I've been watching or maybe I should say binging on Little League World Series games. It's four games per day double elimination until the final game on Sunday. So no shipyard work has been going onThanks for the reply. As I move on to the stern planking, I see that I have 3 sets of 21L, 20L, 20R and 20R. Is the stern wale intended to be 3 layers thick, despite the instructions (and video) only showing 2 layers (p. 109)? I also have parts A22-2R and A22-2R with no purpose. Did you use them? Sorry to bother you, but I know that you are past this point so I wanted your opinion. Thanks for your thoughts.
The stern wale is two layers thick, ie. piece 21L doubled, 20L doubled, 21R doubled, 20R doubled (My Plan 108). A22R and A22L go over the top of the Gunport openings. (MyPlan 109). Those plans are in the series 106-142 sent out before the last set of plans. I don't have any placement info for A22-2R and A22-2L. I'll have to dig through my Flats tomorrow to see if they are my junk pile. I hope this helps.
Parts 20 - 21 double up for the Wale.

Parts 22L-22R placement

Jan
Thanks for the reply. Not sure why the extra parts are included, but I'll just go ahead and stick to the instructions then. I just didn't want to miss anything. Enjoy watching the games!
@Freddie, I just checked my pile of Flats, 1A and 2A still have those parts attached.Thanks for the reply. Not sure why the extra parts are included, but I'll just go ahead and stick to the instructions then. I just didn't want to miss anything. Enjoy watching the games!
Jan
So sorry, I didn't want you to go to that much trouble. I was just confused and wanted to be sure before I moved on. Thanks again!
You are very welcome , I was glad to be able to help.So sorry, I didn't want you to go to that much trouble. I was just confused and wanted to be sure before I moved on. Thanks again!
Jan
Wow, a nice surprise when I got home today after a six hour roundtrip North in heavy rain. The full sized construction plans of the SB were delivered to my mailbox. My thanks to Denis for his prompt response.
Jan
Jan
- Joined
- Nov 30, 2022
- Messages
- 132
- Points
- 113

The full size plans are beautifulWow, a nice surprise when I got home today after a six hour roundtrip North in heavy rain. The full sized construction plans of the SB were delivered to my mailbox. My thanks to Denis for his prompt response.
Jan
Indeed, much better than the PDF version on my iMac screen.The full size plans are beautiful
- Joined
- Jan 9, 2020
- Messages
- 10,566
- Points
- 938

I believe firmly that you cannot actually build a ship accurately without a full set of full-sized plans. That just makes things so much clearer and easier.Indeed, much better than the PDF version on my iMac screen.
Yup, you are absolutely right. The seven construction plans provide incredible detail.I believe firmly that you cannot actually build a ship accurately without a full set of full-sized plans. That just makes things so much clearer and easier.
Jan
- Joined
- Nov 30, 2022
- Messages
- 132
- Points
- 113

Could you send me the pdf of the tables if I give you my email?Indeed, much better than the PDF version on my iMac screen.
Yup, glad to do it, send your e-mail via PMCould you send me the pdf of the tables if I give you my email?
Jan
Check your messages.Could you send me the pdf of the tables if I give you my email?
Good morning Jan and Heinrich. This is a true story. I remember on my Victory the mast plans were not a 1:1 and the number of times I got the math wrong and had to redo was silly. Cheers GrantI believe firmly that you cannot actually build a ship accurately without a full set of full-sized plans. That just makes things so much clearer and easier.

