
Exactly what I was thinking while viewing this tread. My mom was an usherette at the Jones Beach Marine Theater back in the late fifties early sixties or so when "Showboat" was playing all summer. Andy Devine played Captain Andy. A classic American Musical with great music ( Ol Man River being the most famous song) and fond memories having seen it in bits and pieces several times over that summer.Extremely charming. An important type of boat and rarely seen here. "Ol' Man River..."

-

SUBSCRIBE TO SHIPS IN SCALE TODAY!
The beloved Ships in Scale Magazine is back and charting a new course for 2026!
Discover new skills, new techniques, and new inspirations in every issue.
NOTE THAT OUR NEXT ISSUE WILL BE July/August 2026 -

Win a Free Custom Engraved Brass Coin!!!
As a way to introduce our brass coins to the community, we will raffle off a free coin during the month of August. Follow link ABOVE for instructions for entering.
You are using an out of date browser. It may not display this or other websites correctly.
You should upgrade or use an alternative browser.
You should upgrade or use an alternative browser.
OcCre Mississippi 1:80 [Completed Build]
- Thread starter martijnonderwater
- Start date
- Watchers 11

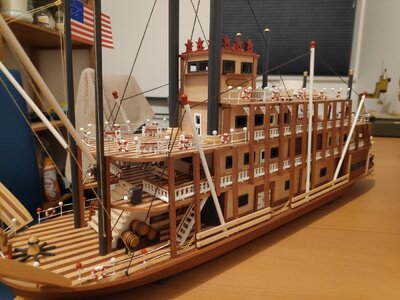
Hallo @martijnonderwaterI built the Mississippi in the autumn and winter of 2020. The interior of the model is furnished, and as such the exterior of the model can be taken apart to view the interior. I also took the opportunity to open up all my old cans of paint, so there are is a vivid mix of colors in the interior
View attachment 232117
we wish you all the BEST and a Happy Birthday

- Joined
- Jan 12, 2021
- Messages
- 255
- Points
- 168

thanks! Fortunately, there are still many years left to build ship models!

Hello, I have just started the same kit. How did you do the bottom of the hull. Did you "wrap" round the wood from the side of the hull. Thanks, roadrunnerView attachment 232149View attachment 232150View attachment 232151View attachment 232152View attachment 232153View attachment 232154View attachment 232155View attachment 232156View attachment 232157View attachment 232158View attachment 232159View attachment 232160View attachment 232161View attachment 232162View attachment 232163View attachment 232164View attachment 232165View attachment 232166View attachment 232167
Perhaps I should add here that I did not notice that the interior of the cabins was furnished, so I glued the ground-floor cabins together. Afterwards I broke them apart again. Also a warning to future builders: the bottom deck has a slight curvature in it, whereas the decks above it are straight. The walls of the cabin on the ground floor that can be taken out have to be able to 'slide' a bit, and because of the upward curvature at the bow, the space between the first two decks decreases. So make the wall that can be taken out a bit less high. It's quite annoying if you have to do this afterwards ;-)
- Joined
- Jan 12, 2021
- Messages
- 255
- Points
- 168
Hi, and welcome to the forum! Great to hear that you started the Mississippi: it really is a great ship to build. I'm not completely sure what you mean, but let me take a guessHello, I have just started the same kit. How did you do the bottom of the hull. Did you "wrap" round the wood from the side of the hull. Thanks, roadrunner
")
This image shows how I started with the hull: the two sides first, and then the bottom: https://shipsofscale.com/sosforums/attachments/img_20200723_172228_1-jpg.232143/
Following the two sides, I planked the bottom with the mahogany strips, and then continued with planking the two sides with a second layer (mahogany this time)
Does this help? If not, let me know
Also, I'd seriously consider making the 'ground floor' deck flat at the very start of the build (so before planking) . The curve adds nothing to the ship's form, and just causes annoying problems afterwards. In hindsight, I'm even wondering if I made a mistake somewhere, and that the curvature shouldn't have happened.
Thanks for the reply. I have never been good at planking on frame so any kits I have attempted have been double planked from the top to the keel. What I meant is how you planked the sides and then run the strips round the bottom of the hull without having an edge where the side and bottom planks meet. I will take your advice about the deck so I will make it level. This is a great forum and I will make use of it.
Hello again, I had a look at the links you sent me. It looks like you have planked round the edge of the hull?
Hi Martijn and 'roadrunner'.Also, I'd seriously consider making the 'ground floor' deck flat at the very start of the build (so before planking) . The curve adds nothing to the ship's form, and just causes annoying problems afterwards. In hindsight, I'm even wondering if I made a mistake somewhere, and that the curvature shouldn't have happened.
Sorry for this post of mine, to interrupt your discussion. But the paddle steamer's decks has a lengthwise curve, the sheer, for a reason.
They are large flat-bottomed boats that will deform due to the weight and place of their steam engine and paddle-wheel, if nothing is done about it.
It is not for nothing that 'braces and chains' have been placed on your model:
This drawings from Alan Bates "The Western Rivers Steamboat Cyclopedeum" may clarify this:

The curve of the decks, together with the 'Braces&Chains' ensure that the hull retains its shape. For a model in itself it does not matter, but (almost) every ship has a sheer for a reason.
Regards, Peter
Depending on the ship, we often start from the top and work down about 5-7 planks without tapering. Then lay the plank along the keel as straight as possible. I have to taper the ones in between. I rarely make them less than half the width of the plank toward the stem. I don’t usually have to taper toward the stern. In fact, I have to add stealers to make them wider. Kurt @DARIVS ARCHITECTVS shows how he does it in his build of the Sovereign of the Seas. I hope that addresses your question.Thanks for the reply. I have never been good at planking on frame so any kits I have attempted have been double planked from the top to the keel. What I meant is how you planked the sides and then run the strips round the bottom of the hull without having an edge where the side and bottom planks meet. I will take your advice about the deck so I will make it level. This is a great forum and I will make use of it.
- Joined
- Jan 12, 2021
- Messages
- 255
- Points
- 168
See, that's why I love this forum: I keep learning new stuff! Thanks Peter!Hi Martijn and 'roadrunner'.
Sorry for this post of mine, to interrupt your discussion. But the paddle steamer's decks has a lengthwise curve, the sheer, for a reason.
They are large flat-bottomed boats that will deform due to the weight and place of their steam engine and paddle-wheel, if nothing is done about it.
It is not for nothing that 'braces and chains' have been placed on your model:
This drawings from Alan Bates "The Western Rivers Steamboat Cyclopedeum" may clarify this:
View attachment 348918
The curve of the decks, together with the 'Braces&Chains' ensure that the hull retains its shape. For a model in itself it does not matter, but (almost) every ship has a sheer for a reason.
Regards, Peter
Thanks to both of you for the advice. Will I level the deck or have it with the sheer?
Below is a short tutorial on drop planks and attached is a beginners guide to planking. Below, I have never seen drop planks done this way before, where two drop planks are adjacent to one another.
How to do a Bluff Bow Planking Job. It has long been noted that planking the bluff bow of ships such as Endeavour and Bounty is quite a difficult job. The shape of the hull makes the planks want to sweep up severely, and presents problems to builders as they attempt to stop the planks ending in sharp points. Here's a good example of full size practice for this type of ship.

Note the multitude of dropped planks to allow the lower planks to sweep up without having to narrow down to a point.
The wales are single solid timbers, and mark a definite upper edge to the run of the planks. The planks immediately below the wales are hooked to allow the plank behind to end at a half width. Notice also the interesting shape of the third plank (blue dot). This type of plank may require wider strips than what are normally supplied in a kit.

In this area four strakes are completely dropped to make room for the lower planks. Again the planks left are hooked to make a blunt half width termination.
It has also been noted by an experienced member of the board that the Garboard strake has been allowed to creep up the stem, and if this had been kept a little lower they may not have needed as many dropped planks.

The typical stealer and drop planks are as follows:

How to do a Bluff Bow Planking Job. It has long been noted that planking the bluff bow of ships such as Endeavour and Bounty is quite a difficult job. The shape of the hull makes the planks want to sweep up severely, and presents problems to builders as they attempt to stop the planks ending in sharp points. Here's a good example of full size practice for this type of ship.
Note the multitude of dropped planks to allow the lower planks to sweep up without having to narrow down to a point.
The wales are single solid timbers, and mark a definite upper edge to the run of the planks. The planks immediately below the wales are hooked to allow the plank behind to end at a half width. Notice also the interesting shape of the third plank (blue dot). This type of plank may require wider strips than what are normally supplied in a kit.
In this area four strakes are completely dropped to make room for the lower planks. Again the planks left are hooked to make a blunt half width termination.
It has also been noted by an experienced member of the board that the Garboard strake has been allowed to creep up the stem, and if this had been kept a little lower they may not have needed as many dropped planks.
The typical stealer and drop planks are as follows:
Attachments
- Joined
- Jan 12, 2021
- Messages
- 255
- Points
- 168
ah, I'd keep the sheer in that case. Now that you know it up front, you can probably deal with it as you go.Thanks to both of you for the advice. Will I level the deck or have it with the sheer?
Also, I tried taking a better picture to show how I planked the hull, but it's rather difficult to do. The edge that is the boundary between the mahogany strips on the side, and the mahogany strips on the bottom, is only visible when photographing the underside of the ship. Also, it is tiny because the strips are thin. But, if you plank the sides after you do the underside, then the boundary edge is invisible on the final model. Hope this helps!
- Joined
- Jan 12, 2021
- Messages
- 255
- Points
- 168
excellent advice! One of the items on my to-learn list, is to create more realistic planking of a hull. My planking has sharp points everywhere. It looks nice though, because the planking accentuates the curvature of the ship. But well, after having done that a few times, I'd like to try something differentBelow is a short tutorial on drop planks and attached is a beginners guide to planking. Below, I have never seen drop planks done this way before, where two drop planks are adjacent to one another.
How to do a Bluff Bow Planking Job. It has long been noted that planking the bluff bow of ships such as Endeavour and Bounty is quite a difficult job. The shape of the hull makes the planks want to sweep up severely, and presents problems to builders as they attempt to stop the planks ending in sharp points. Here's a good example of full size practice for this type of ship.
View attachment 348975
Note the multitude of dropped planks to allow the lower planks to sweep up without having to narrow down to a point.
The wales are single solid timbers, and mark a definite upper edge to the run of the planks. The planks immediately below the wales are hooked to allow the plank behind to end at a half width. Notice also the interesting shape of the third plank (blue dot). This type of plank may require wider strips than what are normally supplied in a kit.
View attachment 348976
In this area four strakes are completely dropped to make room for the lower planks. Again the planks left are hooked to make a blunt half width termination.
It has also been noted by an experienced member of the board that the Garboard strake has been allowed to creep up the stem, and if this had been kept a little lower they may not have needed as many dropped planks.
View attachment 348977
The typical stealer and drop planks are as follows:
View attachment 348978
Don't worry about the mistakes you make on the first model because the next one will be much better!excellent advice! One of the items on my to-learn list, is to create more realistic planking of a hull. My planking has sharp points everywhere. It looks nice though, because the planking accentuates the curvature of the ship. But well, after having done that a few times, I'd like to try something different
Thanks for this info.Below is a short tutorial on drop planks and attached is a beginners guide to planking. Below, I have never seen drop planks done this way before, where two drop planks are adjacent to one another.
How to do a Bluff Bow Planking Job. It has long been noted that planking the bluff bow of ships such as Endeavour and Bounty is quite a difficult job. The shape of the hull makes the planks want to sweep up severely, and presents problems to builders as they attempt to stop the planks ending in sharp points. Here's a good example of full size practice for this type of ship.
View attachment 348975
Note the multitude of dropped planks to allow the lower planks to sweep up without having to narrow down to a point.
The wales are single solid timbers, and mark a definite upper edge to the run of the planks. The planks immediately below the wales are hooked to allow the plank behind to end at a half width. Notice also the interesting shape of the third plank (blue dot). This type of plank may require wider strips than what are normally supplied in a kit.
View attachment 348976
In this area four strakes are completely dropped to make room for the lower planks. Again the planks left are hooked to make a blunt half width termination.
It has also been noted by an experienced member of the board that the Garboard strake has been allowed to creep up the stem, and if this had been kept a little lower they may not have needed as many dropped planks.
View attachment 348977
The typical stealer and drop planks are as follows:
View attachment 348978
Thanks again for the help. I now understand how to plank the hull and I will keep the sheerah, I'd keep the sheer in that case. Now that you know it up front, you can probably deal with it as you go.
Also, I tried taking a better picture to show how I planked the hull, but it's rather difficult to do. The edge that is the boundary between the mahogany strips on the side, and the mahogany strips on the bottom, is only visible when photographing the underside of the ship. Also, it is tiny because the strips are thin. But, if you plank the sides after you do the underside, then the boundary edge is invisible on the final model. Hope this helps!
- Joined
- Jan 12, 2021
- Messages
- 255
- Points
- 168
agreed! I'm at ship nr 9 now, I think, and I keep experimenting and making mistakes. That's the best way to improve and learn at something you enjoy.Don't worry about the mistakes you make on the first model because the next one will be much better!
- Joined
- Jan 12, 2021
- Messages
- 255
- Points
- 168
(for the Dutch people on this forum: I'm selling the model, so if you're interested ... let me know)
- Joined
- Jan 12, 2021
- Messages
- 255
- Points
- 168
I made a video on how to open the model. Perhaps nice for other people working on this ship.