Pavel Nikitin Oseberg #3 kit #61

Joined
Jan 23, 2018
Messages
5,076
Points
738

Location
Maine, USA
I have been lurking in the background while trying to get over a terrible cold. The last couple of weeks have been so so and I haven't done much shipyard work. I've been logging in to see the progress on the current Oseberg builds and have watched all of Pavels videos (#1 - #14) over and over. On a couple of good days I've managed to cobble together some of the bits and pieces that he demonstrates in video #1 and #2.

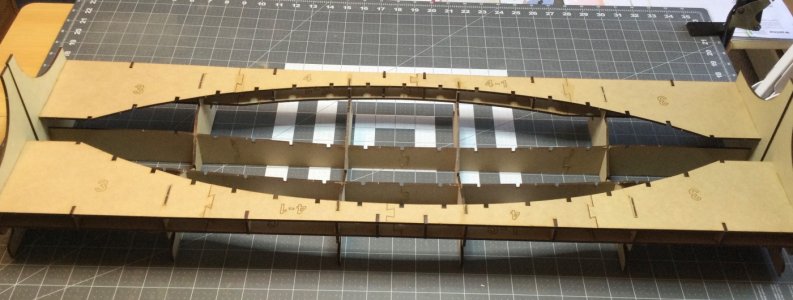
Video #1, The first jig.

A lot of wiggly, wobbly parts that fit together to make a very sturdy jig.
IMG_3471.jpeg

Video #2, The start of the backbone (I knowit's not the right technical term,but the I'm a "Novice") and the ribs.

IMG_4694.jpeg

IMG_3469.jpeg

IMG_3470.jpeg

The "Novice" question, this piece is long, needs to be glued, lined up as precisely as possible and then pegged together.
My problem is my age, dexterity (fat bumbly fingers) and glue set time. I've been using Titebond II ever since I started building ships. But in this case I think my glue would set up too fast to allow time to adjust, align and peg this piece.

So suggestions?

Jan
 
Hi Jan,

A nice project. In response to your question: why do you need to glue up all the parts of the keel at the same time? Can you just do one section at a time? I see the joints are staggered so that should help???
 
Hi Jan,

A nice project. In response to your question: why do you need to glue up all the parts of the keel at the same time? Can you just do one section at a time? I see the joints are staggered so that should help???
Unfortunately the sections of each part of the keel are all ready joined and glued. In a couple of the Oseberg builds there was some discussion on proper alignment of all the rib slots, ie. due to the removal or non removal of the Laser char. Right or wrong, I followed Pavel's video and joined and glued each keel part and then overlayed them. I could not see any "Overlap" in the rib slots. But all that took place in one of my coughing, sneezing and watery eye sessions last week. My problem is while the keel parts are being glued together I have to insert 4mm tapered pegs into slots to do the final true up of them fitting together precisely. I'm leery of the Titebond II setting faster than I can work and then not be able to finagle the two keel pieces into proper alignment. Pavel uses a white glue that seems to give him ample working time.

Jan

(Geez, does that make any sense???)
 
Jan, I'm so glad to see you getting started and I hope you're feeling better!

I also use Titebond II. In retrospect, I think it would have been worth saving the aggravation by getting some 30 minute epoxy. First, it would give you some working time and second, it would not cause the keel parts to curl away from the joint like the moisture in the TB II does. Just make sure you have a million spring clamps or a couple of flat boards with weights to clamp it together. If you use TB, you'll nee lots of weight.

One note - I hope that your frames and your bitis (the crosspieces) are just dry-fitted in your photos. You don't want to glue the bitis on until all the frames are on the keel, otherwise you won't be able to get the stringers in the slots.
Hi Russ, the cold is a bugger, I think I'm over the worst of it but my energy level is a very low point. I only last an hour or so in the shipyard.

In response to your note the frames and bitis are held together by masking tape. I have found that somethe frames need to be reworked after gluing the "wings" on. Some have a slight gap in the fit of the bitis on those.

Jan
 
I think this a very interest boat kit. I've added Pavel's products to what has become a very short list of kits that I think fit my skill level.
 
Hi Grant, good to have you following along. I'm trying to figure out if changing to DST by jumping ahead one hour will give me more time in the shipyard:rolleyes:

Jan
That depends on whether the shipyard is open in the early morning or the afternoon. If you're like me, more afternoon daylight only allows more time for "other duties as assigned" by the Admiral. ROTF
 
The Frames Continued.

I think I might beat @dockattner Chritsmas timeline. Off and on this week I've managed to work on the frames.

IMG_4699.jpeg

The stack on the left needs to be sanded and the stake slots filed, the pieces in the middle are ready for final sanding and the pieces on the right are finished.

Inbetween lurking in the background, coughing, sneezing, etc I've mamaged to make some progress.

Jan
 
Last edited:
The Frames Continued.

I think I might beat @dockattner Chritsmas timeline. Off and on this week I've managed to work on the frames.

View attachment 506421

The stack on the left needs to be sanded and the stake slots filed, the pieces in the middle are ready for final sanding and the pieces on the right are finished.

Inbetween lurking in the background, coughing, sneezing, etc I've mamaged to make some progress.

Jan
Good morning Jan. Ah I see we are both in the framing business ;) . One by one we should be done before ChristmasROTF. Cheers Grant
 
Good morning Jan. Ah I see we are both in the framing business ;) . One by one we should be done before ChristmasROTF
I wonder how much help Pavel has. Over two twenty plus minute videos he has the keel and frames completed and ready to install. He does mention in one of his posts that he has completed these steps umpteen times while testing the kit components before marketing the kit.

Jan
 
I wonder how much help Pavel has. Over two twenty plus minute videos he has the keel and frames completed and ready to install. He does mention in one of his posts that he has completed these steps umpteen times while testing the kit components before marketing the kit.

Jan
Good afternoon Jan. That is pretty speedy….I wonder if there is some editing in the videos….a bit of time lapsing ;) .One of the most enjoyable aspect of this hobby,for me, is the fact that there is no time in my shipyard.If something takes me an hour or a month is irrelevant….I just build removed from the hustle of life…..well mostly:D. Cheers Grant
 
One of the most enjoyable aspect of this hobby,for me, is the fact that there is no time in my shipyard.If something takes me an hour or a month is irrelevant…
Yep, I'm in no particular hurry, I don't set goals, I just work on what interests me at the moment. I'm waiting for warm outdoor temps so I can sand and cut out the gunports on the SB. Lot's of sawdust mess with that chore. The sternwheeler is temporarily docked while I figure out how to cut round circles in cardstock. Then there is the model railroad partially rebuild after the mouse invasion. So I putz in the morning and early afternoon. The late afternoon is reserved for another favorite pastime, reading. But another item not to be dismissed is the "Honey - do" list.

Jan
 
Back
Top