Thank very much for the BD wishAlso from my side a Happy Birthday, Jan.
Regards, Peter
-

Win a Free Custom Engraved Brass Coin!!!
As a way to introduce our brass coins to the community, we will raffle off a free coin during the month of August. Follow link ABOVE for instructions for entering.
-

PRE-ORDER SHIPS IN SCALE TODAY!
The beloved Ships in Scale Magazine is back and charting a new course for 2026!
Discover new skills, new techniques, and new inspirations in every issue.
NOTE THAT OUR FIRST ISSUE WILL BE JAN/FEB 2026
You are using an out of date browser. It may not display this or other websites correctly.
You should upgrade or use an alternative browser.
You should upgrade or use an alternative browser.
Pavel Nikitin Oseberg #3 kit #61
- Thread starter Pathfinder65
- Start date
- Watchers 32
Very slow progress but progress none the less:
Once again checking out Pavel's videos and then looking at the plans, I had to decide when, where and how to do this step. "Taper the keel to .5mm at the top". As noted in photo versus the plan, there is a bit of a difference between the small area tapered on the plan and the actual area proposed by the video.
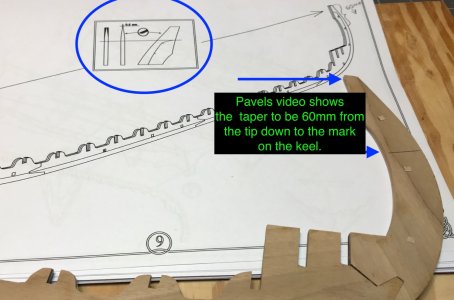
My other worry was that Pavel does the tapering with all the frames assembled and glued into the keel while holding that against build jig #2. I contemplated that video for some time and decided big fingers, fragile frame and vigorous sanding was a bad combo.
So, I stripped the frames from the keel and worked the old elbow grease using numerous pieces of sandpaper to get to this point.

I wasn't as fast as Pavel but in a couple of hours I was done.
The next step was to reassemble the keel and frames back into jig #1
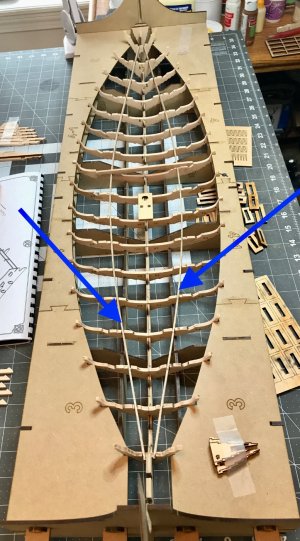
I didn't have any difficulty adding the two stringers that firm up the frames, for the most part they snapped right in.
Unfortunately the whole structure needs to be taken apart so the frames can be glued in.
Jan
Once again checking out Pavel's videos and then looking at the plans, I had to decide when, where and how to do this step. "Taper the keel to .5mm at the top". As noted in photo versus the plan, there is a bit of a difference between the small area tapered on the plan and the actual area proposed by the video.

My other worry was that Pavel does the tapering with all the frames assembled and glued into the keel while holding that against build jig #2. I contemplated that video for some time and decided big fingers, fragile frame and vigorous sanding was a bad combo.
So, I stripped the frames from the keel and worked the old elbow grease using numerous pieces of sandpaper to get to this point.

I wasn't as fast as Pavel but in a couple of hours I was done.
The next step was to reassemble the keel and frames back into jig #1

I didn't have any difficulty adding the two stringers that firm up the frames, for the most part they snapped right in.
Unfortunately the whole structure needs to be taken apart so the frames can be glued in.
Jan
- Joined
- Sep 10, 2024
- Messages
- 1,025
- Points
- 393

Looks good Jan! I chose to wait to taper the stems like Pavel did. Yes, I had to be extra careful, but it worked out ok. My fear at the time was that I would snag the thin tips of the stems while I was installing the frames and cause damage to them. I tapered back 60mm like he did in the video. I'd like to believe that his videos were made long after the instructions were complete and after a few trial runs, he probably learned what works better. Nice job!
I have to blame Pathfinder65, but I ordered the Oseberg. Finished the Duchess of Kingston last year. My wife is already scouting where the put the finished model.
I hope that you will continue to posting your progress.
I hope that you will continue to posting your progress.
OMG that has a familiar ring.My wife is already scouting where the put the finished model.

Jan
- Joined
- Sep 10, 2024
- Messages
- 1,025
- Points
- 393

Looks good Jan!
Yeah ... that's why I had to promise that I would be giving mine away when it's finished.
My wife is already scouting where the put the finished model.
Yeah ... that's why I had to promise that I would be giving mine away when it's finished.
Heinrich my friend, good to hear from you. Thank you very much for the Happy Birhday wishes. We have a clan gathering planned for this weekend, BUT there are also a series of late Spring back to back snowstorms forecast for the weekend.. SO we'll see how that plays out.Very belated, but happy birthday, Jan! May it be a year full of good health and time to spend with the loved ones.
Jan
Hi Jan. There are times I am so grateful to live in Cape Town. Right now it is wether it will be 29•C or 25•C . I hope you get the clan together (weather dependent) for your celebration Jan. Cheers GrantHeinrich my friend, good to hear from you. Thank you very much for the Happy Birhday wishes. We have a clan gathering planned for this weekend, BUT there are also a series of late Spring back to back snowstorms forecast for the weekend.. SO we'll see how that plays out.
Jan
This a typical early Spring storm set. Wet heavy snow, sleet, freezing rain and eventually rain as the storms move North. A big PIA.Hi Jan. There are times I am so grateful to live in Cape Town. Right now it is wether it will be 29•C or 25•C . I hope you get the clan together (weather dependent) for your celebration Jan. Cheers Grant
Jan
Good morning Jan. Lovely progress. Cheers GrantProgress Update:
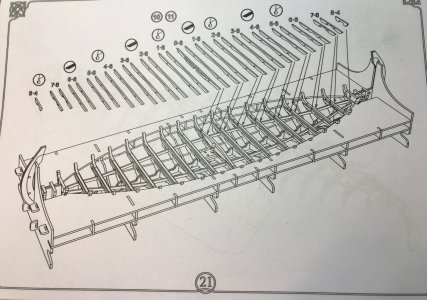
I have completed plans 1 -20 and Pavel's reference video #4
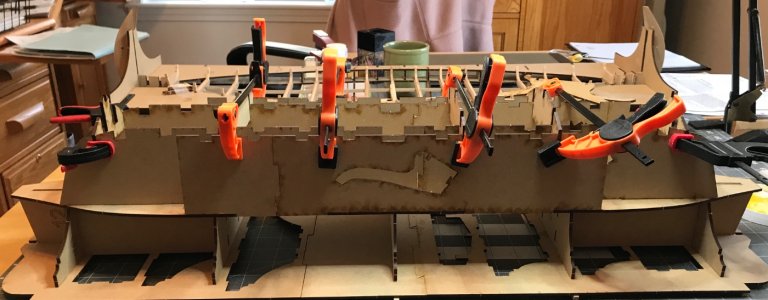
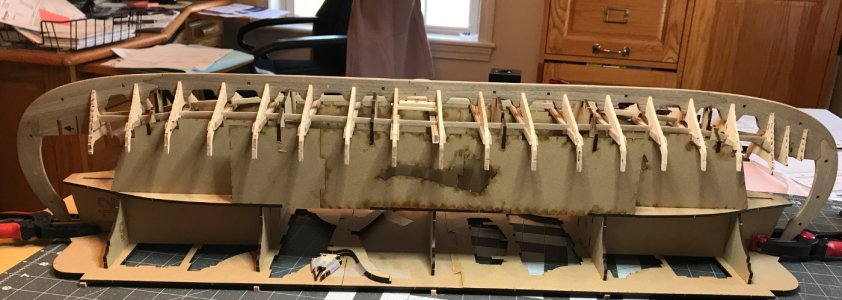
I "gingerly" removed the keel and assembled frames from the jig.
View attachment 510438
I was pleasantly surprised how sturdy the assembly is. The next step is plan #21and video #5
View attachment 510439
Jan
Free from a jig is always a big step, Jan. It’s looking fragile but it’s indeed a sturdy construction.Progress Update:
I have completed plans 1 -20 and Pavel's reference video #4
I "gingerly" removed the keel and assembled frames from the jig.
View attachment 510438
I was pleasantly surprised how sturdy the assembly is. The next step is plan #21and video #5
View attachment 510439
Jan
Regards, Peter
Looks great Jan!
Good morning Jan. Lovely progress. Cheers Grant
Thanks guys.Free from a jig is always a big step, Jan. It’s looking fragile but it’s indeed a sturdy construction.
Regards, Peter
I was a wee bit leery of how the keel & frames would separate from the jig. Happy that it worked out well.
The next step in the build is to add the suppports for the deck sections on the individual frames, so the keel & frames are back in the jig and another char sanding marathon is on the horizon.
Jan
Progressing very nicely, Jan! Way to go!


