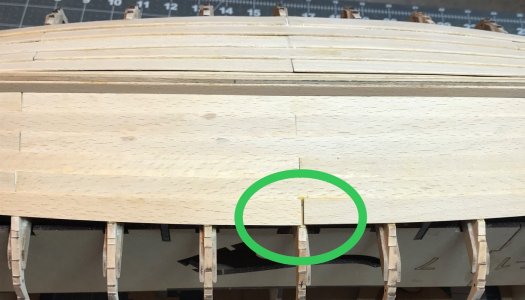
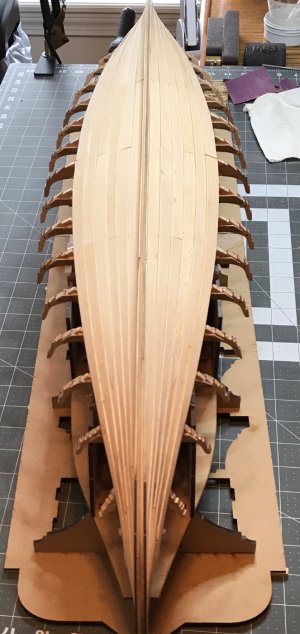
Hi Pathfinder65. I'm really interested here as I'm eagerly waiting the delivery of my boat from Pavel. I'm following your build and wonder what happened here. Do you know.? Was the plank short as supplied?
-

Win a Free Custom Engraved Brass Coin!!!
As a way to introduce our brass coins to the community, we will raffle off a free coin during the month of August. Follow link ABOVE for instructions for entering.
-

PRE-ORDER SHIPS IN SCALE TODAY!
The beloved Ships in Scale Magazine is back and charting a new course for 2026!
Discover new skills, new techniques, and new inspirations in every issue.
NOTE THAT OUR FIRST ISSUE WILL BE JAN/FEB 2026
You are using an out of date browser. It may not display this or other websites correctly.
You should upgrade or use an alternative browser.
You should upgrade or use an alternative browser.
Pavel Nikitin Oseberg #3 kit #61
- Thread starter Pathfinder65
- Start date
- Watchers 32
- Joined
- Sep 10, 2024
- Messages
- 1,025
- Points
- 393

The "AHA, OOOOPS" moment.
I was doing great with laying strakes 1 -5. BUT I didn't figure on this moment.
I'm having a slight problem fitting strake #6. I'ts just a small gap but its temporarily stopped my progress.
View attachment 513434
Definitely a RE-DO candidate.
Jan
Yikes! I've been trying to figure out how that happened. I seem to remember that one particular pair was close, but they all ultimately fit. Did you just trim too much off, or could you have possibly mixed up strakes 4 & 6? Are they already glued? See what you can come up with and if you need some suggestions, just let me know my friend!
If you check out Pavel's videos he shows how to fix it.The "AHA, OOOOPS" moment.
I was doing great with laying strakes 1 -5. BUT I didn't figure on this moment.
I'm having a slight problem fitting strake #6. I'ts just a small gap but its temporarily stopped my progress.
View attachment 513434
Definitely a RE-DO candidate.
Jan
Steve
Yikes! I've been trying to figure out how that happened. I seem to remember that one particular pair was close, but they all ultimately fit. Did you just trim too much off, or could you have possibly mixed up strakes 4 & 6? Are they already glued? See what you can come up with and if you need some suggestions, just let me know my friend!
All the parts for strake #6 are the same size. So the error is my build process. Fortunately nothing is glued. I reworked the "slots" in the frames for that strake and have a better fit for the butt ends. We will see when I glue that strake in place tomorrow.Yikes! I've been trying to figure out how that happened. I seem to remember that one particular pair was close, but they all ultimately fit. Did you just trim too much off, or could you have possibly mixed up strakes 4 & 6? Are they already glued? See what you can come up with and if you need some suggestions, just let me know my friend!
Jan
Which video #If you check out Pavel's videos he shows how to fix it.
Steve
Jan
Hi Jan,Which video #
Jan
Sorry I didn't get back to you sooner, I was putting my second slipway/jig together.
It's not listed in Pavel's Oseberg playlist, it's a video he put out about 3 months ago in his videos list.
Hopefully none of us will have to use this solution, but it is an option when all else fails.
Steve
Hi Steve, many thanks for that video.
Jan
Jan
Hi Jan,The Re-Do of th OOOps.
After a few hoirs of fitting, sanding, filing and head scratching, and repeating the process I managed to close the midship gap for strake #6. I'm happy with the result.
View attachment 514152
Both sides of the hull are now planked up to strake #6,
View attachment 514153
Jan
It looks much better! I'm glad you didn't have to use Pavel's fix!
You're way ahead of me, I have one more stem to sand down before I put the cheeks on. Looking forward to getting started on the strakes after that.
Steve
- Joined
- Sep 10, 2024
- Messages
- 1,025
- Points
- 393

You're making great progress Jan! I'm in the middle of putting the double bead profile on what seems like endless deck boards.  I've also been toying with the idea of redoing (yet again) the thicker biti at the mast, scaling the drawings from Dr. Bischoff's paper for it and the mast partner to make them more realistic. Sigh.
 I've also been toying with the idea of redoing (yet again) the thicker biti at the mast, scaling the drawings from Dr. Bischoff's paper for it and the mast partner to make them more realistic. Sigh.
Considering what you have done so far I think your next step will turn out just fine.You're making great progress Jan! I'm in the middle of putting the double bead profile on what seems like endless deck boards.I've also been toying with the idea of redoing (yet again) the thicker biti at the mast, scaling the drawings from Dr. Bischoff's paper for it and the mast partner to make them more realistic. Sigh.
Jan
At the speed that I work you'll catch up in no time.You're way ahead of me, I have one more stem to sand down before I put the cheeks on. Looking forward to getting started on the strakes after that.
Jan
Good evening Jan. You are owning this. If you didn’t circle the tiny gap no one would have noticed. The “klinker” planks look good. Cheers GrantThe Re-Do of th OOOps.
After a few hours of fitting, sanding, filing and head scratching, and repeating the process I managed to close the midship gap for strake #6. I'm happy with the result.
View attachment 514152
Both sides of the hull are now planked up to strake #6,
View attachment 514153
Jan
Hi Grant,Good evening Jan. You are owning this. If you didn’t circle the tiny gap no one would have noticed. The “klinker” planks look good. Cheers Grant
Jan
- Joined
- Sep 10, 2024
- Messages
- 1,025
- Points
- 393

Hi Grant,
Y up that is one of those taht I'll see every time but no one else will notice.
Jan
Perfection is impossible, and those little imperfections that come from being human will always be there. You're right that they will be invisible to all but the must astute, yet will glare out at you every time you look at it. The real key, though, and it only comes with lots of practice, is to proudly show off your work without pointing out all of those items.
And if someone does call you out on something, just casually say, "Well, I tried to copy every flaw from the original ship as I could."

You make a good argument. One of my neighbors had a look at my build yesterday. His comment, "What kind of boat is that". So.....Perfection is impossible, and those little imperfections that come from being human will always be there. You're right that they will be invisible to all but the must astute, yet will glare out at you every time you look at it. The real key, though, and it only comes with lots of practice, is to proudly show off your work without pointing out all of those items.
And if someone does call you out on something, just casually say, "Well, I tried to copy every flaw from the original ship as I could."Do you really think they're going to look it up?

Jan
Oh boy, oh boy.
While working on placing strake #7 I ran into problems. Two out of the four bow section pieces broke under light pressure when trying to fit them to the hull.

The right side is done and the left side is in the works. The pesty breaks and cracks occurred at bow curve sections the minute any pressure was applied. I wound up working backwards a section at a time to finally get this side done.
Jan
While working on placing strake #7 I ran into problems. Two out of the four bow section pieces broke under light pressure when trying to fit them to the hull.

The right side is done and the left side is in the works. The pesty breaks and cracks occurred at bow curve sections the minute any pressure was applied. I wound up working backwards a section at a time to finally get this side done.
Jan
Oh no!!!Oh boy, oh boy.
While working on placing strake #7 I ran into problems. Two out of the four bow section pieces broke under light pressure when trying to fit them to the hull.
View attachment 514478
The right side is done and the left side is in the works. The pesty breaks and cracks occurred at bow curve sections the minute any pressure was applied. I wound up working backwards a section at a time to finally get this side done.
Jan
I'm glad you were able to fix them, but I'm not sure what you mean by working backwards.
Your build looks great, you've done a nice job!
Steve
I really am following close here as I'm waiting for my kit to arrive and trying to learn the best I can. Would it help do you think if the woods were soak for a short time to help in the bending?
- Joined
- Sep 10, 2024
- Messages
- 1,025
- Points
- 393

I had one break also as I documented in my log. That's an inescapable problem due to the tightly curved pieces being cut out of straight wood. You will inevitably have grain going across a narrow piece. Wetting the wood might help, but more than likely it would probably just soften it more, making it actually easier to break.I really am following close here as I'm waiting for my kit to arrive and trying to learn the best I can. Would it help do you think if the woods were soak for a short time to help in the bending?
One of the things that helped me was to make sure the strake was going to fit properly. Then, just put glue on the first inch or two at the stem end. Glue and carefully clamp it, making sure that the strake is positioned correctly and not under too much pressure. Let it set up. That will help to strengthen it and then, using a toothpick or fine-tipped applicator, put glue on the frames and along the edge of the strake below it, then finish clamping it.


