Hello Everyone,
I sincerely apologize for my absence for the past year and a half. The last year has been pretty busy for me personally and a lot has been going on. I have still been working on the model in my free time and a lot has changed since the last update in terms of design. Some good news is that for the holidays I got a 3D printer as well as a few books on modeling dimensions for ships and rigging. So the new goal is to 3D print the whole model in 1/64 scale and then rig the whole thing and paint it, make sails and build a display case for it. That is currently where I am headed with the build now.
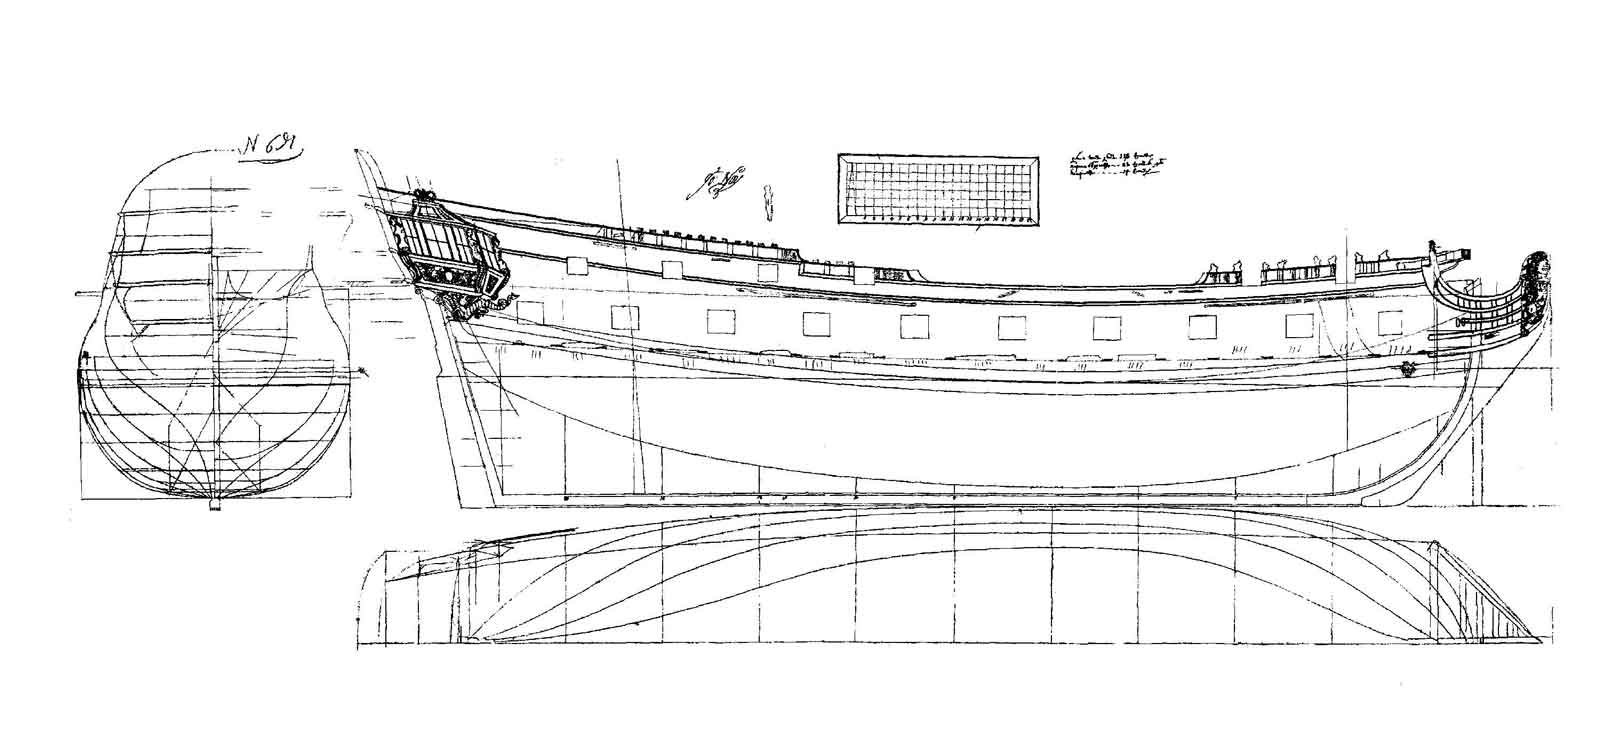
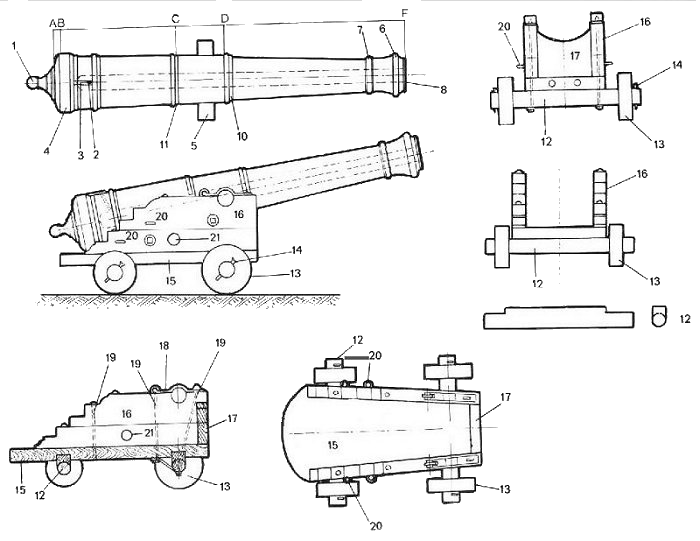
To start with. I changed the overall dimensions of the boat she is now 119 feet long by 28 feet wide by 11.6 foot draught. The formast, main and mizzen also changed height as well accordingly. I added more dimension to the spars with more distal taper as well as yard arms accordingly. The masts are also stepped properly now as well as the correct distal taper. I also modified the heights of the gun carriages as well as barrel lengths and bore dimensions to correctly reflect the armament of the ship. I went with English 9 pounders on the main gun deck as opposed to more historically accurate 8 pounders used by other nations at the time. For some reason 9 pounders appealed to me more lol. I also went with Prussian 4 pounders on the quarterdeck and forcastle and swedish 3 pounders on the poop to reflect the total broadside weight of 109lbs that I wanted. I also added a tenth broadside cannon on the main gun deck, bringing the main armament up to 32 guns including the stern chasers and not including the swivel guns. As I understand it through my research the 32 gun frigates did appear really in this configuration until 1757 with the Southhampton class in the royal navy. Most frigates at this period had up to 30 guns as well as 8 pounders on the main armament instead of 9. It is not as historically accurate but I am taking a little bit of creative license on this part. The flags are also the correct dimensions based on other examples of historical flags that I could find as well as the launches. I will post pictures of the current progress below and explain in more detail for fear of this turning into a novel at the moment. The overall detail has also been greatly improved.

I also added some water for the ship to float in and to represent whereabouts the water line would be. When I go to do the case I want to build to display it in, on the bottom I want to create a simulation of ocean waves as though it looks like its sitting in water on the ocean in the case, possibly using epoxy. I also still have to finish off some of the textures for the water here soon. This is also just an establishing shot for the current progress for where I am at. Currently at the moment I am working on the shrouds and getting those in place. I have to finish up the gammoning line as well as the bobstay. At the same time I am researching different languages to find a suitable name for the ship. I have a feeling the name figurehead and carvings will all come together at the same time, just have to find the right idea eventually. I also added a second jib to the sail plan where I initially only had one. The book I am reading through also mentions dimensions for the cross trees and trestle trees and those are all in the correct dimensions now. The bowsprit is also in the correct dimensions as well as the flagstaff.

A side shot of the current progress, I mapped out where the rest of the shrouds will go using flat planes for right now. I also added more detail along the Quarter galleries and the whole ship.

A closer shot of the waist of the ship. I added spaces to the bow for the gammoning line to pass through as well as detailed motifs to the side of the ship. a lot of the decorations are based on Baroque architecture and design which was common for the period I am trying to portray this ship being in. I also added another hatch leading down into the lower decks behind the boats so that the crew has entrance to the lower decks or vise versa from the waist. The bell was moved back to in front of the mainmast below the stairs.

This is a close up shot of the bow of the ship. I added holes for the gammoning line here as well as decorative rims around the hawse holes. I also added in bitts by the bowsprit for later rigging. Theres a lot more detail in the front bulkhead at the bow. I added a bunch of Baroque esque motifs there to add more decoration and make it more aesthetically pleasing. The catheads have also had an update with flower motifs at the ends aw well as scroll work as the sides. Each motif is made of several pieces put together in various ways. I also added decorative posts at the top of the railing above the bulkheads for each deck.

I update the ships wheel here with more scroll work motifs on the post in front of it. I also added more decorative motifs in the doors and windows into the inner cabins. The spiral stairs have been beveled with custom bevels to represent molding. The balustrades have also been updated with more decoration in them. I added Motifs on every deck for the upper balustrades as well. I appologize for the lighting in this area is not great. I will try got get better close up shots in the future of this area so all the detail can be seen.

The stern of the ship has been updated with a lot more scroll work detail as well as decorative support beams. I also added bands around the rudder for it to be held in place. The balustrades on the balcony also have much more detail with added pillars on the ends. The top of the stern I am still working on. I have to figure out some carvings to go there when I figure out what the figurehead will look like.

Aside view of the new Quarter galleries. I didn't like the old ones very much with the window shapes and decided to change it. The new window shapes were meant to mimic medieval and gothic architecture with their pointed arches. Theres also a lot more Baroque influence here as well with more scroll work and decorative shapes in the framing. I still have to do roof tiles on the top of the quarter galleries and more decorative work up there as well as the support below the last window on the quarter gallery. Some of the geometry will also need to be smoothed out in this area when I subdivide for 3D printing.

A more detailed shot of the decorative motifs in the quarter galleries as well as the sculpted wreaths around the upper gun ports with much better lighting. I also added some decorative work on the bulkheads above the transition from the poop to the quarter galleries.
And If you have made it this far through the update, thank you! I am sorry I know this was a bit of a long one. I will try to update more frequently in the future. I think that is about everything so far. So still working on it, most of it is in place. I plan on doing the rigging first in 3D and then tackling it again on the actual model after I print it so I know what I am doing. I haven't done a model like this before from a kit or otherwise so it will be a good challenge lol. I also plan on printing everything in pieces and sanding it all and gluing it together. I have to merge all the meshes as well so that will take time. I plan on using silkspan for the sails as well after the model is printed. And I have figured out the dimensions of the string I need to rig the model and how much I need as well. I am not going super historically accurate on that part but. that is more for aesthetic reasons. I have to finish making the blocks and tackle as well for the actual modeling. And I think with that that is the end of this update. Thank you all for your time and patience, If anyone has any questions or comments please post a comment below. i always like hearing from people and let me know what you all think. Again sorry this post was a bit of a long winded one! Thank you all!
")


 . As for this project I wanted to make a Pirate ship model and am still working on modeling part of the deck fittings. If anyone has any feedback or thoughts, I greatly welcome and appreciate it. I will be posting more updates as i finish more of the build soon. Below These images I will also post a mood board with reference images and more information.