Planking question and examples

Joined
Dec 26, 2021
Messages
88
Points
68

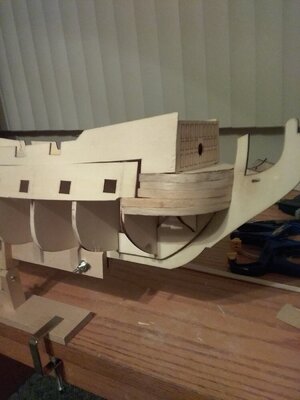
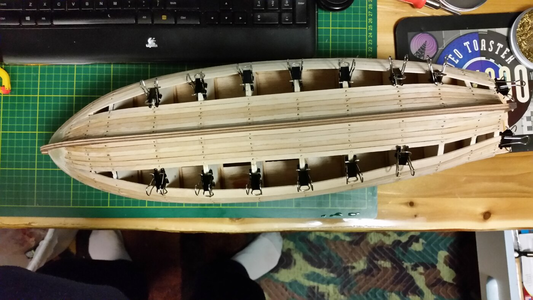
look at these pictures i was practicing having problems with the tapering thing I'm pretty sure I was supposed to taper a couple of planks I'm having a problem understanding which ones to taper and how I've been watching how to videos but I'm just getting frustrated nether pictures are that great but I have to start somewhere.20220117_030845.jpg20220117_030530.jpg
 
Last edited by a moderator:
I sent them as full hope they transferred that way also Max sent me my tracking number and shipping also.
 
Yes, I can see the images that you uploaded. I can make a few comments on the planking, but you are doing fairly well. I have a video to show you on the next post about how to insert your images FULL SCALE. So what for that next.
 
First off, for this scale, your planks may be too wide, making it difficult to follow the twist and curve of the bow. Here are the lines your are looking to follow.

1642492590206.png

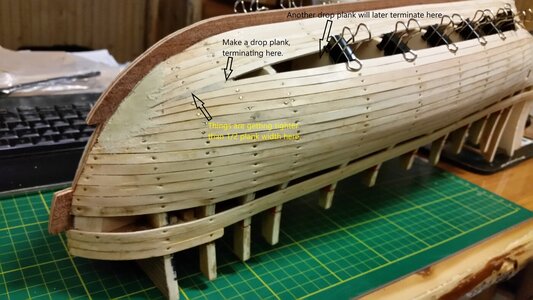
A plank should never be tapered smaller that 50% of it's original width. When things appear to get tight at the bow, make a drop plank like this. The plank that is cut short is 50% of the full width. The plank that absorbs the short end of the taper plank is about 75%-80% of its full width. Before you just start tapering planks, get familiar with judging plank width by taking a pencil and DRAW THE PLANK LINES on the planks, then cut. Cutting planks for me is tricky. I often run off the line and ruin a plank, ESPECIALLY if the knife is dull. So always use a sharp knife blade, preferably a new one. I often SAND the edge of the plank by placing it in a desktop vice and sanding the edge to meet the pencil line. This has saved me much wood and many mistakes cutting.
1642493124694.png

Always make TWO planks at a time, and plank the port and starboard sides at the same time. This allows you to look and check to make sure both sides are symmetrical. You can adjust by making a couple planks a bit thicker on the side that is losing the race toward closing the gap in the hull. Look at the hull of La Couronne below. Note how planks are started at the gunwale at the top, and also at the garboard strake, at the keel, and planking progresses toward a midpoint at the hardest turn of the curvature of the hull. The strip left unplanked is the line where the gun ports will go.
1642493853465.png

The gap narrows. It is obvious at this point hat drop planks will be needed, mostly at the bow, and a couple at the stern.
1642494030485.png

059 Hull Planking 4.jpg


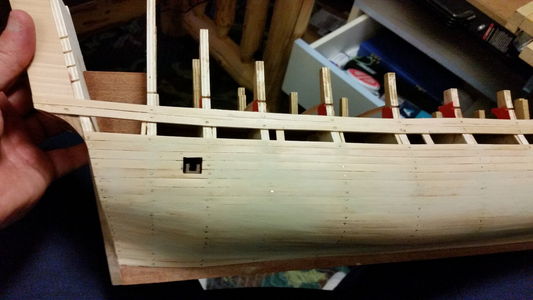
The lines of the planks are harder to see here, because the hull has been sanded, filled, and sanded again several times. Filler fills in flat spots, so the hull curves are never sudden bends, but rather slow and subtle curves. The drop planks at the stern terminate farther from the stern than the drop planks terminate from the bow.
1642494169362.png

1642494193111.png

Really hope this helps! Planking is a skill that terrorized me at first, but with the right instruction, it can be done even by a beginner. Attached below are three tutorials for planking. They use a calculated approach to planking. More than anything, you need PATIENCE to plank a hull. Once you do one, it gets much easier. The nice thing is that the first layer of planks allows you to practice and correct mistakes, which will never show. The final layer is where you have to get it right. By then, you will have the skill to plan and lay each plank, watching how the gap is closed, planning when and where to us drop planks and stealer planks, and keep the planking on both sides of the hull 100% symmetrical. You have to give yourself time to learn.

Watch my favorite tutor and professional modeler, Olha Batchvarov, show you how plank a hull. Note how she makes her drop planks.

Step By Step Model Ship Build : #02 - First layer of planking
 

Attachments

Last edited:
Thanks Donnie, looks like I have the best tutor because I thought I was the only one terrorized by this planking thing.
 
First off, for this scale, your planks may be too wide, making it difficult to follow the twist and curve of the bow. Here are the lines your are looking to follow.

View attachment 283702

A plank should never be tapered smaller that 50% of it's original length. When things appear to get tight at the bow, make a drop plank like this. The plank that is cut short is 50% of the full width. The plank that absorbs the short sn of the taper plank is about 75%-80% of its full width. Before you just start tapering planks, get familiar with judging plank width by taking a pencil and DRAW THE PLANK LINES, on the planks, then cut. Cutting planks for me is tricky. I often run off the line and ruin a plank, ESPECIALLY if the knife is dull. I often SAND the edge of the plank by placing it in a desktop vice and sanding to the pencil line. This has saved me much wood and many mistakes.
View attachment 283703

Always make TWO planks at a time, and plank the port and starboard sides at the same time. This allows you to look and check to make sure both sides are symmetrical. You can adjust by making a couple planks a bit thicker on the side that is losing the race toward closing the gap in the hull. Look at the hull of La Couronne below. Note how planks are started at the gunwale at the top, and also at the garboard strake, at the keel, and planking progresses toward a midpoint at the hardest turn of the curvature of the hull. The strip left unplanked is the line where the gun ports will go.
View attachment 283705

The gap narrows. It is obvious at this point hat drop planks will be needed, mostly at the bow, and a couple at the stern.
View attachment 283706

View attachment 283764


The lines of the planks are harder to see here, because the hull has been sanded, filled, and sanded again several times. Filler fills in flat spots, so the hull curves are never sudden bends, but rather slow and subtle curves. The drop planks at the stern terminate farther from the stern than the drop planks terminate from the bow.
View attachment 283707

View attachment 283708

Really hope this helps! Planking is a skill that terrorized me at first, but with the right instruction, it can be done even by a beginner. Attached below are three tutorials for planking. They use a calculated approach to planking. More than anything, you need PATIENCE to plank a hull. Once you do one, it gets much easier. The nice thing is that the first layer of planks allows you to practice and correct mistakes, which will never show. The final layer is where you have to get it right. By then, you will have the skill to plan and lay each plank, watching how the gap is closed, planning when and where to us drop planks and stealer planks, and keep the planking on both sides of the hull 100% symmetrical. You have to give yourself time to learn.

Watch my favorite tutor and professional modeler, Olha Batchvarov, show you how plank a hull. Note how she makes her drop planks.

Step By Step Model Ship Build : #02 - First layer of planking
 
Hey Kirt, I appreciate your input and guidance so here's my short story I bought a Black Pearl model online from wish it was 100.00 I used to build Revell models all ships when I was a boy. When I received it there was missing parts a few pages of plans wasn't aware of it until I started to build it. So when I joined ship of scale Donnie told me about the scam with these models so then I decided to buy a real one from Max and use old one for practice trying to grasp all the info I think you said it best Terrorized. Donnie has helped get going so my planking is 1/4" should I cut it all down to 3/16" or buy some i would rather make my mistakes on the junk one, I guess I don't know what to do. Sorry for all the drama. Rick
 
Hey Kirt, I appreciate your input and guidance so here's my short story I bought a Black Pearl model online from wish it was 100.00 I used to build Revell models all ships when I was a boy. When I received it there was missing parts a few pages of plans wasn't aware of it until I started to build it. So when I joined ship of scale Donnie told me about the scam with these models so then I decided to buy a real one from Max and use old one for practice trying to grasp all the info I think you said it best Terrorized. Donnie has helped get going so my planking is 1/4" should I cut it all down to 3/16" or buy some i would rather make my mistakes on the junk one, I guess I don't know what to do. Sorry for all the drama. Rick
Hi Rick, I built 150 plastic models when I was young also, and just started building wooden ships 4 years ago. Without instructions, a wooden ship kit is just high priced kindling. EVERYTHING is in the quality of the plans. Many who build kits replace most of the wood with better quality stuff and use a variation of the plans. The kit I'm currently working on provided bamboo strips for planking. Total junk, because they do not bend evenly because of hard spots where the knots are. So, like many others, I bought my own wood strips. The size for the average 3.5' model strip which covers the most but provides enough flexibility is 5/32"x1/16". However, here in the States you can only find 1/4" or 3/16" wide strips. So, I bought a bunch of 3/16" basswood strips from Midwest Products, Inc and ran them through the bandsaw and made them 4mm, which is a tad more than 1/4", and matches leftover lime wood I had leftover from the last ship model from Italy. Bass is course grained, but bends well when wet, and stays mostly bent when allowed to dry over a bending form. Better yet is lime wood, available from ship model suppliers, and found in Corel model kits from Italy. It's my personal favorite because it bends evenly over frames and has a small grain, and carves without splintering like American basswood you buy at Menards. Below is an eBay auction for basswood strips.

3/16"x1/16" Basswood Strips

Don't freak out about now knowing what to do. There are literally dozens of builders here who can and will help. I'm a skilled craftsman, but just finished my first wooden model ship, so I know the learning curve quite well. Everyone here is one the ladder of learning and busy climbing. It doesn't matter who is above or below you, because we are all here because we love model ships, and there are no snobs here. Many are willing to teach. Most new guys just hide in the background, so we have to prod them to make build logs, because if they are too shy to show their models, they won't benefit from the comments and they simply won't learn much. I can't tell you how many idea's I've stolen *AHEM* borrowed from NMBrook, Uwek, DocKattner, Maarten, Ken, Hubac's Historian, EJ on MSW, and countless others here. Just don't make the mistake of NOT asking questions. Before you do, however, make the effort of word-searching the forum. Chances are someone already posted and answer. Deal with the first big scary thing, planking, and you'll have the fortitude to face the second horror: rigging.
:D
 
So do you think I should grab the ones on ebay and see if they will lay better across the bulkheads, I really wood like to know more about the tapering aspect and would like to get it somewhat down on the practice black pearl. So I left 2 wale boards that I had already glued down just under the gunports and being that planks are not long enough so I will have to split them on the bulkhead I'm going to use your process of splitting the hull into 2 sections.
 
So do you think I should grab the ones on ebay and see if they will lay better across the bulkheads, I really wood like to know more about the tapering aspect and would like to get it somewhat down on the practice black pearl. So I left 2 wale boards that I had already glued down just under the gunports and being that planks are not long enough so I will have to split them on the bulkhead I'm going to use your process of splitting the hull into 2 sections.
I found the basswood from Midway to be inexpensive, and you can buy a whole bunch cheaply and not worry about running out of wood, because kits give you the bare minimum. Watch how Olha cuts wood in the link I posted previously. Narrow planks follow the hull well, wide planks make a segmented shape that no amount of sanding will create smooth curves from. Make 4mm planks and then start planking, but look at other models and copy the shape and directions of their planks. It takes practice. Planks should not have any gaps, so sand the edges at angles such that they meet the edges of adjacent planks perfectly. Make each plank FIT. apply glue to the plank edges as well as the frames. Wipe off excess glue with a moist towel and don't smear the glue, ROLL it off using the rag. You can get away with gaps on the first layer, but NOT the finish layer, so you need to practice, and prepare each plank using careful fitting, so by the time comes to add the final planking, you'll have the skill you need.
 
I hope you are aware, that this topic is in the "test" area, so I guess, that not many of our members are reading it.
If you like, I can move this thread in a more public area, so that other members are aware about it and maybe participate in the communication......
 
Hi Uwe, I was going to do that earlier. I had no idea it was going to progress. Where do u want to move it
 
you can go here starting on page 3 about planking and tapering planks

 
Back
Top