• Win a Free Custom Engraved Brass Coin!!!
    As a way to introduce our brass coins to the community, we will raffle off a free coin during the month of August. Follow link ABOVE for instructions for entering.

Planning for the next project.....

I've, sort of, decided on a scale for the mini-Granado. I'm probably going to go with 1:120-ish. I realise that it is not an orthodox scale, but it results in a beam of approx 70mm, which I like. It also allows more surface for glue on the very small parts, and hopefully more strength, as I'm using PVA, not CA

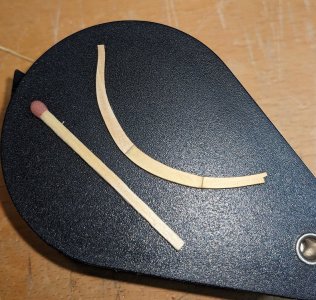
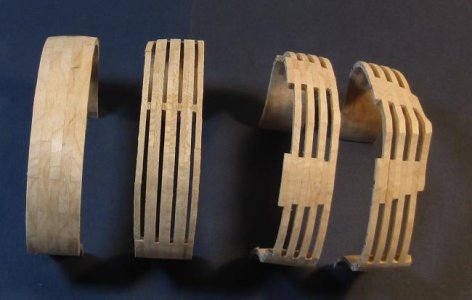
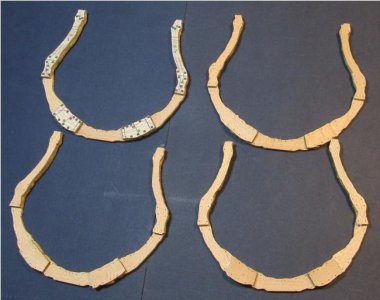
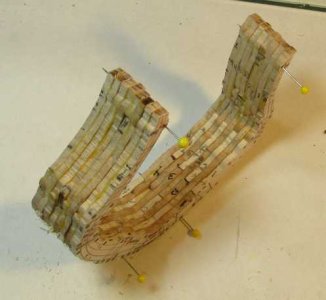
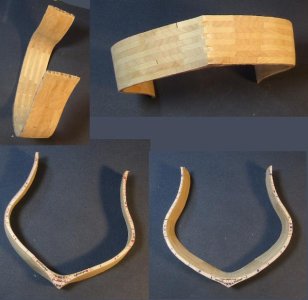
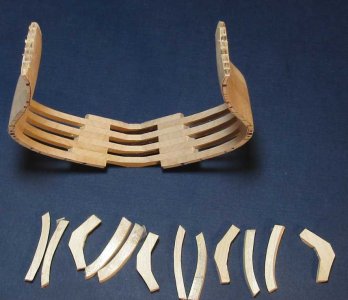
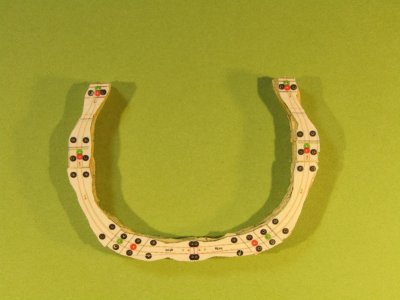
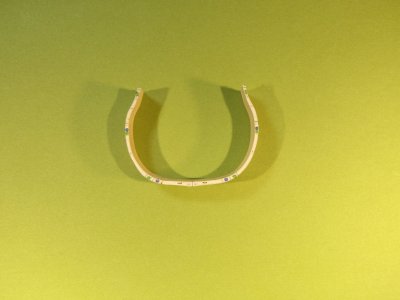
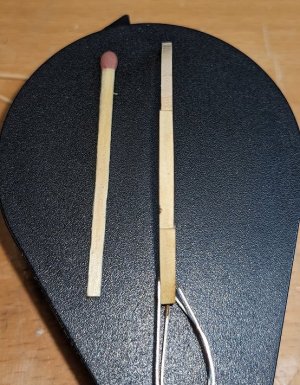
I'm going to create frames with floor timber, futtock, top timber and dog-leg timber for ports where required. I have conducted a test, as seen in the photos below. Current dimensions result it about 0.2mm siding which will likely be reduced through shaping and polishing. I'll let the PVA cure for 24 hrs and then test its strength..............................................


1000054275.jpg1000054276.jpg
 
The port on the left and some others cut into the frames to the point that they are of no value to the whole above where they are cut. I just found the drawing below of the bomb vessel Belzebub 1813 that show a few frames but as it is some 70 years later, maybe not a good reference. I could not find any contracts for bomb vessels except the 34 page contract for Belzebub, so again considering the difference in eras, may not be as helpful as hoped for. Note that page 9 is missing. https://www.rmg.co.uk/collections/objects/rmgc-object-388116

Allan

View attachment 556040


The drawing below is not a bomb vessel, but the relation of the ports to the frames can be seen.
View attachment 556052
Thanks Allan. I'm going to go with the Goodwin single frame layout and see how it goes.
 
Last edited:
To supplement the above, the English seemed determined to have their timbers frame the gunports and sweep ports without having to cut into them. They were willing to have the tracks of the higher level timbers go around Carter's barn to yield that.

RN: F1 may or may not have been sided less than the floor timber. F2 was usually sided less that F1. F3 was sided less than F2. etc. (I have been unsuccessful in finding a shorthand word to describe this.) Even more fun is at the distant fore and aft regions even the floors could be sided less those amidship.

At your proposed scale, I think that you can have this shrinkage of upper level timber sided dimension done if you threaten the sides of the timbers with a 0000 needle warding file by waving it at them. In other words - too slight a detail to be noticed without magnification. It is probably not worth the effort.
I like the way the ports are enabled in British ship, though there are some cut frames in the Goodwin plans, so I'll introduce a few for variety.
 
Last edited:
Here it is.

There is also an all-double frame layout, but Goodwin says that he thinks that the single frame layout is more likely. I'll be following it as closely as possible, because the frame will be exposed on the model.

The gunport between stations 'K' and 'N' is cut into the timber, as are three of the sweep ports, so I'll do that as well for variety! There are quite a lot of fillers, and I may need to add more depend on the strength of my frames.

I am currently looking into ways of improving adhesion on the timbers. I'll be modelling the section between stations 16 and 'N'

The body plan in the book is not good, so I have the full size plan from the NMM print shop. It is extremely beautiful......................................


1000054281.jpg
 
I admire your taking up the challenge to build at such a small scale. You're a better man than I , Gunga Din! :D If you haven't obtained a copy already, I would urge you to get a copy of Lloyd McCaffery's book, Ships in Miniature. See: https://www.amazon.com/SHIPS-MINIATURE-Classic-Manual-Modelmakers/dp/0851774857 and also consider getting a copy of Donald McNarry's Shipbuilding in Miniature. See: https://www.amazon.com/Shipbuilding-Miniature-Donald-McNarry/dp/0668058005 Both are readily available use at very reasonable cost.

McCaffery and McNarry are among the greatest miniature ship modelers of our times. (McNarry is now deceased.) The two books above are the best available on the subject of ship modeling at very small scales and contain a wealth of technical information that you will find most helpful with your build.
 
As a former jeweller small is my norm.

If you check my builds you'll see that I have only made a few ship models, mostly cross-sections. I didn't get much satisfaction from the 1:48 or 1:72 pieces. I tried a 1:96, its the next one to complete, which I do like but the 1:160 feels more 'normal' to me, if a little bit of a challenge.

My next project will be a scratchbuild. I'm having second thoughts, but think that I might do the Staudt Granado cross-section at 1:20, 1:44 or 1:60 as it will ease me into it rather than a complete scratch from NMM plans and the Goodwin book.

I have the P. Reed book and the McCaffery as well. Both are useful. Reed offers more details on his methods though. I hand't thought about the McNarry book, but will get a copy. As you say easily available and reasonably priced.
 
To support your ambition, I offer my evolution in thinking:
Most NMM plans are 1:48 (museum scale). Building at 1:48 offers an opportunity for a lot of detail. If the ships-of-the-line are your interest, a 1:48 model of one tends to be a Baby Huey to live with.
I do not wish to lose the opportunity for detail. I decided that half museum scale would be a reasonable compromise. A model is a 3D object. One half the volume of 1:48 is 1:60 (rounding off). A 50% hull will still occupy a lot of space. I wish my production to be of a family. All are 1:60.


I experimented to see if my POF method would work at smaller scales.
I did a test at 1:120 - the volume is 6.4% of museum. It was a success. It was much faster and inexpensive in wood stock. A fleet would not be overwhelming to display. Everything but the framing would require a special set of skills. Those skills are not my want. I am set in my ways and will stick with 1:60.
To push the limits, I framed a hull at true miniature scale 1:192. The volume is 1.5% of museum. Reed's method of framing is a bit of a challenge. I built the rough framed hull fairly easily. It was quick to do. My eyes, attention, and not as steady hand are not up to the fine shaping part. The rest of it is way too special to attempt as a beginner miniaturist at 79 years old.

I did my 1:20 test using ANCRE Philippe 90 1693 - using timber patterns that I lofted:

a4 framing styles 2.jpg
Solid *** All bends-space=frame *** Navall Timber framing-space all in F1 (navall timber) frame *** Navy Board space alternates frames
Each segment is a station to station sandwich/section of frames.

I did not try singleton filling frames. It would be no more difficult to do than the above. I dislike butt chocks. I hate end grain to end grain bonding. It is not bonding at all. Were I looney enough to do it, I would not remove the space filling timbers until the internal thick stuff and or outside ribbands are in place to support the timbers.

philippe naval bends.jpg
The frames assembled.

Philippe sandwich glueup.jpg
Glued into a station sandwich - the spaces have temporary Pine filling timbers - using an adhesive easily broken using a solvent that does not harm the main PVA bond (easy to say - not so easy to develop)

sanded sandwich 4.jpg
sanded

Philippe sandwich 0 spacers.jpg
Space fillers removed.

For the 1:192 trial, I chose Ajax 74 1767

IMG_0566.JPG
A station sandwich

IMG_0563.JPG
Sanded

The sanding of it was so hairy a job that I decided that the hull:

IMG_0579.JPG
Would be better is stored in a drawer.

So, your 1:120 Granado is readily doable if care is taken.
 
As a former jeweller small is my norm.

Well, say no more! Say no more! Nudge. Nudge. Wink. Wink.

Indeed, then you are already in your element! I can only say that if you favor the harder woods, you will find it much easier. But I'm sure you know that already.
 
To support your ambition, I offer my evolution in thinking:
Most NMM plans are 1:48 (museum scale). Building at 1:48 offers an opportunity for a lot of detail. If the ships-of-the-line are your interest, a 1:48 model of one tends to be a Baby Huey to live with.
I do not wish to lose the opportunity for detail. I decided that half museum scale would be a reasonable compromise. A model is a 3D object. One half the volume of 1:48 is 1:60 (rounding off). A 50% hull will still occupy a lot of space. I wish my production to be of a family. All are 1:60.


I experimented to see if my POF method would work at smaller scales.
I did a test at 1:120 - the volume is 6.4% of museum. It was a success. It was much faster and inexpensive in wood stock. A fleet would not be overwhelming to display. Everything but the framing would require a special set of skills. Those skills are not my want. I am set in my ways and will stick with 1:60.
To push the limits, I framed a hull at true miniature scale 1:192. The volume is 1.5% of museum. Reed's method of framing is a bit of a challenge. I built the rough framed hull fairly easily. It was quick to do. My eyes, attention, and not as steady hand are not up to the fine shaping part. The rest of it is way too special to attempt as a beginner miniaturist at 79 years old.

I did my 1:20 test using ANCRE Philippe 90 1693 - using timber patterns that I lofted:

View attachment 556771
Solid *** All bends-space=frame *** Navall Timber framing-space all in F1 (navall timber) frame *** Navy Board space alternates frames
Each segment is a station to station sandwich/section of frames.

I did not try singleton filling frames. It would be no more difficult to do than the above. I dislike butt chocks. I hate end grain to end grain bonding. It is not bonding at all. Were I looney enough to do it, I would not remove the space filling timbers until the internal thick stuff and or outside ribbands are in place to support the timbers.

View attachment 556773
The frames assembled.

View attachment 556774
Glued into a station sandwich - the spaces have temporary Pine filling timbers - using an adhesive easily broken using a solvent that does not harm the main PVA bond (easy to say - not so easy to develop)

View attachment 556775
sanded

View attachment 556772
Space fillers removed.

For the 1:192 trial, I chose Ajax 74 1767

View attachment 556776
A station sandwich

View attachment 556777
Sanded

The sanding of it was so hairy a job that I decided that the hull:

View attachment 556778
Would be better is stored in a drawer.

So, your 1:120 Granado is readily doable if care is taken.
Thank you Jaager,

Your post is very encouraging. It looks like you have been successful in all of your attempts.

I agree about the end-grain glue joint, but feel that I want to avoid a stylised Navy Board frame in this case. I will attemp a scarf joint, though I may live to regret it!

I haven't decided on a scale, but 1:144 keeps jumping up at me. I like the 160, but am concerned about milling the stock material so thin.
 
Well, say no more! Say no more! Nudge. Nudge. Wink. Wink.

Indeed, then you are already in your element! I can only say that if you favor the harder woods, you will find it much easier. But I'm sure you know that already.

Boxwood is really the only material I am comfortable with. Castello is OK. I use pliers a lot and boxwood can be held firmly without too much surface damage. I find pear wood less accomodating.
 
I find pear wood less accomodating.

There is a Pear species that has harder wood than Pyrus communis.
It is Pyrus calleryana. Callery Pear. Over here the most common variety is Bradford Pear. It is a common street planting - originally a fad and now a pest.
Bradford's have "Y" branch growth. When they get large enough and the wind is strong enough they tend to resemble the skin of a pealed banana.
The wood is more brown than pink and has a waxy look. Very dense. Excellent for our uses.
You would have to harvest your own. It is well worth the effort. You might even be considered favorably for harvesting it.
 
Boxwood is really the only material I am comfortable with. Castello is OK. I use pliers a lot and boxwood can be held firmly without too much surface damage. I find pear wood less accommodating.

If you'll pardon the pun, I'll "go out on a limb" here and suggest something I have myself only contemplated at the moment, but which is in my "gotta try it" pipeline. As we know, boxwood is hard to find and costly. It remains unmatched for small carving work. What you might try, or rather beat me to trying, as a substitute for boxwood is "solid surface material." Invented by DuPont, t was originally only available on the market under the brand name "Corian" and only sold to the manufacturers' licensed fabricators, but similar, if not identical, material is now manufactured by others. Currently popular brands include Avonite®, HI-MACS®, Corian®, Livingstone®, Staron®, Hanex, Meganite®, Wilsonart®, and Formica® Solid Surface.

It's most commonly encountered in the form of kitchen and bathroom sinks and countertops. It's an acrylic polymer. It's produced as sheet material in thicknesses of 1/4", 1/2", and 3/4" and is glued together with a proprietary adhesive or standard epoxy adhesive. It can be worked with standard woodworking tools. From what little of it I've been able to source and work with, it is very easy to cut and shape with a circular saw or router and bits, but it does make something of a mess because the sawdust and shavings produced are a plastic material that seems to pick up a static charge that makes them stick to everything and cleanup is a bit of a pain.
I have not tried carving any of it with hand tools, but it machines beautifully. I am considering trying to use some of it for making small scale blocks, belaying pins, and the like. I expect it would carve very nicely using rotary bits and dental burrs. It comes in many colors, but I expect it is relatively accepting of most paints.

As far as I know, you can only obtain this stuff from wholesale fabricators who aren't interested in selling bits and pieces of offcuts, but, through my connections in the trades, I've been able to talk a couple into selling me some "out the back door" now and again. (I last got a piece some years back to make a table extension for my Unisaw with an inset for a router.) If you can find a fabricator (usually kitchen remodeling outfits) that you can get some scraps from, it might be interesting to play with it and see if it might not work for modeling material. Granted, it's not wood and I'm a bit of purist in terms of archival material, but i do think that this stuff should be sufficiently archival to qualify for modeling use. Actually, if you can find some colored white or light cream, one would be hard put to distinguish it from ivory or bone even at close viewing distances.

If anybody tries this before I get around to it, please do post your findings!
 
I use pliers a lot and boxwood can be held firmly without too much surface damage.

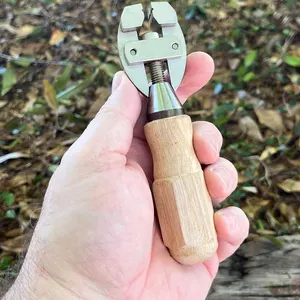
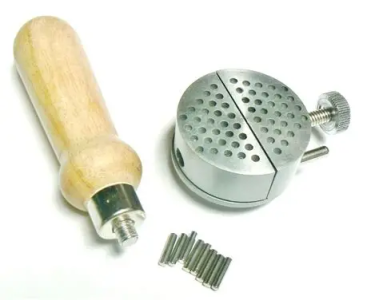
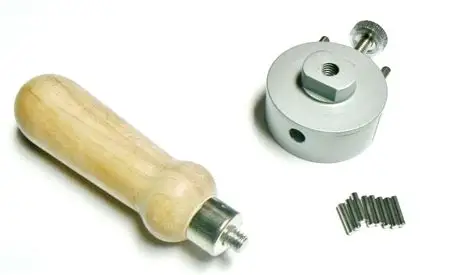
Have you tried holding boxwood workpieces in a smooth-jawed jeweler's hand vise (which may be called something else on your side of the Pond?) That took care of most of the surface damage issues for me. There's also the option of a "universal" hand vise for holding irregularly shaped workpieces. It took me years to get myself out of the bad habit of just grabbing the nearest pair of pliers to hold something that should have been held by a tool made to do that properly. ;)

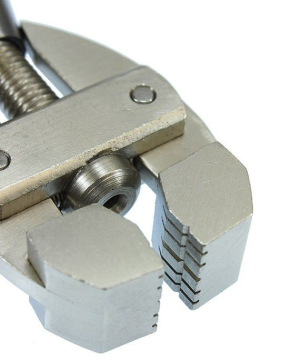
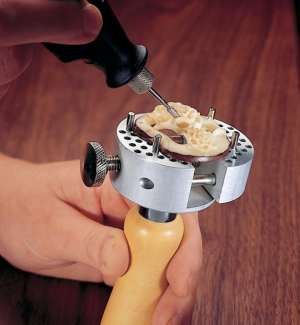
I'm sure you've got more than one of these types of hand vises in your jeweler's tool kit, but I'll attach a couple of examples for anybody who isn't familiar with these very useful modeling tools. They are widely available online and at professional jewelry supply houses and on Amazon. They retail for around $25 and up. As usual, the lower priced versions are Asian knock-offs with lower quality fit, finish, and materials, but otherwise indistinguishable from the more expensive versions, so study the online offerings closely.


1763157560455.png
1763157426912.png
The jaws close flat against each other when the handle is twisted, pushing the cone at the top of the handle upwards against the bottom legs of the jaws to close them. The vertical notches in the jaw faces are for holding various gauges of wire when using the vise to pull wire through a drawplate. The horizontal groove in the jaw face is for holding round rod stock. The handle and threaded center bolt are hollow to permit long pieces of wire to extend through the handle as might be desired for working close to the end of a long thin workpiece or for "choking up" on long wire pieces drawn progressively through a drawplate.


On this "universal" style jeweler's hand vise below, the pins are placed as required to hold irregular shapes. The pins can be placed inside the edges of a hollow workpiece such as a finger ring and then opened to hold the piece firmly, or, as usual, on the outside edges to grasp it by compression. The handle on this style screws off so that the vise can be then held firmly in a bench vise or on a milling table by clamping onto the flats on the hand vise's "neck" as shown in the last picture below.
1763155044463.png'
1763156351795.png
1763156879304.png
 
Last edited:
if you can find some colored white or light cream, one would be hard put to distinguish it from ivory or bone even at close viewing distances.
I think Richard may have been about framing stock and not knight heads, port wreaths, figureheads. ......

But since you mentioned bone:

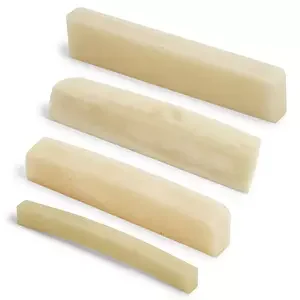
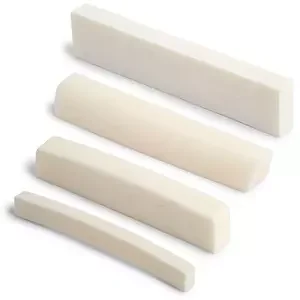
I came across this:6000-v-1-3000.webp6000-1-bleached-3000.webp rectangular blocks of actual bone

https://www.stewmac.com/luthier-too...ls/nuts-and-saddles/bleached-white-bone-nuts/

I took a shot at it with a sharp chisel - not easy to cut.
 
There is a Pear species that has harder wood than Pyrus communis.
It is Pyrus calleryana. Callery Pear. Over here the most common variety is Bradford Pear. It is a common street planting - originally a fad and now a pest.
Bradford's have "Y" branch growth. When they get large enough and the wind is strong enough they tend to resemble the skin of a pealed banana.
The wood is more brown than pink and has a waxy look. Very dense. Excellent for our uses.
You would have to harvest your own. It is well worth the effort. You might even be considered favorably for harvesting it.
Interesting. I have seen examples on line and it is a bit too heavily figured for my taste.
 
Have you tried holding boxwood workpieces in a smooth-jawed jeweler's hand vise (which may be called something else on your side of the Pond?) That took care of most of the surface damage issues for me. There's also the option of a "universal" hand vise for holding irregularly shaped workpieces. It took me years to get myself out of the bad habit of just grabbing the nearest pair of pliers to hold something that should have been held by a tool made to do that properly. ;)

I'm sure you've got more than one of these types of hand vises in your jeweler's tool kit, but I'll attach a couple of examples for anybody who isn't familiar with these very useful modeling tools. They are widely available online and at professional jewelry supply houses and on Amazon. They retail for around $25 and up. As usual, the lower priced versions are Asian knock-offs with lower quality fit, finish, and materials, but otherwise indistinguishable from the more expensive versions, so study the online offerings closely.


View attachment 556945
View attachment 556943
The jaws close flat against each other when the handle is twisted, pushing the cone at the top of the handle upwards against the bottom legs of the jaws to close them. The vertical notches in the jaw faces are for holding various gauges of wire when using the vise to pull wire through a drawplate. The horizontal groove in the jaw face is for holding round rod stock. The handle and threaded center bolt are hollow to permit long pieces of wire to extend through the handle as might be desired for working close to the end of a long thin workpiece or for "choking up" on long wire pieces drawn progressively through a drawplate.


On this "universal" style jeweler's hand vise below, the pins are placed as required to hold irregular shapes. The pins can be placed inside the edges of a hollow workpiece such as a finger ring and then opened to hold the piece firmly, or, as usual, on the outside edges to grasp it by compression. The handle on this style screws off so that the vise can be then held firmly in a bench vise or on a milling table by clamping onto the flats on the hand vise's "neck" as shown in the last picture below.
View attachment 556929'
View attachment 556941
View attachment 556942

You'd be suprised how many tools jewellers have for holding metal. Looking at photos of jeweller's benches give the impression that you need hundreds of tools. However, on most days very few holding devices get used because the skin on your fingers becomes extemely hard in short time. At that point your fingers become the most adaptable vice possible.

The key is to have a few good tools that you know well. Thats because muscle memory allows to use them in a wide range of ways. One of our party tricks was to create a visually flat surface on men's signet rings in a single stroke by using a flat file! Thats was on gold, which is a soft metal.

Regarding the types of pliers, we would spend most of the day using high-quality parallel pliers. Flat, half-round or round. Maybe two sizes of each. Depends on what you are working on.

An adjustable device, similar to that above, might be used on occasion. However, if it were used for wood the pins might make noticable indentations if a thin piece were gripped securely.
 
Last edited:
I think Richard may have been about framing stock and not knight heads, port wreaths, figureheads. ......

But since you mentioned bone:

I came across this:View attachment 556986View attachment 556987 rectangular blocks of actual bone

https://www.stewmac.com/luthier-too...ls/nuts-and-saddles/bleached-white-bone-nuts/

I took a shot at it with a sharp chisel - not easy to cut.
I have a large stock of ivory which can't even be used. Nowadays we remove the ivory key wafers when we export old and antique pianos. The key front is just a piece of bone.

It saddens me to think of the suffering that was caused to obtain it, and it doesn't feel that different to good plastics. :-( The only thing it can be used for is the occassional key wafer replacement for a piano that still has legal ivory keytops, although it would be illegal to charge a fee for it and I've never heard of anybody doing that (£250,000 fine and six year imprisonment).
 
Last edited:
rectangular blocks of actual bone
Large, dried and bleached beef bones can be purchased in just about any pet store these days. Sold for dogs, of course. Besides long bones, you can also get knuckle bones which have a more solid, less grainy texture. With my wife's kennel hobby, there's a ton of them kicking around our place.
 
O. K.
Still looking into making a Granado X-section and working on it at present.

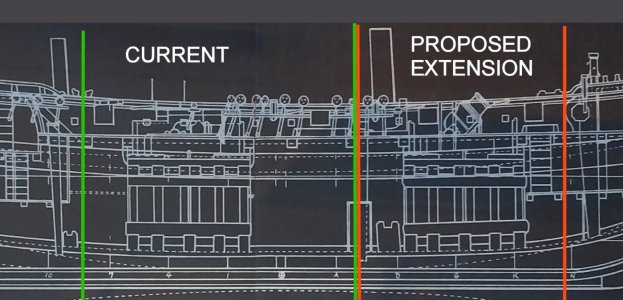
My plan is to extend the Staudt model towards the bow as seen below. I have already made the Miniature Arts 1/72 kit and want this next project to be a challenge and include scratchbuilt elements. I am considering 1:96 or 1:160 scale. I may make one, then the other as this is a learning experience.

Granado_Extension.jpg

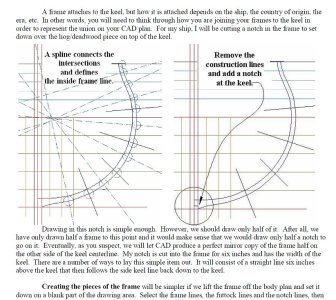
I'm following the Wayne Kempson CAD tutorial and am trying to determine the inside frames line as seen below...................

in-out frames.jpg


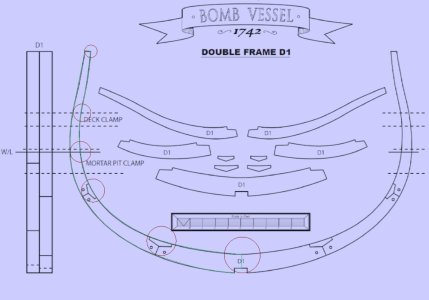
I have already lofted extra frames to the exterior molded dimension in order to match the Staudt plans, but need to know the interior dimensions. Below is the last frame of the Staudt plans which my extension is added to. Could I take the dimensions as shown by the red circles and transfer them to the extension frames?.....


in-out Granado.jpg

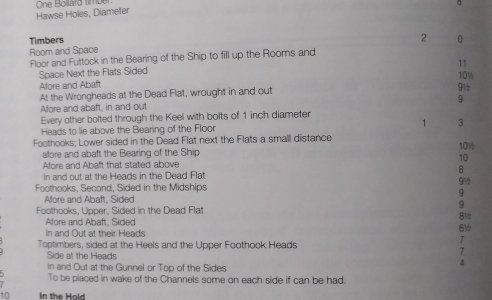
If not, Goodwin's book has a simplification of the dimensions and scantling list, and I suspect that the information for the interior is somewhere in this section. Is it the " In and out at the/their heads", dimension? Would appreciate any help.....................................


20251121_195047.jpg
 
Last edited:
Back
Top