This is going to be great! Looking forward to seeing more.Made some time to work on the Duc as well.
The block is mostly finished:
View attachment 526396
Compared to the Anniversario model with the extra added items, I added some extra-extra tubes and wires. I found the manual from Autograph that released a very detailed set for the Duc. Only that set is quite expensive ......... about 2x the price of the Pocher kit.
View attachment 526397
Then I'm going to scratch build some things from that manual.
I'm going to apply it to the exhaust system:
View attachment 526398
Just like with the previous model (see insert), all screw holes (A) will be closed.
Then I take the part apart again and all thickenings (B) are sanded away, all seams will be filled and the entire exhaust is sanded, with the exception of both end-muffers.
As an idea of what I'm going to do:
-various flanges and welds,
-clamps,
-flat control with wiring,
-2 Lambda sensors,
And what I'm going to pay most attention to: the weathering of all this so that it looks like it's had to work hard. With a heavy discoloration of the exhaust.
I will try to make pictures of the several steps.
Regards, Peter
-

Win a Free Custom Engraved Brass Coin!!!
As a way to introduce our brass coins to the community, we will raffle off a free coin during the month of August. Follow link ABOVE for instructions for entering.
-

PRE-ORDER SHIPS IN SCALE TODAY!
The beloved Ships in Scale Magazine is back and charting a new course for 2026!
Discover new skills, new techniques, and new inspirations in every issue.
NOTE THAT OUR FIRST ISSUE WILL BE JAN/FEB 2026
- Home
- Forums
- Ships of Scale Build Logs
- Super Detailing Static Models / Other Genres
- Super Detailing Static Models
You are using an out of date browser. It may not display this or other websites correctly.
You should upgrade or use an alternative browser.
You should upgrade or use an alternative browser.
Pocher 1:4 Ducati Panigale S ‘Anniversario’ + ‘Final Edition
Thanks, Dean. It was quite exciting and a challenge to tackle these parts rigorously.This is going to be great! Looking forward to seeing more.
Regards, Peter
First I started by removing the flanges:
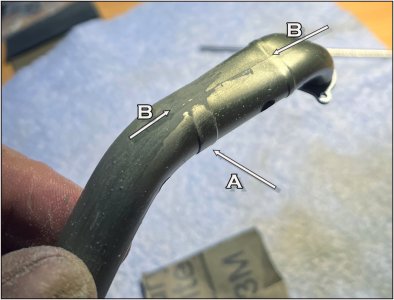
At arrow A it is still there, on the left it is gone.
Between arrows B the seam between both parts can be seen. Although the fit of the parts at Pocher is very neat, these types of seams are even more present after spraying.
Another example:
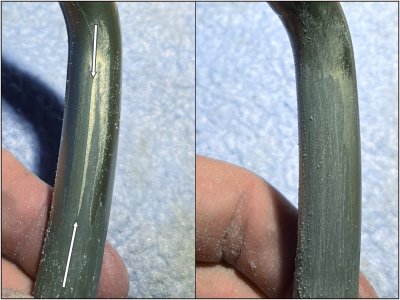
In the left image I am filing the raised left part between the arrows. A clear sharp edge can still be seen.
In the left image the raise is gone. In order not to look at a flat surface I have turned the part to the left and right while filing, which allows me to maintain an even round shape.
The rough work is done:
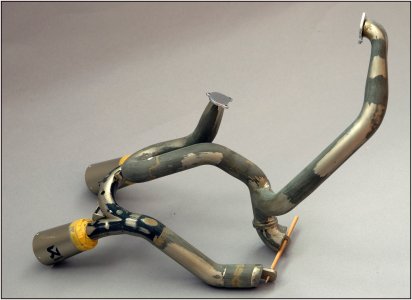
On both parts all holes filled with pieces of the frame from which the parts come. The frame parts have exactly the diameter of the screw holes. All seams filled with a filler and then everything sanded.
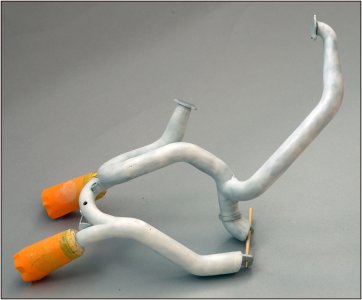
And provided with the first layer of primer. I can now further smooth out all the small irregularities.
Regards, Peter

At arrow A it is still there, on the left it is gone.
Between arrows B the seam between both parts can be seen. Although the fit of the parts at Pocher is very neat, these types of seams are even more present after spraying.
Another example:

In the left image I am filing the raised left part between the arrows. A clear sharp edge can still be seen.
In the left image the raise is gone. In order not to look at a flat surface I have turned the part to the left and right while filing, which allows me to maintain an even round shape.
The rough work is done:

On both parts all holes filled with pieces of the frame from which the parts come. The frame parts have exactly the diameter of the screw holes. All seams filled with a filler and then everything sanded.

And provided with the first layer of primer. I can now further smooth out all the small irregularities.
Regards, Peter
After sanding, filling and sanding again I started applying the details:
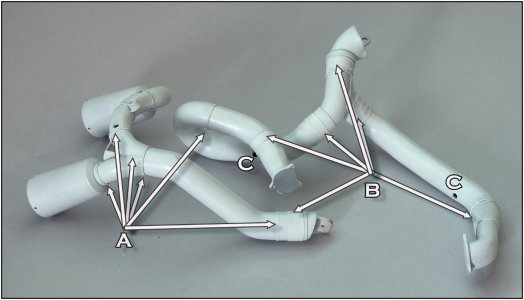
A: the weld lines, made of Evergreen 0.5 mm wire that I hammered with a sharp hammer,
B: the flanges of Evergreen 0,25 mm sheet , some of which have 2 layers, with adjacent welds,
C: 2 holes for the Lambda sensors. The hole for the exhaust flap control is not visible.
Also decided to paint both end-muffers so that the color will be more in line of the rest. A plus for that decision was that Paul Koo has put muffer decals in his kit. And tiny torx bolts for attaching the end grids. Therefore 2x4 tiny holes drilled.
Then both parts provided with a new base layer. This has to be sanded again before I can start with the actual colors.
Regards, Peter
Last edited:
Looks great! Going to be very realistic when done.After sanding, filling and sanding again I started applying the details:
View attachment 527534
A: the weld lines, made of Evergreen 0.5 mm wire that I hammered with a sharp hammer,
B: the flanges of Evergreen 0,25 mm sheet , some of which have 2 layers, with adjacent welds,
C: 2 holes for the Lambda sensors.
The hole for the exhaust flap control is not visible.
Then provided with a new base layer. This has to be sanded again before I can start with the actual colors
Regards, Peter
Before I can start painting, I want to have all the other parts ready. Like 2 types of clamps.
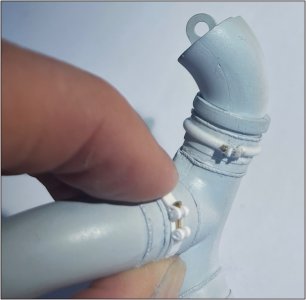
Above a large clamp consisting of 2 half brackets. Below a band clamp. With a view on the several weld lines ........
Some pictures of how I made them.
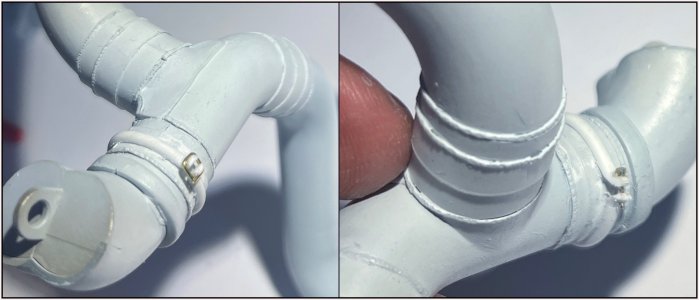
The 2 half brackets are made of Evergreen 2 mm half round. On one side they are held together with a square bracket. On the other side the clamp is tightened with a M 0.8 mm bolt.
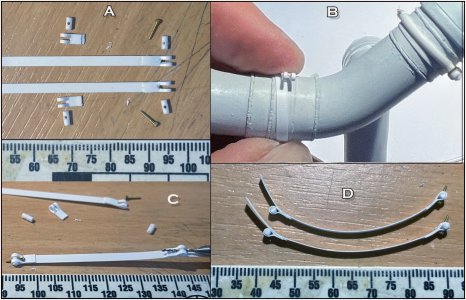
The band clamps are made of Evergreen 0.25 x 2.5 mm strip.
A: First I made the loop on one side where I cut out the slot. With 2 loose loops that have to be glued in the right place on the strip. Also 4 pieces of Evergreen 1.6 mm rod with a 0.8 mm hole.
B: The strip held around the flange to determine where the loose loop should go.
C: The loose loop glued, the 2 bushings inserted and the holes aligned.
D: Then you get these band clamps.
Regards, Peter

Above a large clamp consisting of 2 half brackets. Below a band clamp. With a view on the several weld lines ........
Some pictures of how I made them.

The 2 half brackets are made of Evergreen 2 mm half round. On one side they are held together with a square bracket. On the other side the clamp is tightened with a M 0.8 mm bolt.

The band clamps are made of Evergreen 0.25 x 2.5 mm strip.
A: First I made the loop on one side where I cut out the slot. With 2 loose loops that have to be glued in the right place on the strip. Also 4 pieces of Evergreen 1.6 mm rod with a 0.8 mm hole.
B: The strip held around the flange to determine where the loose loop should go.
C: The loose loop glued, the 2 bushings inserted and the holes aligned.
D: Then you get these band clamps.
Regards, Peter
Last edited:
And it was time for me to start spraying both parts of the exhaust:

The whole thing in Titanium as the basic layer.
The Autograph manual advised using AK's XTREME METAL. Bought a set of the recommended colours:
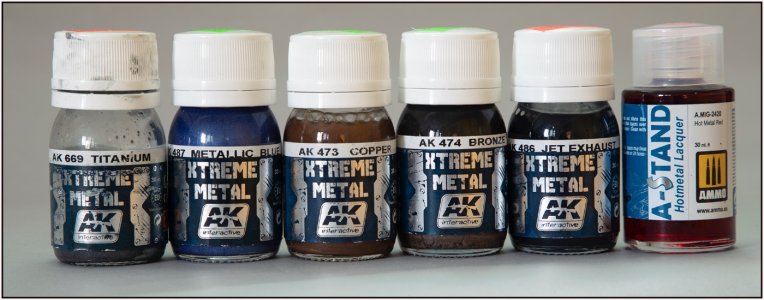
This paint is new to me but I really liked it. Used straight from the bottle. It can be applied very thinly. If you get a wet spot somewhere, it will flow away nicely into the paint you spray around it. As soon as I was at the end of a part, I could already apply the next layer, etc. etc. etc. Until I had an overall even coverage.
For the EXTREME METAL range they also have a Thinner&Cleaner (AK470). And I used the Primer&Microfiller (AK759) for the base layer.
The advice was to also use ALCLAD II's HOTMETAL RED. I couldn't find it anywhere and that brand has apparently been replaced by A-STAND.
When everything is properly dry, the other colours are applied according to the Autograph manual. It looks impressive there. Hopefully it will be the same for me soon.......
Regards, Peter

The whole thing in Titanium as the basic layer.
The Autograph manual advised using AK's XTREME METAL. Bought a set of the recommended colours:

This paint is new to me but I really liked it.
For the EXTREME METAL range they also have a Thinner&Cleaner (AK470). And I used the Primer&Microfiller (AK759) for the base layer.
The advice was to also use ALCLAD II's HOTMETAL RED. I couldn't find it anywhere and that brand has apparently been replaced by A-STAND.
When everything is properly dry, the other colours are applied according to the Autograph manual. It looks impressive there. Hopefully it will be the same for me soon.......
Regards, Peter
Thanks, Stephan. Most of the credits goes to the manual of Autograph. Only they made the parts in the special kit and I have to make them scratch. But it give me more satisfaction then “use this piece, glue it that that piece, paint it Titan etc ….”.Your keen eye for detail is so extra extraordinarily refined. Again, a part that can not be mistaken from real.
Regards, Peter
After using the recommended colors, now the final step:
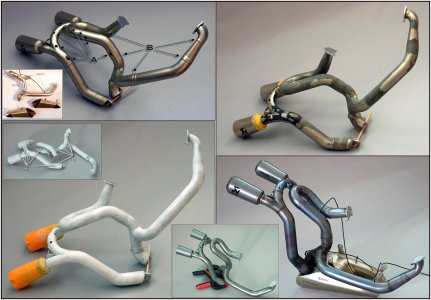
In terms of logical recommended steps, build up from light to dark.
After the Titanium, the Metallic Blue, the Copper + Bronze and finally the Pale Burn Metal/Jet Exhaust and some Hot Metal Red.
Then carefully applied to the engine:
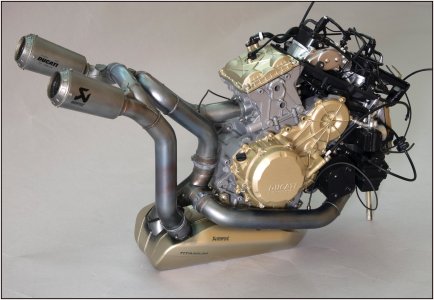
The end muffers provided with the little torx-bolts and decals from the Paul Koo kit
The other side:
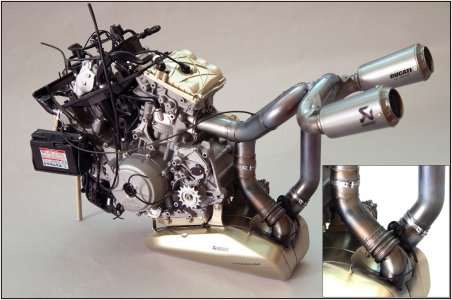
With a insert with a bit more view of the parts at the connection to the main-muffler. Lightened the dark parts a little.
A view of all the pipes and bends:
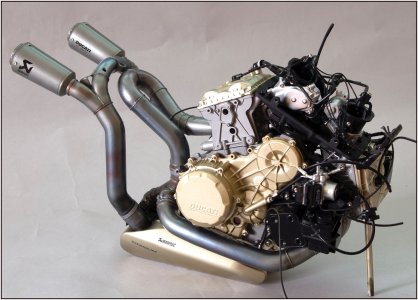
The exhaust gases first go to the muffler under the engine and then to the two rear mufflers.
Not quite perfect but I'm still happy with this new genre for me: special paint and wheathering.
Regards, Peter

In terms of logical recommended steps, build up from light to dark.
After the Titanium, the Metallic Blue, the Copper + Bronze and finally the Pale Burn Metal/Jet Exhaust and some Hot Metal Red.
Then carefully applied to the engine:

The end muffers provided with the little torx-bolts and decals from the Paul Koo kit
The other side:

With a insert with a bit more view of the parts at the connection to the main-muffler. Lightened the dark parts a little.
A view of all the pipes and bends:

The exhaust gases first go to the muffler under the engine and then to the two rear mufflers.
Not quite perfect but I'm still happy with this new genre for me: special paint and wheathering.
Regards, Peter
Last edited:
Peter, you may be a shipwright at heart, but when it comes to bikes, you're nothing short of a master bikewright!
Thanks, Jim. I love them both, although I haven't a ship in 1:1.Peter, you may be a shipwright at heart, but when it comes to bikes, you're nothing short of a master bikewright!
Regards, Peter
- Joined
- Mar 11, 2020
- Messages
- 213
- Points
- 143

This is one COOL looking model, The details, WOW!!!!
You are doing an excellent job building it.
Marcus
You are doing an excellent job building it.
Marcus
Thanks for the compliments, Marcus. Even though it's my 3rd, it's still fun to explore new paths.This is one COOL looking model, The details, WOW!!!!
You are doing an excellent job building it.
Marcus
Regards, Peter
While the Balder's various paint stages were drying, I took the time to work on the Duc as well.
I made a few modules that can now be assembled:
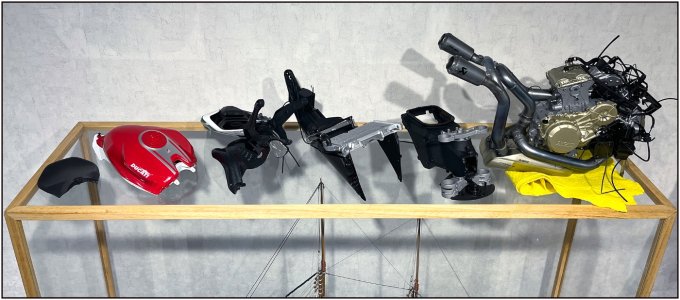
First, the airbox with part of the front fork attached on top:
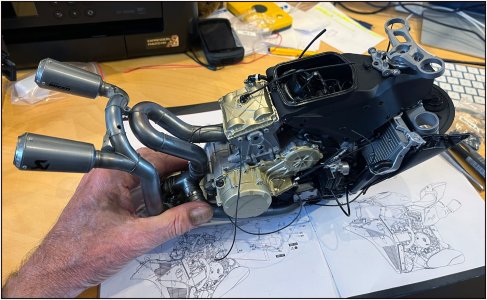
Everything is balancing on a section of the exhaust, so I have to hold it in place.
The rear frame with covers:
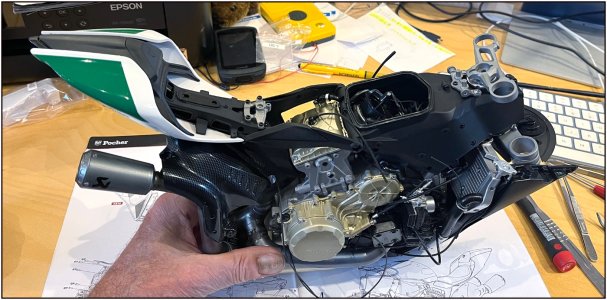
When assembling the modules, it's important to be careful how you hold and lay everything down. There are a lot of protruding parts.
The tank and seat have been installed, and this is how it looks now:
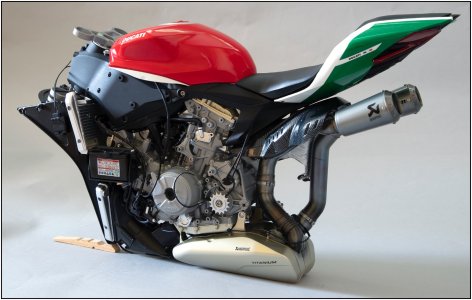
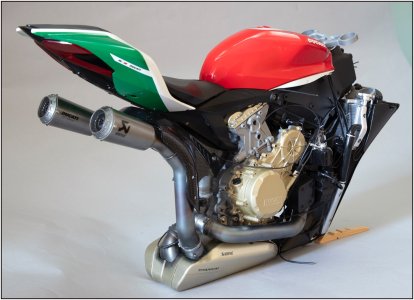
There are still a lot of cables and hoses sticking out. These will be connected piece by piece in the various subsequent steps.
The fuel filler cap itself is already nicely detailed. Made a little extra detail:
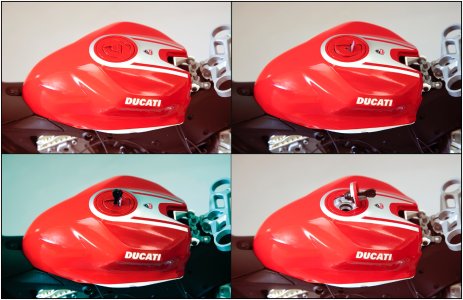
The fuel filler cap is closed with a small flap. When you open the flap, you can now see the lock opening. On the Pocher part, it was completely closed. So, I milled a small slot. The key can now be inserted, and then you can open the flap.
Fill it up ......
Regards, Peter
I made a few modules that can now be assembled:

First, the airbox with part of the front fork attached on top:

Everything is balancing on a section of the exhaust, so I have to hold it in place.
The rear frame with covers:

When assembling the modules, it's important to be careful how you hold and lay everything down. There are a lot of protruding parts.
The tank and seat have been installed, and this is how it looks now:


There are still a lot of cables and hoses sticking out. These will be connected piece by piece in the various subsequent steps.
The fuel filler cap itself is already nicely detailed. Made a little extra detail:

The fuel filler cap is closed with a small flap. When you open the flap, you can now see the lock opening. On the Pocher part, it was completely closed. So, I milled a small slot. The key can now be inserted, and then you can open the flap.
Fill it up ......
Regards, Peter
Excellent work Peter! Love the exhaust!
Thanks, Dean. Much appreciated from you with your painting skills!Excellent work Peter! Love the exhaust!
It was a new challenge for me to do this with the airbrush. But the AK metal paint works well, with a smooth finish.
I'm also happy with the colors: it looks like the engine was thoroughly tested on the Dyno. It delivered slightly more power than the factory-specified 209.4 hp @ 11.000 rpm .......
Found a nice short video on the Ducati site:
Last edited:
The modules to set the Duc on tire are ready:
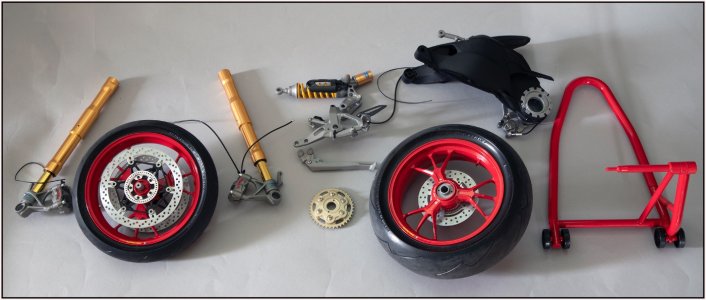
But I had to do something on the tires. This is the rear one:
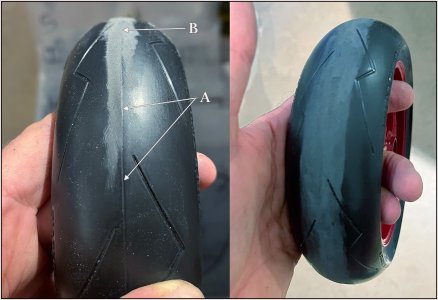
The arrows 'A' are pointing to the casting seam, which also had a slight height difference on either side. Actually unworthy of Pocher!
So I started filing the center of the tire, arrow 'B', until I had a smoother run. But just like the exhaust, the tires should also have a slightly used look. A better picture will follow soon ......
Here are the modules attached and the Duc hangs in the garage support:
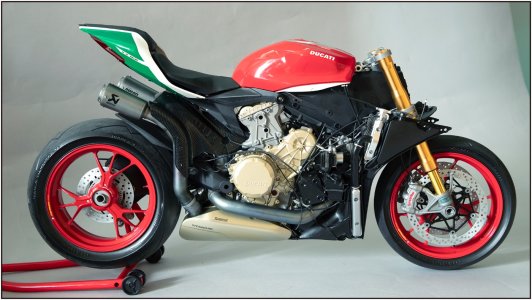
And you can still have a nice view on the exhaust and the used rear tire: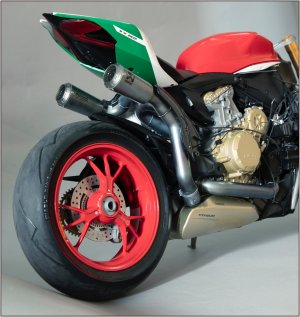
Still te be add a lot of small parts, but now it's time again for the Balder.
Regards, Peter

But I had to do something on the tires. This is the rear one:

The arrows 'A' are pointing to the casting seam, which also had a slight height difference on either side. Actually unworthy of Pocher!
So I started filing the center of the tire, arrow 'B', until I had a smoother run. But just like the exhaust, the tires should also have a slightly used look. A better picture will follow soon ......
Here are the modules attached and the Duc hangs in the garage support:

And you can still have a nice view on the exhaust and the used rear tire:

Still te be add a lot of small parts, but now it's time again for the Balder.
Regards, Peter
Last edited:
Thanks, Stephan. You are right. Luckely we have this sub-forum: Super Detailing Static Models / Other GenresActually, it's quite nice to have a different model every now and then. You make again a nice piece of art from it.
With this explanation:
This forum gives our members a chance to share ideas, techniques, and results of "super detailing" their models. This will not be limited to ship models as the techniques used to super detail models typically spans all types of models, not just ships. It also gives our members the chance to showcase their modeling prowess, regardless of whether their best work such as Planes, Cars, Trains, Motorcycles, Figurines, etc.
Regards, Peter

