Pride of Baltimore II by David Lester - Model Shipways, 1:64 scale

Joined
Apr 30, 2019
Messages
98
Points
133

Location
Cobourg, ON
As there is no rest for the wicked, I am now launched into my next project - the Pobpob! - (plank on bulkhead Pride of Baltimore.) Actually two projects, as I'm doing something I've never done before and am building two kits at the same time, the other being the Artesania Latina Titanic lifeboat.

On the POB, I have the bearding line cut and the bulkheads in place. These are the best fitting bulkheads I've run across yet; they lined up perfectly with the top of the keel and the bearding line/rabbet at the bottom. Not sure how they will all line up when I start fairing, but at a glance they look like they will be pretty good. This doesn't look like it will be too hard a planking job either.

David

20191004_142735.jpg
 
- Dave, that's very kind of you to say "this should be fun," but it's a little like having Leonardo da Vinci watch me do a paint-by-number version of the Last Supper. :) Your woodworking skills are so finely honed.

I'm really looking forward to this one. It won't have all the involved rigging that CWM did, which really got me down by the end. I think it's a very beautiful ship and there are many resources available to help me get the details right.

I've studied the plans extensively already and when I went to visit the ship during the Tall Ships Challenge last month, I went prepared to photograph the little details that had eluded me. (They're pretty boring pictures for someone else to look at, but they work for my needs.) I would have been disappointed anyway if I wanted beautiful pictures as the crowds were so huge they would have been impossible to get.

One big decision on this ship that doesn't arise for many others is whether to model it as the ship actually is, or to model it as it would have looked had it been built during the age of the Baltimore Clippers. The kit includes many details that are on the actually ship, but are modern necessities such as propellers, radar, water spigots, etc. My inclination is to build it as it actually is and to include all the modern details.

One question that was confusing me is the colour of the hull. Most pictures show it with a light green colour like patinated copper, while the odd one shows it with a much darker green. Yesterday on their Facebook page I saw it with a dark green colour and it looked freshly painted. I emailed them and was pleased to get a quick response. They confirmed what I guessed - that it's dark green when they paint it and it changes colour over the course of the season. So that's a decision too, whether to use the light or dark green.

Thanks again everyone for your interest.
David
 
Good Morning,
I have been progressing slowly on my POB; too many leaves to rake and too much painting at my daughter's house to do!

I've attached the plankshear and wales. This plankshear is a tricky piece to position correctly. As is so often the case, the location of the gunports is key. I think I have it more or less in the right spot.
20191029_201744.jpg

I hate to add paint this early on in the process, but I couldn't think of another way to get a good crisp delineation between the yellow and the black where the plankshear and the wales meet the hull. I have now completely covered this area with masking tape to protect it while I proceed to other areas.

The plankshear is yellow outboard and dark red inboard. I've scored it with a razor blade to help with the delineation when I add the red paint and the inboard side.

20191029_201628.jpg

20191029_201648.jpg

The plankshear doesn't actually fit the hull very well. No matter what I did it came up about a half inch too short. This has to be a design flaw, because even allowing for minor differences in the way the hull is shaped or faired from one builder to another, a half inch is a lot.

By getting the holes for the stanchions where it appears they ought to be according to the plan, the shortfall was at the bow. I ended up cutting off the mating ends of the plankshear and making a new piece to fill in the space at the bow. It looks a little rough at this stage, but there is much to add at this location which will virtually bury it.

Parts of the framework appear discoloured because I wasn't happy with its location on my first attempt and decided to remove it and relocate it. Dissolving the glue spread the black paint around a little bit.


20191029_201919.jpg

So, that's all for the time being. I'm now about to start planking the counter and lower transom.

David
 
Good Morning,
Brief update -
One problem I often encounter is this: early on in the build, before planking the hull, I glue pieces of scrap the mast mortises and then cut a rectangular tenon on the ends of the masts and fit them snugly in the mortises. So far so good. However, much later, when I square up the top ends of the masts, I often have trouble getting the square exactly in the right plane. If I leave it like that, the mast top isn't properly aligned and it can't be left that way. In order to fix it, I end up trimming the lower tenon, so I can rotate the mast, but it results in a very loose and poor fit and I wonder why the heck I spent so much time getting the tenon to fit well in the first place.

This time, I'm trying something different. I padded the mast mortises with scraps of wood, so that they are actually square rather than rectangular. Then I carved round tenons on the masts. They fit very snugly and at the right angles. Now my hope is that later I can simply rotate the masts to line up properly without losing the nice snug fit.

20191105_114005.jpg

20191105_114049.jpg

Planking - I have to admit it - I am probably the world's worst hull planker. It's never my favourite part of the build and I never approach it with a good attitude. The POB is a single planked hull and I was not happy with the job I was doing. On top of that, the plans indicate planks 1/8" wide but the provided strips are 3/16" wide which doesn't look quite right to me. I was fretting about it all, but I think I have a solution.

I had bought some cherry from Cornwall Model Boats that is .5mm x 3mm to upgrade the decking and I bought a ton of it. (Might as well get my money's worth out of the shipping fee, right?) 3mm is approximately 1/8" so I am going to double plank the hull with this material. It's so thin that it's really just a veneer, but I think it's going to address my problem. Once I made this decision, I was able to finish the first layer without more fretting, as I knew I would just sand the heck out of it and use a lot of wood filler.


20191105_113926.jpg

I've now got a good smooth solid base, (although ugly as sin,) and I'm ready for the veneer layer.

Thanks again for your comments and likes.
David
 
Good Morning,
A little progress to report - To answer your question Jim, I think it's cherry veneer that I using. I ordered some along with some tanganyka from Cornwall Model Boats and it came all mixed in together and I honestly cannot tell them apart. I separated then as best I could by colour, but honestly, I can't be sure. God knows what they really were. They look virtually identical. The strips are .5mm by 3mm.

I ordered the veneer for the deck, but had enough to veneer the hull, which worked well.

Here is the deck -

20191125_093655.jpg


DSCN2622.jpg

(I took this picture when I visited the POB this summer at the Tall Ships Challenge. I can't believe I was able to get even one picture that didn't have hundreds of people in it! It was one crowded ship.)


The deck on the real POB is very dark (and to be truthful, a bit ugly.) I wanted to recreate the look of it, without it looking too rough. I used this cherry, or tanganyka or who knows what it is for the deck. I painted it with a mixture of orange and brown acrylic paint, watered down so that it acted more like a stain, then finished it with amber shellac. It pretty much gives the effect I was striving for.

20191125_093712.jpg

I experimented a bit with the red and yellow colours for the bulwarks and many of the deck fittings and am reasonably happy with the two shown above. They pretty much match those on the real ship.

I have Bob Hunt's practicum for this kit, but have not really been following it, except in one respect. The instructions for the kit would have you glue all the stanchions into the holes in the plankshear and then plank them. It seemed to me that it would be very difficult to get them all standing at exactly the right angle and height, so here I used Bob's technique which was quite different.

He suggests doing each section between the gunports separately, by gluing the planks to the stanchions (having spaced them correctly first) and then placing each completed section of bulwarks onto the plankshear. This seems to be working very well. I have finished the starboard side and am currently completing the sections for the port side. (In the picture below, nothing is glued in place, just positioned for the picture.) I will paint each section before gluing it in place. I'm not a bad painter, but painting the plankshear and stanchions after they were assembled would be very challenging.

20191125_122538.jpg

That's all for now.

This is a nice kit - not too large a project, poses some challenge, but is not defeating. I'm really enjoying it.

David
 
Happy New Year Everyone!

I have been pretty derelict in my posting lately, so thought I better do something before the build gets too far along.

The hull is pretty much finished, bulwarks installed and top rail in place. The upper hull and inner bulwarks are painted. I'm still debating on the shade of green I'm going to use on the lower hull.

The stern caused me a bit of trouble. I never manage to get a perfectly symmetrical hull, which doesn't matter too much when you view the side of the model, but it's more noticeable when viewed from one end or the another. So, just as a carpenter has to do some fudging to get square factory made kitchen cabinets to fit into an out of square kitchen, I had to do quite a bit of tweaking to get the lettering and other details to fit an out of whack stern. This isn't the best stern I've produced, but after many tries, this is the one I'm going to live with.


20200102_140312.jpg

20191205_201234.jpg


I've started in on the deck furniture. There is a ton of it on this ship and the tolerances are pretty small - very little space between components. I know from experience that if I simply start at one end and work to the other that I'll either have no space left or too much space left. I was particularly concerned about that on this ship because of the number of items. That's the reason that I didn't build the coamings in before I planked the deck, which is my preferred method. I opted to have all of the pieces finished and moveable before fixing any of them in place.

My only exception is for the fife rails which I like to do first and get them positioned and then locate the other things working from the fife rails in both directions.

This ship has a lot of natural honey coloured woodwork and I was concerned about duplicating the look with basswood which is notoriously difficult to finish. My solution seems to be ok. It's a light wash of orange acrylic paint, very watered down, then followed up with a couple of coats of orange shellac.

20200102_140210.jpg

One detail that this ship has that I haven't run across before is "baggywrinkles."

images.jpg

I've been wondering how I'm going to recreate those. I asked a friend who is an avid knitter if she had any fuzzy wool, so she gave me these samples:

20200102_142148.jpg

I might be able to make one of them work, but then yesterday I spied this in the grocery store and bought it on spec:

20200102_142107.jpg

In many ways it looks less like a cleaning mitt than a baggywrinkle dispenser! If this proves to be my solution, it looks like I have a lifetime supply of baggywrinkles.

That's where I'm at for now. Many thanks for looking int.
David
 

Attachments

  • 20200102_142107.jpg
    20200102_142107.jpg
    322.4 KB · Views: 3
David,
Hows the POB building going? I have put aside the scratch build of the USS Constitution, biting off more than I can chew at the moment. I purchased one of those super inexpensive, 20$ models of the POB. The directions are washed out from too many printings. I've downloaded several articles and photos of the Pride of Baltimore II and bashing away at it. Much appreciate what your doing here and wondered if you are progressing?
Regards,
Dan
 
Hello Dan,
I have been working away at my POB and it's coming along well, but I'm afraid I have been very negligent with respect to my build log. I've been taking pictures, but I never seem to get around to posting updates. I'll get something together and post it today! Thanks for asking.
David
 
Hello Dan,
I have been working away at my POB and it's coming along well, but I'm afraid I have been very negligent with respect to my build log. I've been taking pictures, but I never seem to get around to posting updates. I'll get something together and post it today! Thanks for asking.
David
We‘ ve been waiting!
 
Forgive me Followers - it’s been over a month since my last update!

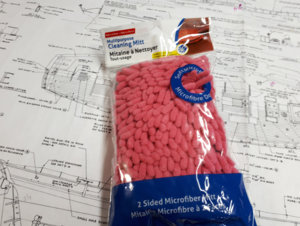
In my last post I was experimenting with ways to make the baggywrinkles. I found this “cleaning mitt” which looked like an ideal solution. It would have been perfect, however the scale was way too big, and the pieces fell apart if I tried to cut them down. So I prowled the dollar store and found this cat toy. These little thingys would have been perfect, as they were about the right scale, but when I cut them off and attempted to thread them on the line, they just crumbled, so it’s back to the drawing board for the baggywrinkles.

20200102_142107.jpg

20200216_125731.jpg

At this point, the deck and hull are pretty much finished; later I just have to add the stanchions and rope railing along the rail.

I really hated the supplied life rings. They are cast, including the rope that surrounds them, which looked ridiculous to my eye, so I found these ones at Bluejacket without rope and then I added some rope myself. Not actually all that much fun to do, but the result is well worth it.

20200112_190115.jpg


20200122_114959.jpg

20200122_115323.jpg

20200122_115419.jpg

You may notice that I have omitted the airports that run down both sides of the deck. The ones provided have a large rim that protrudes above the surface, and I just hated the look of it. I did use them on the cabins, but I hated the thought of them on the deck. I know I can buy flush ones, but they would have required very precise holes to be drilled and I doubted my ability to do that 14 times. One misstep and the whole deck would have been ruined. The supplied ones with the large rim would have been forgiving and the holes easy to drill, but I opted to omit them nevertheless.

20200122_115137.jpg

20200228_092918.jpg

20200228_092939.jpg

I was perplexed by the colour of the hull. It never appears the same twice in any of the pictures I find. It seems to change over the course of a season in the water. However, I found a picture of the hull being painted, so I used that one as my guide and managed to find a decent enough match.

darkGreen.png

20200228_093013.jpg

20200228_093030.jpg

I’m now well into the rigging and it’s always the same – as I near the end of the woodworking part of the build, I can’t wait to start the rigging and then as soon as I’m into it I wonder why I was so anxious to begin. In any case, it’s going fine.

20200201_161835.jpg

I have been experimenting with upgraded blocks. On my CW Morgan I used Bluejacket cast blocks for the larger ones and Syren for the smaller ones. Both were great. For this model, I am trying Master Korabel which I bought from Vanguard Models. In addition to being good looking, these ones are also nice to use. They have very sharp grooves cut into each corner and the line really grabs. They never slip out of place. However, they are so finely made, that every hole has to be re-drilled to get the rigging line through.

20200228_092039.jpg

20200228_092817.jpg

20200228_092438.jpg


I recreated the star decoration on the bowsprit on the computer.

DSCN2678.JPG

20200228_102345.jpg

So that’s it for now. Many thanks,

David
 
Back
Top