Ragusian Carrack by jack.aubrey - Marisstella - 1:59 scale [COMPLETED BUILD]

Monday, January 15, 2018

I'm working on three fronts, making some experimentation to see the possible results.

1) Planking part of the stern post with the second and final cherry wood strips.
The photo here below shows the final result of how the hull should 99% look in its outer part, after the second planking. Live is much more realistic and I like it very much. For now the experiment ends here, but the work will continue on this track at the right moment.

01 Ragusian Carrack/15012018/IMG_20180115_204048.jpg
y4m43oWby9ipsba_1QzagPiARjWU4rsAj7AUDQn3


2) Removal of fake bulwarks stanchions of the midship bulkheads and construction of the internal side of the bulwarks
Here the work has just begun and consists in removing the fake stanchions on the proper bulkheads. In anticipation of this task I proceeded to make the bonding on these elements rather labile. Once the piece has been removed, I proceed to glue a strip (equal to that used for the planks) inside the bulwarks side, but positioned perpendicularly. The thickness now doubles but above all the strength of this area takes enormous benefit from the crossing of the wood grain. Work to be performed step by step.

02 Ragusian Carrack/15012018/IMG_20180115_204118.jpg
y4mOX8LBiGtoEm1_ERzZ5I777eeyjZGM6E9O-hSy


3) Start installation of the first planking on the main deck.
This operation is similar, apart from the dimensions, to what was done on the higher deck at poop. For technical reasons, the planking will be applied in two pieces. At the moment I'm starting this activity and I still have to understand the best way to proceed, but I think everything will be pretty good.

03 Ragusian Carrack/15012018/IMG_20180115_204129.jpg
y4mdTfkk5pFoewR4eMyXrgkbRajqk_EqgJXY5OHl


04 Ragusian Carrack/15012018/IMG_20180115_204245.jpg
y4mky7ur1c7mzLix4F6t9OT-8FYWn0aKcyOYYVl6


That's all for today, politely, Jack.
 
Thursday, January 18, 2018

The model of the Ragusian Carrack, also known as Argosy, is growing quite well, even if it takes small steps, day after day.
I particularly like the installation of the planks on the main deck. I remember, however, that this is only the first layer and some imperfections are admitted.
I discover now, while I'm writing, that I forgot to open the hole for the mizzen mast . .
Best regards, Jack.

01 Ragusian Carrack/18012018/IMG_20180118_233203.jpg
y4mTPfwvLa9JOJzrkBfRbNlH6EOjBam0dE8JL5aA


02 Ragusian Carrack/18012018/IMG_20180118_233248.jpg
y4mO7h6lC-g2eE-VRXzzitVJXeM4IYRxVyEwuiex


03 Ragusian Carrack/18012018/IMG_20180118_233302.jpg
y4mx7GseyMfBcWRw4pkTHvlrRaFL7G2c0QZ0ICjv


04 Ragusian Carrack/18012018/IMG_20180118_233310.jpg
y4mkJ52q2fMGQ_csFQNOQ9_S8CsPGzIANVUuOGO3


05 Ragusian Carrack/18012018/IMG_20180118_233323.jpg
y4mqTLd95xBy5uoncgDZA_Xh55t-ssoG2VTFJtRw


06 Ragusian Carrack/18012018/IMG_20180118_233442.jpg
y4m0g0yqVVhWtqlkkaRkglXTrUbhwY763YOgukRZ


07 Ragusian Carrack/18012018/IMG_20180118_233511.jpg
y4mMM6Y-HRtuB8N97Q_-ifojJNiqv5tTuLuguKj7
 
Saturday 27 January 2018

Yes I know, the images are very poor but I just could not do better because there was a very strange daylight and I had to use the flashlight. But the result was unsatisfactory anyway.

- I finished to apply the vertical strips inside the bulwarks and at the same time the fake stanchions on the bulkheads are now all removed. Now the area is completely smooth, ready to receive the last planking, made of cherry veneer, spread in the traditional, horizontal way.

- In the meantime I am carrying out the installation of the main deck using the walnut strips supplied with the kit. I decided to use them as first layer for this deck because there are plenty of them. At the end of the operation I will apply the final layer in tanganika as for the other two decks, already completed.

- I installed the waterways in the proper place, which will spread 1-1.5 mm from the deck.

I enclose the usual roundup of (ugly) images, regards, Jack.

01 Ragusian Carrack/27012018/IMG_20180127_154827.jpg
y4mcFqc6EmlwyYJ1TyOT5LreblrgkdRZQOhNNrjd


02 Ragusian Carrack/27012018/IMG_20180127_154850.jpg
y4mag478qX9XP3Eok1olxlfm5ZrsTZm2ZmvSnUKm


03 Ragusian Carrack/27012018/IMG_20180127_154901.jpg
y4mqg_Tu3FFBCTfHYBepgvGvhbmiy7NLemxmwcM9


04 Ragusian Carrack/27012018/IMG_20180127_154914.jpg
y4mmWJcMg-H5r09Ef0UoRDfINi0i68UPQpxWKw51


05 Ragusian Carrack/27012018/IMG_20180127_154929.jpg
y4mk0MPH9SwqeGS4jB0M7qMnntKQQB2D66CClYp6
 
Friday 9 February 2018

I have not been online for a few days with messages . . but the problem is that, although I worked quite regularly and continuously, I, unfortunately, had no interesting material to show. And even now it's not like you probably may expect. But I still find it useful to post something because actually there were some important news.

I left you in my last update while I was working to install the planking on the main deck. From the photos I show at that time you could see that there was still enough work to complete this activity. In the following picture you can now see how this is almost completely concluded. Only one last shaped plank is missing on the two external sides in order to say: "mission accomplished!". This happened about a week ago.
Another activity that can be said complete is the battens of the internal part of the sides on the main deck: a last layer of cherry veneer has been laid horizontally. The strips are at the moment of the photo here below only laid down and not yet refined but in any case I'm still far from the final result on these elements. This achievement becomes the starting point for future activities.

01 Ragusian Carrack/09022018/IMG_20180203_103247.jpg
y4mdZUCta-DQW9wMoPh-duKg079LyazEOEPleQEy


At the same time I started thinking about the completion of the hull planking, so I began to verify that everything was ready and that there was not some bulkheads to "adjust". From the picture below it seems that, for now, there is nothing to do, with the only exception of a tidy bulkhead at bow that will have to be slightly thickened before applying the next planks.

02 Ragusian Carrack/09022018/IMG_20180207_101751.jpg
y4mBz1RSkoInUwz7BZWpPXRwzGDcxXAemnLCosJD


Still in parallel I started laying the second planking on the main deck. According to the drawings the pattern of this planking foresees the use of a 72mm long strip divided into four 18mm segments. The installation is staggered at each strake on a new segment and is repeated every four strakes. The central strakes are in tanganika and the two darker ones in mahogany. They are 5mm wide while the outer ones are (and will be all the way down) 4mm wide in tanganika. The next two images show the work done so far. It seems to me that everything is going well. For the color of the wood this will become equal to the two highest decks after the application of some wood oil.

03 Ragusian Carrack/09022018/IMG_20180209_163107.jpg
y4m62gV5NFGFTE0Jv1-hVKOpij-uYtKmqEnyOczU


04 Ragusian Carrack/09022018/IMG_20180209_163114.jpg
y4mzs72Zs6i8ikWZi5E3xExch9kWdraybrCUFDiI


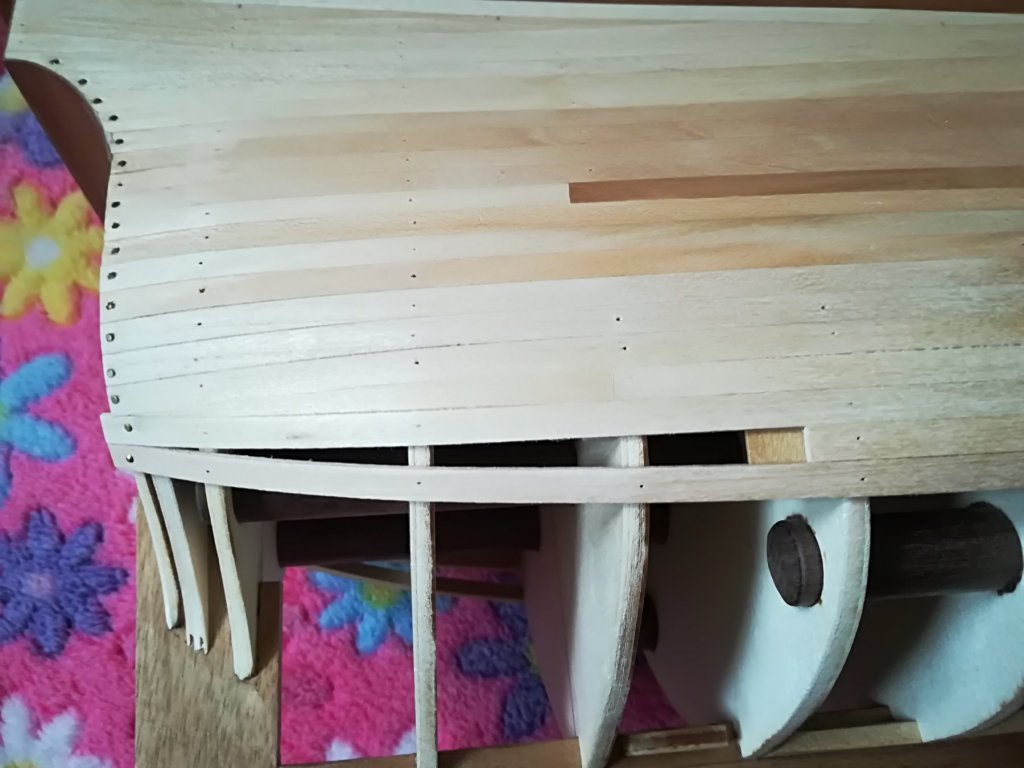
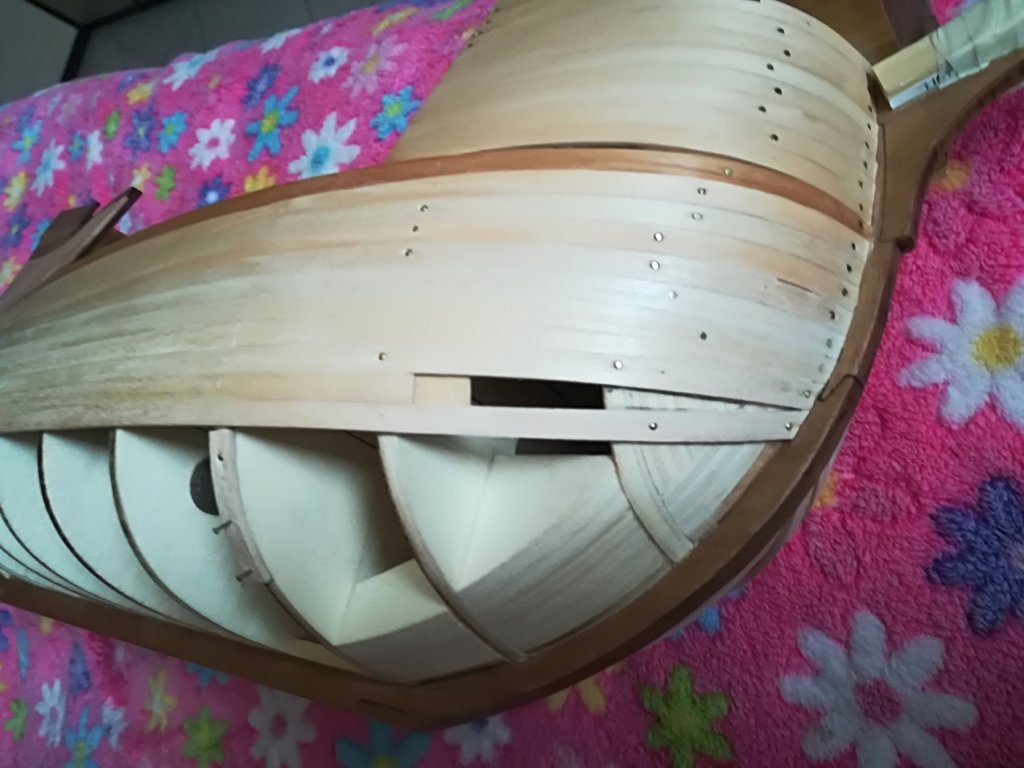
Finally I applied four strakes on the hull on both sides. To simplify my life I'm using the method that I usually use in presence of a second planking, without stylistic frills that will not be seen anyway. The empty spaces with "triangular" shape will be filled in the next few days with a little patience. I believe this method will end here in the stern area but will still continue at bow, where the bowl shape of this area requires more drastic measures. The three images that follow show the work carried out until yesterday. Today, however, no modeling, I've been around Pisa for some commissions and shopping and I hadn't time to spend. Tomorrow it's forecasted good weather and maybe I'll organize a quick trip to the seaside . . otherwise let's go with other new strips !!

Kind regards, Jack.Aubrey.

05 Ragusian Carrack/09022018/IMG_20180209_163124.jpg
y4mLLH7TcsuEfD_mTWd1Mody0bdMrq2Fh71_Z_9g


06 Ragusian Carrack/09022018/IMG_20180209_163133.jpg
y4mLCbMC3eJHsAzUTKOwJhODZwveLfASvtlzbaSq


07 Ragusian Carrack/09022018/IMG_20180209_163140.jpg
y4mdwnzaayMnApeybRROH0jDfQbGDkRs_Ft8NPLC
 
Monday, February 19, 2018

I finally completed the planking of the main deck. As with the other two smaller decks, I used tanganika veneer, reduced to strips of 4 or 5 millimeters in width and just over 7 centimeters long. The result is like a parquet with a pattern of junctions every four courses.

Here are some pictures of the finished work. I must underline that all the finishing touches are still to be done, therefore any groove will be leveled and above all the color of the wood will change, and probably a lot, after the application of a couple of coats of oil for wood. See the color of the other two decks to get an idea.

At this point I believe that the next activities will be totally aimed at the completion of the hull first planking: we are more or less straight ahead even if probably this could be the hardest part to perform.

Anyway, cheers by Jack.

01 Ragusian Carrack/19022018/IMG_20180219_180631.jpg
y4mngNB4X6Q1UHQ2lOtPiT5PjWVfjmSzpNt6j-fh


02 Ragusian Carrack/19022018/IMG_20180219_180809.jpg
y4mrh2twmn_yZtshTOJH7mn6KaCjAxZL5fNX9v4D


03 Ragusian Carrack/19022018/IMG_20180219_180847.jpg
y4mdNTDhhUCcibgNBzxUcntVKjT84XT-HGIJOMKS


04 Ragusian Carrack/19022018/IMG_20180219_180701.jpg
y4m1Y73iFBEwTCprrqyKNhs7C7QXj1gx9cZhSdiz


05 Ragusian Carrack/19022018/IMG_20180219_180710.jpg
y4mEbzmqMHORfPwuCKJ-19E3Dh6PMEXqKYEsTqXr
 
Friday 23 February 2018

Nothing new . . The only task performed these days was to apply a coat of oil for wood on the main deck, an activity that radically changed the color of the wood.

And this is exactly what I want to point out.

The first three photos were made with (little) daylight, while the remaining three were taken under the same artificial light conditions as my previous message and should allow you to better notice the difference between before and after.

Regarding the next activities these will suffer a break of about a week, according to weather forecasts, due to the Siberian cold wave expected: I am not interested in spending hours in my workshop in the cold!

01 Ragusian Carrack/23022018/IMG_20180223_130847.jpg
y4me3OMH4V5JTDk3uGI_tgHijqMenBZ_TVvX8UNk


02 Ragusian Carrack/23022018/IMG_20180223_130922.jpg
y4mA-z4o5EdDM8x6IDjHxbaH4XptIWAk7fqWRIma


03 Ragusian Carrack/23022018/IMG_20180223_130956.jpg
y4m-H6PW8AYEHvcANREb2izjpPl6dkRwxNAMro5V


04 Ragusian Carrack/23022018/IMG_20180223_192344.jpg
y4mccjA5xL-TrkBsJ8nmM564bFL592mj8IfCBH9Y


05 Ragusian Carrack/23022018/IMG_20180223_192500.jpg
y4m0xYm0mfa4BZG8n0IEtSbgF-qLjQH1JBlR5zWN


06 Ragusian Carrack/23022018/IMG_20180223_192544.jpg
y4mxASBe7regANgZkS_MayL0PlCjKy-rUYn6EGVb
 
Hi Jack, fantastic job planking the hull, it does look excellent, no imperfections (don't get me wrong, i am not looking for any ;)), the lines are smooth conforming the hull. Are you plan to extract nails later or you will leave them in places?
 
Hi Jack, fantastic job planking the hull, it does look excellent, no imperfections (don't get me wrong, i am not looking for any ;)), the lines are smooth conforming the hull. Are you plan to extract nails later or you will leave them in places?
I believe you are referring to the brass nails at prow and poop. As I plan a second planking I will simply file them at wood level and, at the end, cover them with the second layer. Cheers, Jack.
 
Thursday 8 March 2018 ---------------- Creative Planking . . .

Now that the cold weather of last days is over, I resumed the activities to conclude the first planking of the hull. As I had already mentioned, this task is giving me some troubles because of the particular shape of the bow and in part, though much less, of the stern.

After having found that the installation of the new courses from the top to the keel became less and less practicable, I decided to continue starting from the keel to climb upwards.

But the problem at the bow area remained unaltered and sincerely I regretted not having further filled the space between the first and the second bulkhead at prow with additional filler blocks. The space between the second and third bulkhead should instead be ok as it is now. But now it's too late.

So here I introduced a little creativity in order to simplify the remaining work, at least until the next crisis. Hence the definition of Creative Planking of the title, a concept that will surely horrify the orthodox modeller, but that for me isn't a problem as the whole will be subsequently covered by the second planking, which obviously can not follow this unorthodox method . .

What is it? Well, in this case, rather than spending a hundred words to explain it, I think that an image is enough to give the most of my idea . .
Then I attach a couple of images I hope can be interpreted correctly.

Finally, a couple of words about the pieces of wood glued above the strips, which in the picture can be seen in 3/4 points on the hull: these are fills of minimum thickness that serve to level a piece of hull with adjacent strips due to unevenness caused by various reasons. Once glued to the right places and properly sanded, they brilliantly solve the problem without using putty. At the end, with the fully closed hull, new ones will certainly be needed.

A cordial greeting, Jack.Aubrey.

01 Ragusian Carrack/08032018/IMG_20180307_183813.jpg
y4mdx_3Yt-gSKLnu8fkUa69FfZwGG3AtuhAwM12S


02 Ragusian Carrack/08032018/IMG_20180307_183849.jpg
y4mxf-Z5dsugH3gCPAjoONUp0wSt_ilCPewAbYdX
 
Sunday 25 March 2018

I almost finished the application of the first planking of my Ragusian Carrack. Due to my daughter's arrival at the airport of Pisa from Stockholm almost concomitant I had to stop and so a couple of "stealers" near the sternpost on both sides of the hull are missing. I think I will definitively close the matter shortly.

The last half dozen planks (on each side) were not a simple task, and honestly, despite the experience gained with this first planking, I have no idea how to properly approach the second layer in this difficult area of the hull. We'll see.

In the worst case, since it is an area below the waterline that should be colored (according to the plans of the kit) in black (but should it not be a dirty white?) I could hide with paint an incorrect arrangement of the strips.

Once applied the four pieces of wood still missing, I expect a nice session (or more) of sanding, so . . . sawdust and even sawdust.

Salutoni. Jack.

01 Ragusian Carrack/25032018/IMG_20180325_122425.jpg
y4m6fGmlali-NW_wt5lBbrnODVp8RKhBS0bZd_bi


02 Ragusian Carrack/25032018/IMG_20180325_122430.jpg
y4mCThbX6UY8W9W-8JXL5i-2YBiZZmY22Vylu_Dt


03 Ragusian Carrack/25032018/IMG_20180325_122439.jpg
y4mNwIGPDtyVa-ogOL6yJCEX9yncXJATRztuHS9g


04 Ragusian Carrack/25032018/IMG_20180325_122523.jpg
y4msO1JNiuWok5YJXhuFe4os9kNxGhazmN8KulSO
 
Monday 26 March 2018

Here below some additional images of the model . . same day of previous message. Regards, Jack.

01 Ragusian Carrack/25032018/IMG_20180325_122538.jpg
y4mEy3P-tSgeOH-SKzrSxMTTepwJaZC65Zyq79Z-


02 Ragusian Carrack/25032018/IMG_20180325_122555.jpg
y4mU61opurFXsuCxygI7GgJ4BGB_UTzycs7iUJxT


03 Ragusian Carrack/25032018/IMG_20180325_122546.jpg
y4mD5tDvF1NkCb6Y0OsaCge-xpcc-jvVDb6eEZUB


A nice present made of beers from Stockholm, hope they are good as beauty. I'll let them stand some days because of the journey and then . . . prosit.

04 Ragusian Carrack/25032018/IMG_20180325_184115.jpg
y4mRgSvLMeGsXavIrJC-oHZ6F0gk9M7nB6HsipOP
 
Thursday, April 5th, 2018

The first planking is now definitely complete.
The following three images show a small groove still to be closed in the connection between the hull and the forecastle. It is now closed but I didn't shoot other photos for such an insignificant detail. Now it is a matter of sanding and smoothing the whole hull to level the small differences in height between some strips and adjust a batch of small depressions in the lower area, below the WL, at the bow.

01 Ragusian Carrack/28032018/IMG_20180328_195638.jpg
y4m5GzfNdLhlEYZEpoPnwI_yejO2HDL1UH08FkkS


02 Ragusian Carrack/28032018/IMG_20180328_195722.jpg
y4mPh2KGOhl-tx9jWCGB2wxtW9i07Y6L9DLpEZth


03 Ragusian Carrack/28032018/IMG_20180328_195757.jpg
y4mP7TTidH0zQNCKPcF3AYojoGtBB3NiH3hTfoYQ


While I'm waiting to get the will to breathe some sawdust, I proceeded to complete the second planking, with cherry veneer, on the transom. Three images of the final result follow here below.

04 Ragusian Carrack/05042018/IMG_20180405_160542.jpg
y4mbMYWrycGMBcufqb3DO-V-4e3rVHQLwRcX14KM


05 Ragusian Carrack/05042018/IMG_20180405_160449.jpg
y4mgwdZuW6UYidn6pUbgZhGqyvV0b07D0nj0blrL


06 Ragusian Carrack/05042018/IMG_20180405_160225.jpg
y4mfLT_nb6vdVL1vzBK5WwyoXnEyXaEmzE0242ft


See you next time, even if I have a garden table with two chairs, a bit ruined by sun and rain to be repaired: sanding, a couple of paint undercoats and a final coat of clear paint with wax effect. This is to say that you probably shouldn't expect too many news soon.
Greetings, Jack.
 
Sunday 8 April 2014

Since I do not expect to have many things to show soon, I decided to discuss some aspects related to the finishing of the first planking, task mandatory to prepare the hull to receive the second planking. I remember that this second layer will be applied using strips from veneer of cherry wood.

Now let's clarify better: once you have applied all the strips of the first planking, you need to smooth the hull because you will discover a lot of imperfections, some of them of very little importance but also some problems that could affect the subsequent tasks and the expected results. Usually in this phase we'll work with sandpaper and sanding blocks to smooth and level the entire hull. In the worst cases using even some kind of putty.

One of the problems that occurs very often is the fact that two or more planks, placed side by side, are not properly aligned assuming the form of steps. They may be originated for different reasons, for example for a different thickness of the strips, maybe only for few tenths, or a curvature slightly different and so on. Regardless of the reason, during the finishing phase after the planking, you must resolve these aspects to get at the end a perfectly smooth hull, without steps, bumps or dips.

The solutions for leveling these steps are substantially two: 1) lower the area of the most protruding strip to bring it to the same level as the deeper one or 2) fill the area of the most hollow strip to bring it to the level of the most protruding.
In the first case it's a matter of sanding one strip in order to remove the excess part, in the second it is necessary to fill the missing part with a filler.
Regarding the solution to be adopted from time to time there aren't precise rules, it's our sensitivity, experience and knowledge of how we have applied the plank. However, most frequently, we will use both methods because these differences in height are very, very common.

Well, I have written that in the case of the solution #1 it is sufficient to smooth the affected area to achieve the result, while in the case #2, once the points to adjust are properly identified, we can choose between A) use putty as filler or B) glue some wood, in the form of strips of adequate thickness, in the area to be filled and then level it by sanding.

Photos #01 and #02 here below show on the hull of my carrack some areas, highlighted with a pencil, where you need to apply the filler. Thanks to the high contrast of the images in daylight, many other areas with steps are also visible. If not marked with the pencil, it means that I have decided to use the #1 solution. After a preliminary roughing, I sat in a well lit area and proceeded to identify these critical areas and to highlight them, marking their right positioning.

It's all for today, see you next time. I beg your pardon for my english, greetings, Jack.

01 Ragusian Carrack/07042018/IMG_20180407_105523.jpg
y4miWjl0-FTPNdXDhw6bOroNN_fKueS-sqkhmpl1


02 Ragusian Carrack/07042018/IMG_20180407_105529.jpg
y4m1viUx0Xsx0SfCczFThSP4idqNbi84qkocDYTH
 
Last edited:
Monday 9 April 2014

Now it's a matter to apply the filler. Personally I try to avoid using putty and I prefer to use wooden strips as a filler.

For this purpose I have a supply of sweetwood strips of 0.5mm thickness which is usually good for almost all cases. The strips must be the same height as those used for the planking.

I cutout a piece of strip with the length of the area to be filled, then, using the cyanoacrylate glue I paste it in place and move to another area until the operation is completed on all the previously highlighted parts. At this point, I cover these areas with a coat of vinyl glue diluted 50% with water. In this way I soak the strip and fill all the outer edges with glue.

This operation adequately fixes the batten to the hull even in the most remote areas ensuring a bonding that covers 100% of the area ensuring a perfect seal. Images #03 and #04 show these strips applied and before the next sanding phase.

I let, for safety, spend a day to dry and then I move to smooth the part of the wood strip in excess. At this point the problem is 99% solved. Once polished with ever finer abrasive paper, I proceed to stabilize the area by reapplying a second coat of diluted vinyl followed a few hours after by a slight smoothing with a fairly fine abrasive paper. In the most difficult cases only at this point I consider the application of a small amount of putty.

03 Ragusian Carrack/07042018/IMG_20180407_115552.jpg
y4myr-trVQRKZ_VTL_UhTfeHJzN6JoyJ3kLB0iI6


04 Ragusian Carrack/07042018/IMG_20180407_115602.jpg
y4mAJBozLVJiFcWr3_HBtjdKCX_9VwKMqJDnEFKQ


PS: This technique can also be used to fix areas of the hull where there are slight dips.
Photos #05 and #06 show two of these areas in the bow area in which I have implemented this technique.
I think, instead, that for the bumps there is only one solution: prevent their formation by checking well the course of the plank before applying it.

05 Ragusian Carrack/07042018/IMG_20180407_115608.jpg
y4mLfKZSF-3tfb3Z9I10_B26MbOz3gVBL_sQpShM


06 Ragusian Carrack/07042018/IMG_20180407_115625.jpg
y4mtNGY-29IeOrtWdQOQ5N67ryniosC_t8fWpKA1


In the next message I will go on to show the result obtained when processing is finished.
 
Friday, April 16th, 2018

Today, let's try to complete the speech interrupted a few days ago, relating to the removal of the gaps between a plank and its adjacents without using putty.

Once the preliminary tasks have been completed (glueing strip segments, fixing them with diluted vinyl glue, etc.), we proceed by sanding these sections to level them to the other parts of the hull.

It is advisable to work gently, avoiding to use coarse grained sandpaper. It is important to use only sanding blocks, avoiding, until the desired result is achieved, the use of abrasive paper only with hands.

The first two images show the work almost finished when this technique is used to eliminate the differences in height between one strip and another: depending on the height of the gap, the piece will be more or less thin, so that in some points the signs made with a pencil, to delimit the area, may appear, while in others not.

01 Ragusian Carrack/13042018/IMG_20180413_183457.jpg
y4mfb2ZhX79FG-nC7Q4KFX-flFZftldLCSpHV5JM


02 Ragusian Carrack/13042018/IMG_20180413_183512.jpg
y4mowZmMn1znvDO1TTdjfTndeKnv3l5W2-yvEtMH


In the next two images, instead, we see the results when using this technique to fill in depressions on the hull. Here the papersanding technique, although very similar, is slightly different but with a little practice and intuition you may easily learn how to proceed.

03 Ragusian Carrack/13042018/IMG_20180413_183432.jpg
y4mR5gq4z-YDg9_lF3SD-CMfcdm7-rwUjk1NCOLl


04 Ragusian Carrack/13042018/IMG_20180413_183520.jpg
y4mbZjYyr6qWXPH8Ae9BJ720q7iKrQ6EhWVVPW9N


Finally, an image from a particular perspectiv where it is possible to notice how the two slight depressions that were present are now disappeared. This is appreciable by observing the correct curve on the hull.

05 Ragusian Carrack/13042018/IMG_20180413_183540.jpg
y4mzeKEC5BKynU8Jbrm4D8Pqw68nhHIJR_9bJ-kR


Finally, as last step, a new coat of diluted vinyl glue over the areas where we worked on and, when the mixture of water and glue will be perfectly dry, a light refinement with very thin abrasive paper to completely smooth the whole. To speed up drying and waste little time, you can use a hair dryer.

Now that we have also fixed these problems we can move on to the final hull sanding which from now on becomes an ordinary matter, made of patience and sawdust. In some cases we could fill some small grooves in certain points of the hull with putty, but usually, having to apply above a second planking, this operation is not strictly necessary and could even be bypassed.

A friendly goodbye, Jack.Aubrey.
 
Many thanks for your thorough explanation, Jack. It is well appreciated. Ok I do have a question, however. I guess, you called a vinyl glue a PVA glue of any kind? Also, why would you need a coat over the working areas? Is it works as a sealant?
 
Many thanks for your thorough explanation, Jack. It is well appreciated. Ok I do have a question, however. I guess, you called a vinyl glue a PVA glue of any kind? Also, why would you need a coat over the working areas? Is it works as a sealant?

1) Vinyl glue = PVA glue

2) I use the diluted PVA glue after the initial sanding as a soaker liquid useful to stenghten the wood, as sealer and to avoid the formation of small splinters. But remember: the glue MUST be diluted, at least 50%, not less.

Hope it helps clarifying, Jack.
 
Back
Top