
Thanks so much Jim, Don, Knut, and Maarten. I have the oar assembly line in full production now and should have another report soon

-

SUBSCRIBE TO SHIPS IN SCALE TODAY!
The beloved Ships in Scale Magazine is back and charting a new course for 2026!
Discover new skills, new techniques, and new inspirations in every issue.
NOTE THAT OUR NEXT ISSUE WILL BE MARCH/APRIL 2026 -

Win a Free Custom Engraved Brass Coin!!!
As a way to introduce our brass coins to the community, we will raffle off a free coin during the month of August. Follow link ABOVE for instructions for entering.
You are using an out of date browser. It may not display this or other websites correctly.
You should upgrade or use an alternative browser.
You should upgrade or use an alternative browser.
Ragusian Galley by Don Robinson - MarisStella
- Thread starter DonRobinson
- Start date
- Watchers 17

Mike, that is brass wire twisted together using a drill
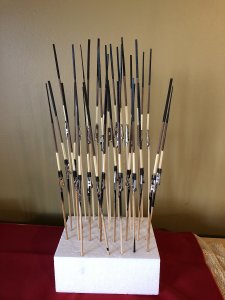
Hello all, a big thank you for all the likes comments and visits. Today's update is again not really showing much but trust me when I say there was hours of work done since the last post. First the second sail was completed(not yet on spar) again the sewing was a chore and seemed to take forever to finish. The thirty oars were made and painted c/w a poly finish finally the masts were stepped. There were also some minor changes made to the rigging of the blocks on the spars mainly just changing the size of rope I used as the original looked far too large to me.

Making the oars, in the foreground a blank then oars shaped,next pile are the oars with handles carve and markings for the final sanding and the very top pile are the oars with final sanding ready for painting and poly.
Having problems loading more than one picture, I will see if I can figure this out. Be back soon
Attachments

Hello Don there is a problem uploading more than 1 image Donnie is waiting for the server hosting company to resolve this problem.Hello all, a big thank you for all the likes comments and visits. Today's update is again not really showing much but trust me when I say there was hours of work done since the last post. First the second sail was completed(not yet on spar) again the sewing was a chore and seemed to take forever to finish. The thirty oars were made and painted c/w a poly finish finally the masts were stepped. There were also some minor changes made to the rigging of the blocks on the spars mainly just changing the size of rope I used as the original looked far too large to me.
View attachment 104238
Making the oars, in the foreground a blank then oars shaped,next pile are the oars with handles carve and markings for the final sanding and the very top pile are the oars with final sanding ready for painting and poly.
Having problems loading more than one picture, I will see if I can figure this out. Be back soon
Try this again, the system locked up then asked me If I was a robot. Immediately I was thinking somehow the system seen me last Saturday night dancing!!! 
But all seems good now and there are no videos of Saturday night:

The oars completed

It is hard to tell in the picture but what I was trying to show is how the ends of the spars, where they overlap, are filed flat.

This picture shows it better and the glue is still wet

Here the masts are stepped and the completed oars. I stepped the masts using epoxy which allows plenty of time to adjust masts and is very strong.

Making the toggles from 2 mm dowel. Sorry the picture could have been better

Making the slings for the spars

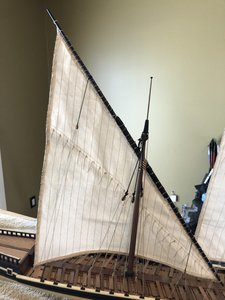
The completed main spar, almost as long as the ship itself. The spar still needs to be painted and a coat of poly applied

Making some rope. Here I am spinning two threads of Gutermann thread. When done this I take three of these and spin them together to make a .75 mm rope. This the rope I used to attach the blocks to the spars. MarisStella does supply .75 mm rope but it needs to be coloured black and I was just too lazy to buy more stain.

I was thinking of how to imitate the ropes that hold the oars on the thule pins and came up with this idea. Wrap some rope, in this case .5 mm, around a appropriate sized drill bit. Give it a good coat of diluted pva glue and let dry.

When dry and using a sharp razor blade cut into thin slices, be sure to have at least two wraps in the slice or it will not work

And the final product. In my mind looks much better than having unsightly knots. I must admit that this is not completely my idea just the application of it is. This actually called a zip seizing when used on rigging, they would be made in much smaller sizes to conform to the rigging line being used. They actually are a very good idea especially in hard to get at places.
That's all for now, we'll see you all later
But all seems good now and there are no videos of Saturday night:
The oars completed
It is hard to tell in the picture but what I was trying to show is how the ends of the spars, where they overlap, are filed flat.
This picture shows it better and the glue is still wet
Here the masts are stepped and the completed oars. I stepped the masts using epoxy which allows plenty of time to adjust masts and is very strong.
Making the toggles from 2 mm dowel. Sorry the picture could have been better
Making the slings for the spars
The completed main spar, almost as long as the ship itself. The spar still needs to be painted and a coat of poly applied
Making some rope. Here I am spinning two threads of Gutermann thread. When done this I take three of these and spin them together to make a .75 mm rope. This the rope I used to attach the blocks to the spars. MarisStella does supply .75 mm rope but it needs to be coloured black and I was just too lazy to buy more stain.
I was thinking of how to imitate the ropes that hold the oars on the thule pins and came up with this idea. Wrap some rope, in this case .5 mm, around a appropriate sized drill bit. Give it a good coat of diluted pva glue and let dry.
When dry and using a sharp razor blade cut into thin slices, be sure to have at least two wraps in the slice or it will not work
And the final product. In my mind looks much better than having unsightly knots. I must admit that this is not completely my idea just the application of it is. This actually called a zip seizing when used on rigging, they would be made in much smaller sizes to conform to the rigging line being used. They actually are a very good idea especially in hard to get at places.
That's all for now, we'll see you all later

Hi Don, great work.
Is that the large Domanoff rope machine?
Is that the large Domanoff rope machine?

A beautiful model, Don! She looks better each day!
WONDERFUL BUILD DON. Don
Thanks Maarten, Dave and Don.
Maarten: yes that is the large Domanoff machine, I also have the smaller one and the serving machine
Maarten: yes that is the large Domanoff machine, I also have the smaller one and the serving machine
hello to all . This last little bit I have been busy with anchors and parrels also stalling on the attaching of the last sail to it's yard. Thanks for stopping in, for your likes and comments:

The anchors came in little kits with the anchor, stock, brass bands and a ring. The anchor was already blackened, the brass bands did not fit on the supplied stock so I used shrink sleeves instead. The supplied ring was also much too small so I made those also.

The first step in making the parrels was to serve four pieces of rope together. The serving is approximately 8 mm long.

Then bend the serving to form to form the eye that is required,

I missed a couple of steps with my pictures. When the seizing in the previous picture is complete the photo etch spacers and wooden trucks are added. After that serve another 8 mm of the lines bend over to form eye and seize.

Lines are cut off then seizing completed

Completed parrels

Finally the sail that I have been taking my time doing. I am on the final stages of getting it attached to the spar. Up to this point it has taken me approximately 2.5 hours about 5 minutes per stitch.
Take Care and have a good day
The anchors came in little kits with the anchor, stock, brass bands and a ring. The anchor was already blackened, the brass bands did not fit on the supplied stock so I used shrink sleeves instead. The supplied ring was also much too small so I made those also.
The first step in making the parrels was to serve four pieces of rope together. The serving is approximately 8 mm long.
Then bend the serving to form to form the eye that is required,
I missed a couple of steps with my pictures. When the seizing in the previous picture is complete the photo etch spacers and wooden trucks are added. After that serve another 8 mm of the lines bend over to form eye and seize.
Lines are cut off then seizing completed
Completed parrels
Finally the sail that I have been taking my time doing. I am on the final stages of getting it attached to the spar. Up to this point it has taken me approximately 2.5 hours about 5 minutes per stitch.
Take Care and have a good day
Awesome work, Don!
IT SURE IS AWESOME Don. Don
Thanks guys, much appreciated
Hello all, thanks for all your visits, likes and comments.
This build is on it's final stages now as the rigging has started. I have spent the last while completing whatever rigging possible off ship and with this build, fortunately, that would be about 80% of all rigging. The galley's rigging is a fairly basic one which would make it ideal for those that do not care for this stage of a build. There are no ratlines which would also make many happy and with the use of toggles the rigging is rather unique.
There really is not much to show at this point other than a few seizings and the final result the past two weeks. I have spent approximately 30 hours completing this stage. I believe I have shown how to make the seizings already but if not or you wish to see it again let me know and I can post something on that.

Showing a completed seizing. Although I did not do it here it is advisable to wax the area where the seizings will be located as it makes sliding the seizing into position much easier.

Showing the same seizing with block and eye, these will be used in the shroud assembly

Same blocks again along with a couple of jeer blocks. Note the fuzzy black line, this line was not waxed resulting in fuzziness and the seizing was also extremely hard to slide. I typically do not wax entire lines as it attracts too much dust, only the area where a seizing is will I wax.

A completed part of the shroud with the toggle installed, the toggle is carved from 2 mm walnut dowel

Showing two hand tied seizings

Showing two zip seizings. I rarely use these and never in highly visible areas. These particular ones will be located along the deck and will be hard to see. After the eyebolt is attached to the deck the line needs to be adjusted to proper length, much the same as deadeyes on normal shrouds, this would be extremely hard to adjust length and seize in the normal fashion so zip seizings are a great alternative in this case. These particular ones have a .040 " inside diameter and the line being used is .71 mm. I will try to remember to post pictures of this when installed.

And finally a beautiful blurry picture of the off ship rigging ready to be installed
Next up will be installing the shrouds on the foremast. I will be a little more diligent in taking pictures.
Have A Good One!!
This build is on it's final stages now as the rigging has started. I have spent the last while completing whatever rigging possible off ship and with this build, fortunately, that would be about 80% of all rigging. The galley's rigging is a fairly basic one which would make it ideal for those that do not care for this stage of a build. There are no ratlines which would also make many happy and with the use of toggles the rigging is rather unique.
There really is not much to show at this point other than a few seizings and the final result the past two weeks. I have spent approximately 30 hours completing this stage. I believe I have shown how to make the seizings already but if not or you wish to see it again let me know and I can post something on that.
Showing a completed seizing. Although I did not do it here it is advisable to wax the area where the seizings will be located as it makes sliding the seizing into position much easier.
Showing the same seizing with block and eye, these will be used in the shroud assembly
Same blocks again along with a couple of jeer blocks. Note the fuzzy black line, this line was not waxed resulting in fuzziness and the seizing was also extremely hard to slide. I typically do not wax entire lines as it attracts too much dust, only the area where a seizing is will I wax.
A completed part of the shroud with the toggle installed, the toggle is carved from 2 mm walnut dowel
Showing two hand tied seizings
Showing two zip seizings. I rarely use these and never in highly visible areas. These particular ones will be located along the deck and will be hard to see. After the eyebolt is attached to the deck the line needs to be adjusted to proper length, much the same as deadeyes on normal shrouds, this would be extremely hard to adjust length and seize in the normal fashion so zip seizings are a great alternative in this case. These particular ones have a .040 " inside diameter and the line being used is .71 mm. I will try to remember to post pictures of this when installed.
And finally a beautiful blurry picture of the off ship rigging ready to be installed
Next up will be installing the shrouds on the foremast. I will be a little more diligent in taking pictures.
Have A Good One!!
Very good and consequent preparation works
Hello all finally an update

I've been busy looking after my kids, these are triplets. I also have a pair of twins that come to the yard

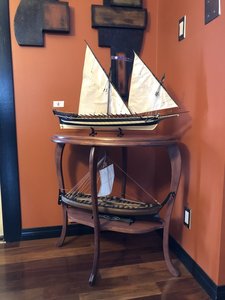
First sail up


Main mast shrouds.
More to come, hang in there
I've been busy looking after my kids, these are triplets. I also have a pair of twins that come to the yard
First sail up
Main mast shrouds.
More to come, hang in there


She turned out beautifully, Don. Great job!!!