
As you, I haven't been around lately, due to personal circumstances. However, you have made some major advancement. I like the way you did your decks - have to keep that one in mind - and also the method for the gun ports.

-

SUBSCRIBE TO SHIPS IN SCALE TODAY!
The beloved Ships in Scale Magazine is back and charting a new course for 2026!
Discover new skills, new techniques, and new inspirations in every issue.
NOTE THAT OUR NEXT ISSUE WILL BE July/August 2026 -

Win a Free Custom Engraved Brass Coin!!!
As a way to introduce our brass coins to the community, we will raffle off a free coin during the month of August. Follow link ABOVE for instructions for entering.
You are using an out of date browser. It may not display this or other websites correctly.
You should upgrade or use an alternative browser.
You should upgrade or use an alternative browser.
San Felipe 1690 - Panart
- Thread starter carlosys
- Start date
- Watchers 14
-
- Tags
- panart san felipe

Eccellent method of layout on the Gun Ports, etc. Very nice progress - some really good workmanship here !!! :greetings-clapyellow:

Thank you very much to all for your comments :text-thankyouyellow:
Apologize for the last few weeks of absence. I've been (and I) quite busy at the gigs and I can not devote many hours these days.
I started with the gun ports port and the idea was to let these facts loopholes frames with some "depth" to make it look once painted the effect of "bulk" of the hull, since the wall at that point is only 1 , 5mm.
The problem begins in the implementation of these frameworks. I tried 1mm (too thin), 2mm (too thick) .. I made a template, mold, etc ... but were not exactly the same.
The idea is to make a square tube frames far and go mode cutting slices. In this way, everyone is equal and then with the second liner, dissimulation possible defects in the pocket.
Now I only doubt what color I paint the frame ... red, walnut, etc ...
With picture is clearer but not much mystery.
This is what you need to get

The wood that will square tube and gluing process. This helped me a aluminum profile measures slightly smaller, but perfectly aligns the slats.


With the circular saw (gift") ) cut the "slices" of the gun ports
) cut the "slices" of the gun ports


Here the first of 13x11 port side. Those that are not done yet deck the area that are somewhat larger.


Simulation second plank


Regards
Apologize for the last few weeks of absence. I've been (and I) quite busy at the gigs and I can not devote many hours these days.
I started with the gun ports port and the idea was to let these facts loopholes frames with some "depth" to make it look once painted the effect of "bulk" of the hull, since the wall at that point is only 1 , 5mm.
The problem begins in the implementation of these frameworks. I tried 1mm (too thin), 2mm (too thick) .. I made a template, mold, etc ... but were not exactly the same.
The idea is to make a square tube frames far and go mode cutting slices. In this way, everyone is equal and then with the second liner, dissimulation possible defects in the pocket.
Now I only doubt what color I paint the frame ... red, walnut, etc ...
With picture is clearer but not much mystery.
This is what you need to get
The wood that will square tube and gluing process. This helped me a aluminum profile measures slightly smaller, but perfectly aligns the slats.
With the circular saw (gift
) cut the "slices" of the gun ports
Here the first of 13x11 port side. Those that are not done yet deck the area that are somewhat larger.
Simulation second plank
Regards
Hello Carlos,I will be getting this model soon,and will follow your log in a third row seat if you do not mind,your Felipe is neatly built,good photo"s and clearly explained,the method used for your gunports is brilliant,thank you for the learning.Happy modeling . Edwin .http://www.shipsofscale.com/phpBB3/posting.php?mode=reply&f=52&t=341#
Carlos,
Now - that is some clean work done on those port frames ! Very nicely executed ! What kind of table saw ?
Donnie
Now - that is some clean work done on those port frames ! Very nicely executed ! What kind of table saw ?
Donnie
Donnie said:Carlos,
Now - that is some clean work done on those port frames ! Very nicely executed ! What kind of table saw ?
Donnie
Thanks Donnie. The table saw is very simple. The PROXXONKS-230
Regards
Hello
We continue with the gun ports.
To make things easier, once the plant properly located in the town, proceed to mark in a "dirty" various loopholes to get dirty location, but quite real.
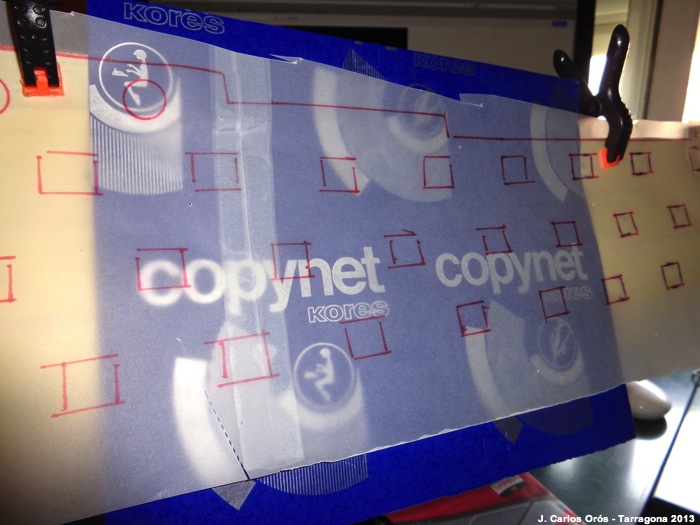

The next step is to take measurements of the shafts and start drawing each of the 49 pockets ... but to make things easier, we will abuse the technology.
First with autocad do I serve matrix template and then print it on transparent paper adhesive. This way, I save a lot of time.


So are restated the pockets. Now back to pull drill, cutter and patience ....


Regards
We continue with the gun ports.
To make things easier, once the plant properly located in the town, proceed to mark in a "dirty" various loopholes to get dirty location, but quite real.
The next step is to take measurements of the shafts and start drawing each of the 49 pockets ... but to make things easier, we will abuse the technology.
First with autocad do I serve matrix template and then print it on transparent paper adhesive. This way, I save a lot of time.
So are restated the pockets. Now back to pull drill, cutter and patience ....
Regards
Excellent templates (using AutoCad I see). Very nice Carlos - I am jealous - I should have used the CAD to do my templates too. Fantastic idea there. (just kidding about the jealous part) :razz:
Donnie
Donnie
Donnie said:Excellent templates (using AutoCad I see). Very nice Carlos - I am jealous - I should have used the CAD to do my templates too. Fantastic idea there. (just kidding about the jealous part) :razz:
Donnie
Thanks Donnie. I if I have jealous of your fantastic job with the Santísima Trinidad

Regards
Hello
I finished the task of gun ports.
All gun ports tinted walnut.
Now looks like a ship to moles, haha

Detail tinted walnut gun port


I opted to make the second planking with 10 cm segments.
The idea is to do with that lining the gun ports within which in theory should fit the window. As I finish about half a millimeter before lined hollow gun port.

Regards
I finished the task of gun ports.
All gun ports tinted walnut.
Now looks like a ship to moles, haha
Detail tinted walnut gun port
I opted to make the second planking with 10 cm segments.
The idea is to do with that lining the gun ports within which in theory should fit the window. As I finish about half a millimeter before lined hollow gun port.
Regards
hi carlos, looking good. cant wait to see more of your build . terry

Fantastic Work following along
hi carlos, great work. how did you figure out how to sand all your frames to run into the filler pieces on the bow and stern? hope you can tell me how to do this. I always have a problem with them. thanks and I enjoy watching your progress on the ship. did you have any special tools to do this? very limited on tools that I have. I have built 3 other ships and they always have between frames 1,2,3 a bulge between them that seems to stick out. then I have to use filler and sand to fill in. any help would greatly welcomed. thanks terry

Sure would like to see more.
Hello
Thank you so much all for the comments. Due to lack of time, I left the San Felipe assembly parked a few years ago and dedicated myself to other smaller models. I hope to resume assembly in a few months.
I just saw Donnie's model finished and I remembered mine

I leave you some pictures of how it is right now.
Regards


I will be back
Thank you so much all for the comments. Due to lack of time, I left the San Felipe assembly parked a few years ago and dedicated myself to other smaller models. I hope to resume assembly in a few months.
I just saw Donnie's model finished and I remembered mine
I leave you some pictures of how it is right now.
Regards
I will be back
Many thanks for the reactivation of this topic - and I have to say, that you have here a very good prepared and built hull - very accurate built.
It would be really a good basis for finishing this model - I am looking forward
It would be really a good basis for finishing this model - I am looking forward

Pues yo tambien quiero verlo acabado un dia, espero que es aun en este vida (estoy bromeando Carlos )
un salu2
dj56
Well, I also want to see it finished one day, I hope it's still in this life (I'm kidding Carlos)
a salu2
dj56
un salu2
dj56
Well, I also want to see it finished one day, I hope it's still in this life (I'm kidding Carlos)
a salu2
dj56
Pues yo tambien quiero verlo acabado un dia, espero que es aun en este vida (estoy bromeando Carlos )
Eso espero yo yambién jeje.
Saludos
