
-

SUBSCRIBE TO SHIPS IN SCALE TODAY!
The beloved Ships in Scale Magazine is back and charting a new course for 2026!
Discover new skills, new techniques, and new inspirations in every issue.
NOTE THAT OUR NEXT ISSUE WILL BE MARCH/APRIL 2026 -

Win a Free Custom Engraved Brass Coin!!!
As a way to introduce our brass coins to the community, we will raffle off a free coin during the month of August. Follow link ABOVE for instructions for entering.
You are using an out of date browser. It may not display this or other websites correctly.
You should upgrade or use an alternative browser.
You should upgrade or use an alternative browser.


finally some update again.
The upper gun deck is finished on both sides and I started with the port middle gun deck
Hallo Wolfgang,
it is looking very good.
One question: As we can see, the second planking with the gunports cutted via laser are one piece (5 planks high) over the length installed, or are these more? I am wondering, if these second planking parts are fitting well on the prepared surface (and form) of the prepared hull?
One suggestion if not already planned: Maybe you can try to simulate later on butt joints on this planking. It would be more realistic.....
Yes those pieces are just one piece each. The middle gunport line (at the moment the lower) was a little bit tricky to install, because the curve of the precut piece was not 100% matching the curve of the installed planks. Therefore I had to bend it a little bit and in order for easier installation I just in some parts standard wood glue and in the more stressed area some super glue as well.
Regarding simulation of the butt joints:
I honestly have not thought about that. The idea sounds great, but I do not know if you see the butt joints after painting the hull black. Maybe I will try it in a small area, paint it and then see if there is a big difference.
Thanks for the suggestion Uwe.
Regarding simulation of the butt joints:
I honestly have not thought about that. The idea sounds great, but I do not know if you see the butt joints after painting the hull black. Maybe I will try it in a small area, paint it and then see if there is a big difference.
Thanks for the suggestion Uwe.
.....
Regarding simulation of the butt joints:
I honestly have not thought about that. The idea sounds great, but I do not know if you see the butt joints after painting the hull black. Maybe I will try it in a small area, paint it and then see if there is a big difference.
Thanks for the suggestion Uwe.
Are you planning to paint these planks between the gunports black?

Hello Uwe,
I really like the colours of Garys Sovereign. So I plan to make it quite similar.
I really like the colours of Garys Sovereign. So I plan to make it quite similar.
GaryM said:

it is visible also at the photo, but off course painted in black not so much like without paintI tried to also cut in the butt joint and painted over it.
I am not sure if you really see it.
What is your opinion?
View attachment 44850
.....I think your decision should depend on the expectation, if these joints could be made without any damages to the rest.....

Hello all,
thanks a lot for your interest in my build.
It has been a while since my last update, but summer was great in Austria and I was a lot outside.
The weather has turned so I am back to my Sovereign.
Here is an update: The frames of the second gun deck are cut out and also the lining of the gunport frames is finished on both sides.
Hallo Wolfgang, the summer here in Austria was really good - In the next months there will be enough ugly rainy days, so you will have a lot of time with your Sovereign.......great that you are back at the workbench ")

But then snow is comming and we finally can go skiing.

Fair point
Placed the precut part for the last gun deck started to cut out the gun ports and then I have seen that they are not aligned with the gun support in the ships body.
On the attached picture you see that the rear gun port is directly in the middle of the bulkhead.
So today in the morning I was just a "little" bit pissed.
I had to remove the nice precut part which I have, stupid as I am, already glued in place. And when I glue something it is bomb proof. It took me an hour to remove it.
In the afternoon I will put it on the ship again just 1cm further aft.
Unfortunately something like this happens all the time.......and everytime you will be angry, about yourself not checking it before, or angry on the manufacturer, which did not design the kit proper......But this is the "salt in the soup" for a modeler -> without problems modeling would make less fun, or?
Keep on going the good work
@Maarten : In winter half austria is on the ski-slope - together with a quarter of all dutch")
Keep on going the good work
@Maarten : In winter half austria is on the ski-slope - together with a quarter of all dutch
this sounds like exactly like my emotional rollercoaster today:
First angry on the manufacturer (the pictures of the ship model in the booklet are not identical to the ships plans) then angry with myself for not checking.
Now I am at the stage that I have identiefied the problem and eager to solve the problem
First angry on the manufacturer (the pictures of the ship model in the booklet are not identical to the ships plans) then angry with myself for not checking.
Now I am at the stage that I have identiefied the problem and eager to solve the problem

Yes, the gun ports do fall on some of the frames, but at this stage when the first planking is done, the frames are not really required for support. It is frustrating, but that is Mantua for you. There are other problems like the one you just mention, but the key is to check the instructions, the plans, and try to figure out what is supposed to be accomplished before committing. Dry fitting sometimes helps resolve the issue and is really necessary when attaching fittings . What I see is that they did not rebuild the model after redesigning the kit and updating the plans, so there are some alignment issues. However, the did solved some of the other things that were even worse in the original design.
Last edited:
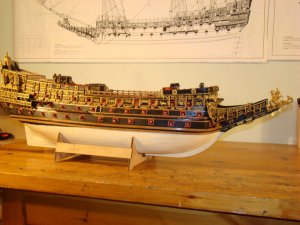
Well, well. Between family, work and other stuff I also did find some time to be at the shipyard.
All gun ports are finished and painted in red.
I also continued the second planking on the upper hull. Hopefully I can finish the upper hull this week.

All gun ports are finished and painted in red.
I also continued the second planking on the upper hull. Hopefully I can finish the upper hull this week.
Looking great. I just caught up on your log, fine job.

Great looking build

Started with the planking of the lower hull. It is quite time consuming, because half of the planks have to be cut or sanded individually. But on the other hand that is what it makes intersting.


picture of the bow area.

picture of the stern.
picture of the bow area.
picture of the stern.