"Start-up Conversations" and "Build Support-Tips, Advice" here.

I found out that printers have a SELECTION for plain printing OR printing "ACTUAL SIZE" especially when it comes to printing from a pdf file. Certainly, you would want to experiment. Maybe get the printer store to print out ONE for you - compare - if it is good, then let them do more for you.
If it is good, then I would get the name of the associate (as it would appear that they know how to set up the printer/plotter) - I have heard that not all associates can set up a printer/plotter to do that correctly. Just a tip !
 
Hi Oliver,
to 1.) now depending on which method you want to use, you need at least three copies 4 are even better. One as a replacement if a frame breaks e.g.

You get 3 frames on a sheet of paper that makes 6 copies starting with frames 1-3 you can use 3 sheets for frames 1 and 3 and 3 sheets for frame 2.

As Donnie pointed out, not every copier/printer with a scanner works 100%. I'm lucky that my printer really prints 1:1.

to 2.) You can only use the upper plate for one ship unless you intend to build Le Rochefort more often. Small joke.

to 3.) As mentioned above, it is up to you which method you want to use. Regarding Adrian's method, you really have to work extremely precisely on the joints. Sanded 1/10 too slanted and you get 5-10mm differences at the top frame ends and you only notice it when you glue both pairs of frames together or worse when you build them into your jig and they don't fit. You can correct some things easily with water and then bring them into shape, but it's holding you back. However, you have a good deal less waste and all the joints are where they should be.
Regarding the Hahn method, it can be said that it is relatively accurate, but was not developed by Hahn for the building of the Admiralty. You need about twice as much wood but are a lot faster.
sorry, if I may, why not make practical examples with drawings, that there is more clarity and possible discrepancies
 
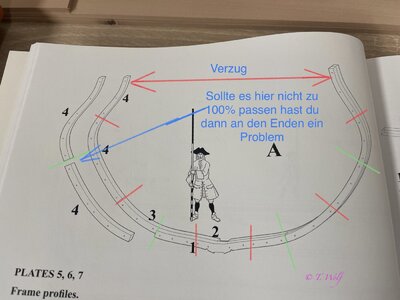
I have an example in pictures here.

View attachment 348950
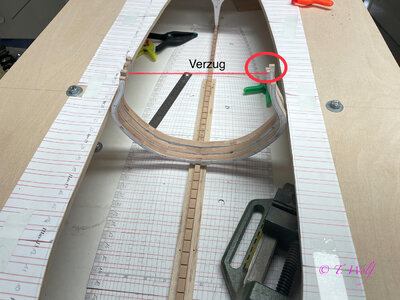
Translation In picture 1 it should not fit 100% here, this distortion occurs at the top

View attachment 348949
in my opinion there should also be a comparison between the frames and the shape, methods, they are all effective but ships have their own construction logic like the Admiralty. It's just my thought, nothing more
 
Hi Oliver,
to 1.) now depending on which method you want to use, you need at least three copies 4 are even better. One as a replacement if a frame breaks e.g.

You get 3 frames on a sheet of paper that makes 6 copies starting with frames 1-3 you can use 3 sheets for frames 1 and 3 and 3 sheets for frame 2.

As Donnie pointed out, not every copier/printer with a scanner works 100%. I'm lucky that my printer really prints 1:1.

to 2.) You can only use the upper plate for one ship unless you intend to build Le Rochefort more often. Small joke.

to 3.) As mentioned above, it is up to you which method you want to use. Regarding Adrian's method, you really have to work extremely precisely on the joints. Sanded 1/10 too slanted and you get 5-10mm differences at the top frame ends and you only notice it when you glue both pairs of frames together or worse when you build them into your jig and they don't fit. You can correct some things easily with water and then bring them into shape, but it's holding you back. However, you have a good deal less waste and all the joints are where they should be.
Regarding the Hahn method, it can be said that it is relatively accurate, but was not developed by Hahn for the building of the Admiralty. You need about twice as much wood but are a lot faster.
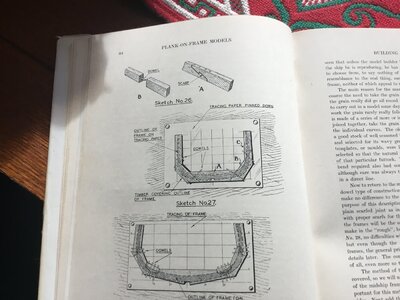
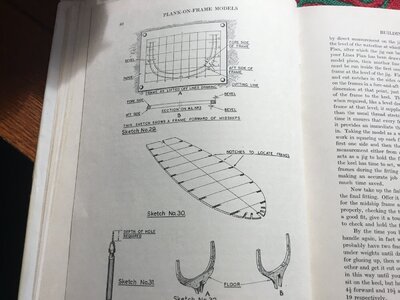
Thanks Tobias. I should clarify that I was thinking of using a modified Hahn method. Actually I was looking at Underhill’s method which appears to mimic Hahn‘s method (Sketch No. 27 & 28) but the model is built upright in a dry dock and uses template (Sketch No. 30) inside the frames to keep everything true.image.jpgimage.jpg
 
Questions for the group…
Based on following your other builds as well as Tony and Tobias on their good start on Le Rochefort your expertise is way above mine. Thanks for being defacto mentors.
1. When making copies of the plans to cut up for laying out frames etc, did you take them to a copy center like FedEx Office and plot them or just use home printer? How do verify that the scale doesn’t change from the original plans?
2. For the assembly frame, do you make a new one for each model or construct a universal jig and make new top frame for each build?
3. I’m vacillating between the Hahn method for making the frames versus laying out the pieces as Sorola shows in his book. What is the consensus is one method more suited to a beginner?

I’m probably overthinking on a lot of this but it is a bit scary jumping into the pool…
Please be careful using copy machines... Do some tests and verify that the copies are accurate in both the X and the Y axes... See this thread... Post in thread 'LE ROCHEFORT -1787 by jwallKC (Ancre plans)' https://shipsofscale.com/sosforums/...1787-by-jwallkc-ancre-plans.10942/post-277964
 
Please be careful using copy machines... Do some tests and verify that the copies are accurate in both the X and the Y axes... See this thread... Post in thread 'LE ROCHEFORT -1787 by jwallKC (Ancre plans)' https://shipsofscale.com/sosforums/...1787-by-jwallkc-ancre-plans.10942/post-277964
Thanks for the info and completely agree with you. The self serve copy centers (FedEx Office aka: Kinko’s). Is horrible at keeping their machines accurate. I made the drive to my favorite blueprint store. They understand the need for accuracy since they reproduce engineering drawings that MUST be to scale with no drift, creep or waves. We printed each page and laid them over the original on a light box and they’re all spot on. Problem solved.

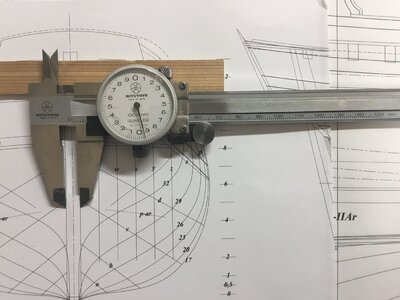
That being said, there was some discussion early on about the thickness of the keel components. Adrian’s book says it’s 6.75mm yet when I scale the drawings the thickness measures 6.95mm. I’m not sure how much 0.20mm difference affects the outcome but I will start with 6.95mm and can always reduce if needed. Thoughts? C693A8A0-73AC-43B4-85F1-3C9CE0E3E665.jpeg
 
Thanks for the info and completely agree with you. The self serve copy centers (FedEx Office aka: Kinko’s). Is horrible at keeping their machines accurate. I made the drive to my favorite blueprint store. They understand the need for accuracy since they reproduce engineering drawings that MUST be to scale with no drift, creep or waves. We printed each page and laid them over the original on a light box and they’re all spot on. Problem solved.

That being said, there was some discussion early on about the thickness of the keel components. Adrian’s book says it’s 6.75mm yet when I scale the drawings the thickness measures 6.95mm. I’m not sure how much 0.20mm difference affects the outcome but I will start with 6.95mm and can always reduce if needed. Thoughts? View attachment 348993
Hi Olivier, in my opinion, you have to respect the dimensions that are shown in the monograph
 
Hello colleagues IMPORTANT!!!

I think I have got to the bottom of the mystery that has caused some confusion.

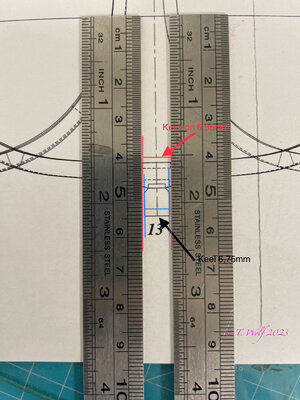
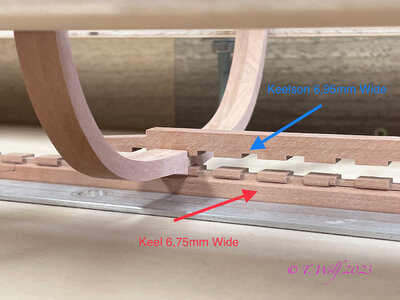
6.75mm or 6.95mm, both measurements are correct. I am in the process of building a test frame and lo and behold, here we find the two different measurements.
Keel measures 6.75mm in width
Keelson measures 6.95mm in width.

43546CA0-2695-4EB1-987A-399401BB2F1F.jpeg

ED558305-D600-42E3-AA8B-4264F8EC1924.jpeg
 
Last edited:
Question for the group: Would it make sense to cut the keel (a1 & a2) and the rising wood (e1, e2 & e3) as one piece instead of separately? The rising wood is so thin that I can’t seem to keep it square when sanding or milling. If it were already attached to the keel it seems like it would be easier or am I just asking for trouble down the road?
Thanks all
 
Of course you can do it that way, I think everyone should do it the way they find easiest. It only becomes more difficult to mill the small grooves. The rising wood in these plans is a little different than in La Palme and was also new to me.
 
Questions for the group…
Based on following your other builds as well as Tony and Tobias on their good start on Le Rochefort your expertise is way above mine. Thanks for being defacto mentors.
1. When making copies of the plans to cut up for laying out frames etc, did you take them to a copy center like FedEx Office and plot them or just use home printer? How do verify that the scale doesn’t change from the original plans?
2. For the assembly frame, do you make a new one for each model or construct a universal jig and make new top frame for each build?
3. I’m vacillating between the Hahn method for making the frames versus laying out the pieces as Sorola shows in his book. What is the consensus is one method more suited to a beginner?

I’m probably overthinking on a lot of this but it is a bit scary jumping into the pool…
I went to local copy shop and made 4 copies of each plan, total 60.00 CAD$… and save them into pdf file in case I have to make extra copy..
 
Form your slots on the rising wood before cutting it that thin. Mill it then cut it on the table saw to thickness.
 
I went to local copy shop and made 4 copies of each plan, total 60.00 CAD$… and save them into pdf file in case I have to make extra copy..
i think I made a mistake and only had 3 copies made. Well when I go back I’ll have them scanned to TIFF files as I prefer working with vector graphics which are easier to import into Autocad.
 
Of course you can do it that way, I think everyone should do it the way they find easiest. It only becomes more difficult to mill the small grooves. The rising wood in these plans is a little different than in La Palme and was also new to me.
Again, thanks! Since this a learning process for me I believe I will try several methods to see what works best. I just wasn’t sure if the rising wood needed to be separate due to a later process in assembly that would create a problem.
 
Hello all, sorry that it is too late for one or the other.
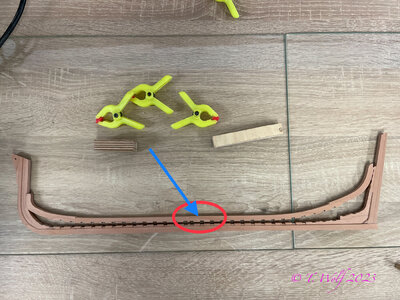
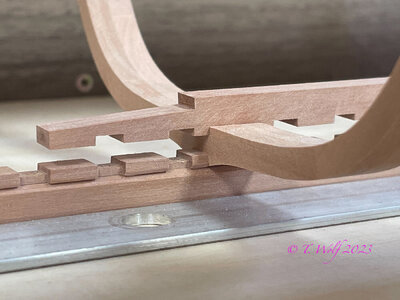
A small tip from me, glue the keelson in the middle only at the very end when all frames are set up and the keys are in place. The reason for this is that it is much easier for you to fit the keelson to the frames and the keys (height, width, depth). You may also have to make small corrections to the length (0.5mm - 1mm). If everything fits, glue the keelson, but not yet with the rest of your construction. Then sand the interior and if you think it fits, glue the keelson together.

62855EA4-A6DF-4252-B00F-5B546E3C2AAF.jpeg

Here you can see that I have not glued it yet.

C5DF6FB1-62DE-4675-ACDC-9EEF2920F0CC.jpeg
 
Our member @Steff66 has also built one or the other tool himself, here is the link to his thickness grinder, very great work by Stephan.

Thread 'Drum sander, thickness sander DIY (with plans)'
 
Back
Top