• Ships of Scale has incorportated an extra level of security when you log In. Please follow on-screen prompts to acknowledge that you are not a robot via a "Check Box" or a "Pictorial Check Box Puzzle". This is needed due to higher level of AI Activity Security.
  • SUBSCRIBE TO SHIPS IN SCALE TODAY!

    The beloved Ships in Scale Magazine is back and charting a new course for 2026!
    Discover new skills, new techniques, and new inspirations in every issue.

    NOTE THAT OUR NEXT ISSUE WILL BE July/August 2026
  • Win a Free Custom Engraved Brass Coin!!!
    As a way to introduce our brass coins to the community, we will raffle off a free coin during the month of August. Follow link ABOVE for instructions for entering.

Syren 1803 1:64 Model Shipways

View attachment 240358

I started building the Model Shipways Syren last year. I knew, because of other commitments, it would be very slow progress for me. Since joining SOS I have read through many logs, threads and posts. The knowledge of members, incredible model builds and workmanship on this site make it kind of humbling to even think I should start a log. However, I need to force myself to keep going and complete the Syren. So a log it is.

My first few photos are progress so far. I am currently working away at the hull planking. Even though the hull below the waterline will be plated I am thinking of trying my best to complete the planking as though it were going to be visible. Extra work no doubt but that way I can try my hand at proper planking techniques. It will be a good learning experience for me. Then I get to cover it up with copper plates!

I did not simulate caulking of the plank seams above the wales. I was going to eventually paint the sides dull yellow ochre. Changed my mind because I thought the fibrous basswood would look terrible. Then after doing those upper areas, decided I would stain instead, then realized I should have after all used a pencil for caulking. So now I am hoping a Golden Oak stain will darken the seams and make it appear as though they are caulked. Time to experiment I think.

So a few photos to start me off.

View attachment 240366View attachment 240364View attachment 240365View attachment 240363View attachment 240362
 
As I approach completion of my first ship (OcCre HMS Beagle) I am looking forward to the Syren next. I really like the beautiful planking job you've done so far! It's also nice to know that this was done by someone who is (or was, since this is several years ago) a relatively new ship modeller like myself. I hope to follow this log and hopefully do as nice a job as I see so far in these pics. Thanks for the log!

-Rich
 
As I approach completion of my first ship (OcCre HMS Beagle) I am looking forward to the Syren next. I really like the beautiful planking job you've done so far! It's also nice to know that this was done by someone who is (or was, since this is several years ago) a relatively new ship modeller like myself. I hope to follow this log and hopefully do as nice a job as I see so far in these pics. Thanks for the log!

-Rich

Thanks for your post and comments Rich, very much appreciated.

I think you’ll really enjoy the Syren as your next build, especially since you already have some first build experience. It has taken me a lot longer than I expected but no less enjoyable as I move slowly forwards. I find some parts extremely finicky and time consuming but these shaky old hands get the job done eventually. The impressive build manual is really well done and I found reading ahead, then working on a particular part, really helped me understand “what goes where and why” :).

I’m presently working on the very awkward head rails and timbers. A little frustrating with multiple repeats but I’m making them from pear so that has slowed me down even more. I think parts get deliberately smaller as we age ROTF.

Enjoy the Syren!
 
Hardest part so far

The longest period without an update but small progress is at least progress.

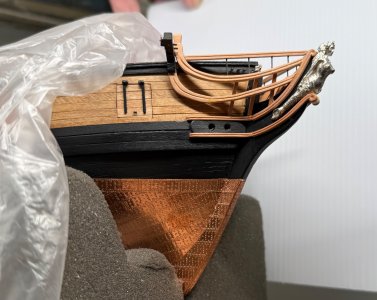
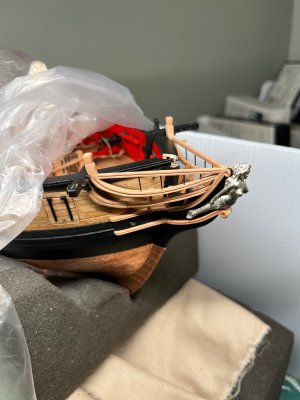
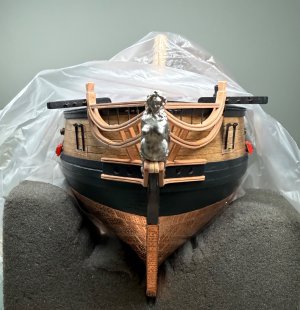
Over the past weeks (jeez- months Redface) I decided to get the for’d bow rails, framing and timbers out of the way. This was one of those mini projects that no matter how much swearing took place it never became easier. I know other Syren builders found this part of the build difficult and extremely frustrating but there appear to be a variety of build solutions. I was initially intrigued with Dirk’s ( @Dubz Modelling World ) solution but stayed mostly with the basics after all, as shown in the manual.

So after many repeated and failed attempts I decided on good old “modellers licence” and adjusted to what I felt looked ok. One of the hardest parts I found was trying to place the head timbers between the head rails to make it look like one piece of timber, as suggested in the manual. Trying to align the tiny angled parts was too fiddly for me so I opted for three single pieces of pear, each side, laid inboard but resting on the respective rails. I had seen quite a variety of solutions from that era so I felt it was realistic enough. One of those times to ask “is good enough - good enough?”.

The parts are all made from pear and even with that tight wood I have quite a bit of cleaning up to do. It needs some cosmetic surgery. I am hoping future clutter will hide some of my clumsy work but there’s going to be no more repeats unless I break something.

The top rail and metal stanchions were a pain to do but more cursing helped ROTF.

So that’s it for now. As always thanks for using your valuable time reading and following my limited progress.

IMG_5240.jpeg

IMG_1835.jpeg

IMG_5210.jpeg
 
Hardest part so far

The longest period without an update but small progress is at least progress.

Over the past weeks (jeez- months Redface) I decided to get the for’d bow rails, framing and timbers out of the way. This was one of those mini projects that no matter how much swearing took place it never became easier. I know other Syren builders found this part of the build difficult and extremely frustrating but there appear to be a variety of build solutions. I was initially intrigued with Dirk’s ( @Dubz Modelling World ) solution but stayed mostly with the basics after all, as shown in the manual.

So after many repeated and failed attempts I decided on good old “modellers licence” and adjusted to what I felt looked ok. One of the hardest parts I found was trying to place the head timbers between the head rails to make it look like one piece of timber, as suggested in the manual. Trying to align the tiny angled parts was too fiddly for me so I opted for three single pieces of pear, each side, laid inboard but resting on the respective rails. I had seen quite a variety of solutions from that era so I felt it was realistic enough. One of those times to ask “is good enough - good enough?”.

The parts are all made from pear and even with that tight wood I have quite a bit of cleaning up to do. It needs some cosmetic surgery. I am hoping future clutter will hide some of my clumsy work but there’s going to be no more repeats unless I break something.

The top rail and metal stanchions were a pain to do but more cursing helped ROTF.

So that’s it for now. As always thanks for using your valuable time reading and following my limited progress.

View attachment 623657

View attachment 623658

View attachment 623659

Mega job!
 
Hardest part so far

The longest period without an update but small progress is at least progress.

Over the past weeks (jeez- months Redface) I decided to get the for’d bow rails, framing and timbers out of the way. This was one of those mini projects that no matter how much swearing took place it never became easier. I know other Syren builders found this part of the build difficult and extremely frustrating but there appear to be a variety of build solutions. I was initially intrigued with Dirk’s ( @Dubz Modelling World ) solution but stayed mostly with the basics after all, as shown in the manual.

So after many repeated and failed attempts I decided on good old “modellers licence” and adjusted to what I felt looked ok. One of the hardest parts I found was trying to place the head timbers between the head rails to make it look like one piece of timber, as suggested in the manual. Trying to align the tiny angled parts was too fiddly for me so I opted for three single pieces of pear, each side, laid inboard but resting on the respective rails. I had seen quite a variety of solutions from that era so I felt it was realistic enough. One of those times to ask “is good enough - good enough?”.

The parts are all made from pear and even with that tight wood I have quite a bit of cleaning up to do. It needs some cosmetic surgery. I am hoping future clutter will hide some of my clumsy work but there’s going to be no more repeats unless I break something.

The top rail and metal stanchions were a pain to do but more cursing helped ROTF.

So that’s it for now. As always thanks for using your valuable time reading and following my limited progress.

View attachment 623657

View attachment 623658

View attachment 623659

 
Hardest part so far

The longest period without an update but small progress is at least progress.

Over the past weeks (jeez- months Redface) I decided to get the for’d bow rails, framing and timbers out of the way. This was one of those mini projects that no matter how much swearing took place it never became easier. I know other Syren builders found this part of the build difficult and extremely frustrating but there appear to be a variety of build solutions. I was initially intrigued with Dirk’s ( @Dubz Modelling World ) solution but stayed mostly with the basics after all, as shown in the manual.

So after many repeated and failed attempts I decided on good old “modellers licence” and adjusted to what I felt looked ok. One of the hardest parts I found was trying to place the head timbers between the head rails to make it look like one piece of timber, as suggested in the manual. Trying to align the tiny angled parts was too fiddly for me so I opted for three single pieces of pear, each side, laid inboard but resting on the respective rails. I had seen quite a variety of solutions from that era so I felt it was realistic enough. One of those times to ask “is good enough - good enough?”.

The parts are all made from pear and even with that tight wood I have quite a bit of cleaning up to do. It needs some cosmetic surgery. I am hoping future clutter will hide some of my clumsy work but there’s going to be no more repeats unless I break something.

The top rail and metal stanchions were a pain to do but more cursing helped ROTF.

So that’s it for now. As always thanks for using your valuable time reading and following my limited progress.

View attachment 623657

View attachment 623658

View attachment 623659

I can imagine that this ‘3D sculpture’ took some hard times, Roger. But it looks very nice!
Regards, Peter
 
I can imagine that this ‘3D sculpture’ took some hard times, Roger. But it looks very nice!
Regards, Peter
Yes, hard times describes the many, many attempts to get something passable. I know now what I could do better in the future, especially the moulding profiles. I’m not happy with them at all but no more repeats. When my frustration at my frustration took hold I knew it was time to settle for “as is” and move on :). All in all a good learning experience, thanks Peter.
 
Very good result, I remember how hard it was and how long I tried! Super! :-)

Hi Dirk, I follow your excellent work and remember your comments about the rails, framing and timbers for’d. Your clever solution tempted me to follow suit but I settled on a mix of the Syren manual and a lot of relevant photos. At least with your build there’s a place for the “seats of ease”. With mine it’s a free fall arrangement ROTF.
 
Back
Top