I am inquiring if any of you have used a wood lathe to turn and taper your dowels for masts and yards? Any suggestions? I want to try it! Thanks!
Last edited:
I've always used either a plane. chucked a spar in a drill, or sandpaper, but I recently bought a small Proxxon lathe and it is much easier to use. It came with a variety of collets which take care of my spar needs. There is a hole in the lathe that lets you insert a long spar, taper half of the spar, switch it around and then taper the other half. I also just received (but have not yet tried) a chuck that replaces the piece that supports the exposed end of the spar. This should be helpful with small diameter spars. I use sandpaper which I fold around the spar and this collects almost all the dust.I am inquiring if any of you have used a wood lathe to turn and taper your dowels for madts and yards? Any suggedtions? I want to try it! Thanks!
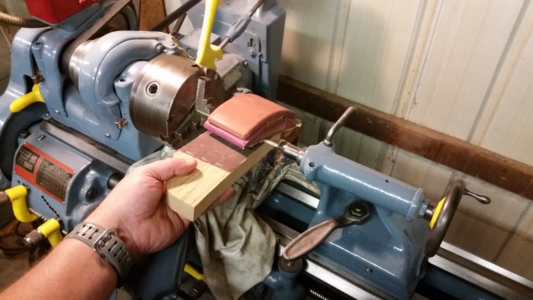
Thank you! I wish I had a metal lathe. I have a wood lathe with plenty of tooling though. It's 36" between centers. I have a 3-jaw chuck too. I am mainly curious about wobble, or distortion while turning something so thin. I sometimes turn pens but they mount to a mandrel. I guess I should take a dowel and....uh.....give it a spin!I used my old South Bend metal lathe because that's what I had. Tapering was very easy by using TWO sanding blocks with the dowel spinning between them. Using that technique, you even can turn thin flag staves down to 1.8mm diameter and even form the ball on the end using files. By using two sanding blocks, you don't place any side pressure on the wood, which may probably cause it to break if the diameter will be less than 3mm. You move the apply light to medium pressure equally on both sides of the spinning wood, moving along the length in strokes to create a smooth taper and avoid making the dowel too thin in one area. Stop the lathe several times and measure at various locations and be careful not to sand below your dimension specification. Start with 60 grit sand paper and move to smoothed grits in a couple steps to 200 grit.
If tapering a yard arm, the wood is tapered on one end, then reversed in the three jaw chuck and tapered on the other end. The narrow sections at the tips can be formed with careful application of a needle file or diamond file. The three jawed chuck was tightened enough to grip the piece without denting the wood. When the shaping is finished, take the piece out of the lathe and polish it with by pinching the piece between 600 grit paper and sanding length-wise. This will remove ring like scratches make by sanding in the lathe and polish the wood up nicely, so the grain will show better after staining or oiling. Remove all circumferential scratches in the piece.
Admire your handiwork. It should take about 4-10 minutes to shape each piece in your mast and yard work, which is surprisingly fast and is easier than you think.
Use both hands when sanding with the blocks. Below I'm holding one home made block underneath because my other hand is holding the camera.
View attachment 219558
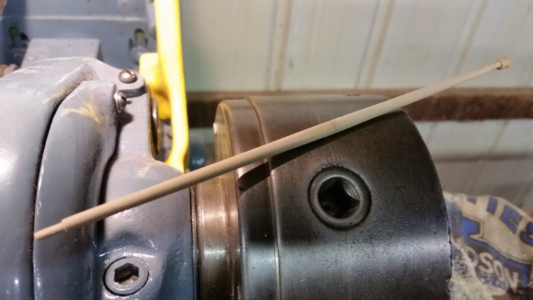
Yardarm ready for trimming at the ends
View attachment 219559
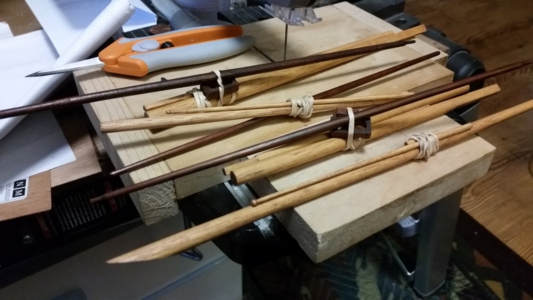
Finished yard and mast pieces, with yards oiled and ready for rigging.
View attachment 219560
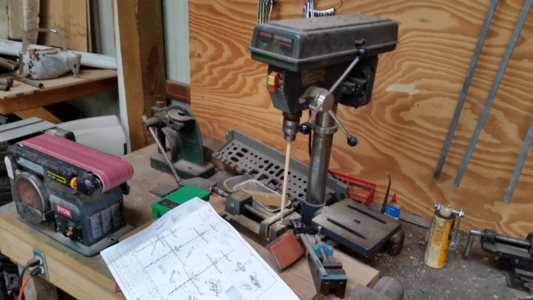
If you don't have a lathe, use a drill press!
View attachment 219561
I used my old South Bend metal lathe because that's what I had. Tapering was very easy by using TWO sanding blocks with the dowel spinning between them. Using that technique, you even can turn thin flag staves down to 1.8mm diameter and even form the ball on the end using files. By using two sanding blocks, you don't place any side pressure on the wood, which may probably cause it to break if the diameter will be less than 3mm. You move the apply light to medium pressure equally on both sides of the spinning wood, moving along the length in strokes to create a smooth taper and avoid making the dowel too thin in one area. Stop the lathe several times and measure at various locations and be careful not to sand below your dimension specification. Start with 60 grit sand paper and move to smoothed grits in a couple steps to 200 grit.
If tapering a yard arm, the wood is tapered on one end, then reversed in the three jaw chuck and tapered on the other end. The narrow sections at the tips can be formed with careful application of a needle file or diamond file. The three jawed chuck was tightened enough to grip the piece without denting the wood. When the shaping is finished, take the piece out of the lathe and polish it with by pinching the piece between 600 grit paper and sanding length-wise. This will remove ring like scratches make by sanding in the lathe and polish the wood up nicely, so the grain will show better after staining or oiling. Remove all circumferential scratches in the piece.
Admire your handiwork. It should take about 4-10 minutes to shape each piece in your mast and yard work, which is surprisingly fast and is easier than you think.
Use both hands when sanding with the blocks. Below I'm holding one home made block underneath because my other hand is holding the camera.
View attachment 219558
Yardarm ready for trimming at the ends
View attachment 219559
Finished yard and mast pieces, with yards oiled and ready for rigging.
View attachment 219560
If you don't have a lathe, use a drill press!
View attachment 219561
The two block sanding is a good suggestion for round tapering. Some spars though are to be kept straight on one side; the Bluenose is one example where there are very few fully round tapers. My hand sanding on the selected sides is not the most stimulating time spent! RichThank you! I wish I had a metal lathe. I have a wood lathe with plenty of tooling though. It's 36" between centers. I have a 3-jaw chuck too. I am mainly curious about wobble, or distortion while turning something so thin. I sometimes turn pens but they mount to a mandrel. I guess I should take a dowel and....uh.....give it a spin!
If you sand the wood simultaneously from both sides, there is no wobble, and no transverse stress on the piece. You have complete control over the wood removal process, and you can apply more pressure from both sides than from one side, plus with two sanding blocks, material is removed more than twice as fast. I was able to make minimum 1.8mm diameter flagstaffs for the masts and stern quite easily. You trim the wood off the top of the ball, and shape the top of the ball with files and hand sanding. You just have to be more careful spin-sanding the small diameter parts. I only broke one in the course of shaping a top ball with a needle file, and re-making a new one only took 10 minutes. Press gently while running the file forward across the spinning wood. Many small cuts are better than breaking a part and starting over.Thank you! I wish I had a metal lathe. I have a wood lathe with plenty of tooling though. It's 36" between centers. I have a 3-jaw chuck too. I am mainly curious about wobble, or distortion while turning something so thin. I sometimes turn pens but they mount to a mandrel. I guess I should take a dowel and....uh.....give it a spin!
Using your fingers will get them burned every time, and stop your from sanding. Plus, it may make uneven waves along the length of the mast or yard. Using blocks prevents both.I use the same technique to shape masts and yards in a metal lathe (and sometimes in a hand drill). Using sandpaper is somewhat tricky though. Sanding dowels can require reasonable torque. At bigger diameters it is surprising how much the lathe decreases rpm when using sandpaper as opposed to normal cutting tools. And if the sandpaper is kept between fingers it hots up in no time! That is the sign how much torque is required - and this is the danger that a small diameter dowel can easily break if we are not sanding it very-very lightly.
The other thing I would mention is that the chuck jaws leave marks on the dowel easily first of all if we are working on the second half, fixing the already sanded side of the dowel into the chuck. To prevent this I put a few turns of masking tape on the dowel before fixing it between the jaws.
János
Nice to see the same drill press I have on another workbench besides my own. It's been with me for many years and produced many tapered masts and yards. To avoid chuck marks on the end of a yard, I wrap it with a strip of sandpaper before insertion into the chuck and tighten the chuck by hand. However, getting a nice pole of uniform diameter at the end of a mast is hard to do, and it looks like the lathe gives a superior result.I used my old South Bend metal lathe because that's what I had. Tapering was very easy by using TWO sanding blocks with the dowel spinning between them. Using that technique, you even can turn thin flag staves down to 1.8mm diameter and even form the ball on the end using files. By using two sanding blocks, you don't place any side pressure on the wood, which may probably cause it to break if the diameter will be less than 3mm. You move the apply light to medium pressure equally on both sides of the spinning wood, moving along the length in strokes to create a smooth taper and avoid making the dowel too thin in one area. Stop the lathe several times and measure at various locations and be careful not to sand below your dimension specification. Start with 60 grit sand paper and move to smoothed grits in a couple steps to 200 grit.
If tapering a yard arm, the wood is tapered on one end, then reversed in the three jaw chuck and tapered on the other end. The narrow sections at the tips can be formed with careful application of a needle file or diamond file. The three jawed chuck was tightened enough to grip the piece without denting the wood. When the shaping is finished, take the piece out of the lathe and polish it with by pinching the piece between 600 grit paper and sanding length-wise. This will remove ring like scratches make by sanding in the lathe and polish the wood up nicely, so the grain will show better after staining or oiling. Remove all circumferential scratches in the piece.
Admire your handiwork. It should take about 4-10 minutes to shape each piece in your mast and yard work, which is surprisingly fast and is easier than you think.
Use both hands when sanding with the blocks. Below I'm holding one home made block underneath because my other hand is holding the camera.
View attachment 219558
Yardarm ready for trimming at the ends
View attachment 219559
Finished yard and mast pieces, with yards oiled and ready for rigging.
View attachment 219560
If you don't have a lathe, use a drill press!
View attachment 219561
Terrible idea for a dozen reasons. Use a 'vee jig' (see article in the NRJ a couple of years back). Also see another article coming up in the NRJ in a couple of issues on exactly this subject.I am inquiring if any of you have used a wood lathe to turn and taper your dowels for masts and yards? Any suggestions? I want to try it! Thanks!
Another persons ideas may work for them and maybe not for you. That doesn't make those ideas Terrible in themselves; just not as workable from your perspective. Keep your toolbox open for all ideas and then you can use or not use them without criticizing the proposer's own. Just a thought. Rich (PT-2)Terrible idea for a dozen reasons. Use a 'vee jig' (see article in the NRJ a couple of years back). Also see another article coming up in the NRJ in a couple of issues on exactly this subject.

I use a sherline and they have a gadget that holds the spar and prevents the wobbling without scarring the wood. It is triangular shape with three adjustable legs.I am inquiring if any of you have used a wood lathe to turn and taper your dowels for masts and yards? Any suggestions? I want to try it! Thanks!
Experimenting is a large part of our hobbies and ideas come in at unexpected moments. RichI use a sherline and they have a gadget that holds the spar and prevents the wobbling without scarring the wood. It is triangular shape with three adjustable legs.
A whole dozen?Terrible idea for a dozen reasons. Use a 'vee jig' (see article in the NRJ a couple of years back). Also see another article coming up in the NRJ in a couple of issues on exactly this subject.
Were you using a spur drive center? Center finder?I found it a challenge to center the dowels when I tested my new lathe. I also had problems with the dowels stopping turning. Then I discovered the chisels didn’t do a great job on the dowels. I went back to the drill, but it takes so long and I worry it will burn my drill motor out. I suppose it probably has a lot to do with my lack of experience using a lathe. I think I’ll try it again with the sandpaper blocks and the chuck I bought extra.
