I started this build some time in May and currently I'm in the process of shaping yards. I'll be posting pictures and comment starting with the very beginning and hopefully I'll catch up to the build's current state.
This is the model of Russian tender named "Avos". As far as I know this word only exists in Russian language and describes a world view when you don't know the outcome but hope for the best, citing Wikipedia:
The Russian avos' (Russian: русское авось) describes a philosophy of behavior, or attitude, of a person who ignores possible problems or hassles and, at the same time, expects or hopes for no negative results or consequences. It is an attitude that treats life as unpredictable and holds that the best one can do is count on luck.
This ship is well know in Russia because of "Juno and Avos" rock opera that was performed for the first time in 1981. It tells the story of a tragic love between Russian explorer Nikolai Rezanov and a daughter of the governor of Spanish California.
"Avos" was a tender built in Novoarkhangelsk (present Sitka, Alaska) in Russian America in 1806. She was manned by a crew of 12 and was a part of an expedition to California headed by explorer Nikolai Rezanov that consisted of two ships, brigantine "Juno" and tender "Avos".
They arrived in California in the same year, to get provisioning for starving Russian settlements in Alaska. During his stay in San Francisco, Rezanov met a 15-year old daughter of the Spanish governor Maria de la Concepcion Arguello. Maria fell in love with Rezanov and they got engaged. Unfortunately they could not get married because she was a Catholic and he belonged to the Eastern Orthodox Church. Rezanov had to obtain the Russian Emperor's permission to marry Maria. Promptly, he sailed back to Alaska and then to Okhotsk. From there he had to cross all of Russia east to west on horseback to get to St Petersburg. During this perilous trip he fell ill and died in Krasnoyarsk in 1807 at the age of 43. Maria did not believe the news of his death until 1842 when Sir George Simpson gave her a detailed account of Rezanov's death. She took a vow of silence and lived in a monastery in Monterey, California until her death in 1857.
.......
1. As always the first step is setting up the "skeleton" framework for planks. This kit is a plank-on-bulkhead type with two layers of planks. The interesting detail in this kit is that
the whole frame is split horizontally by an HDF plate into two separate parts - top and bottom. First all bottom bulkhead and the center keel are installed into the HDF plate (which has asymetric notches so you'd never be able to mix up left and right bulkheads):


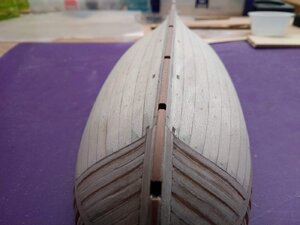
2. After all bulkheads were installed, I planked the lower portion of the hull:

3. Next the upper section of the center keel need to be assembled along with the stern:


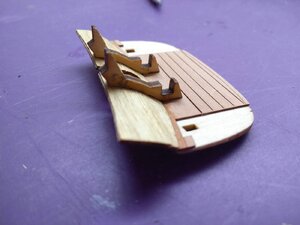
4. What I found really interesting about this build was that counter and taffrail were not glued to the stern. They were supposed to be shaped and assembled separately:


This is the model of Russian tender named "Avos". As far as I know this word only exists in Russian language and describes a world view when you don't know the outcome but hope for the best, citing Wikipedia:
The Russian avos' (Russian: русское авось) describes a philosophy of behavior, or attitude, of a person who ignores possible problems or hassles and, at the same time, expects or hopes for no negative results or consequences. It is an attitude that treats life as unpredictable and holds that the best one can do is count on luck.
This ship is well know in Russia because of "Juno and Avos" rock opera that was performed for the first time in 1981. It tells the story of a tragic love between Russian explorer Nikolai Rezanov and a daughter of the governor of Spanish California.
"Avos" was a tender built in Novoarkhangelsk (present Sitka, Alaska) in Russian America in 1806. She was manned by a crew of 12 and was a part of an expedition to California headed by explorer Nikolai Rezanov that consisted of two ships, brigantine "Juno" and tender "Avos".
They arrived in California in the same year, to get provisioning for starving Russian settlements in Alaska. During his stay in San Francisco, Rezanov met a 15-year old daughter of the Spanish governor Maria de la Concepcion Arguello. Maria fell in love with Rezanov and they got engaged. Unfortunately they could not get married because she was a Catholic and he belonged to the Eastern Orthodox Church. Rezanov had to obtain the Russian Emperor's permission to marry Maria. Promptly, he sailed back to Alaska and then to Okhotsk. From there he had to cross all of Russia east to west on horseback to get to St Petersburg. During this perilous trip he fell ill and died in Krasnoyarsk in 1807 at the age of 43. Maria did not believe the news of his death until 1842 when Sir George Simpson gave her a detailed account of Rezanov's death. She took a vow of silence and lived in a monastery in Monterey, California until her death in 1857.
.......
1. As always the first step is setting up the "skeleton" framework for planks. This kit is a plank-on-bulkhead type with two layers of planks. The interesting detail in this kit is that
the whole frame is split horizontally by an HDF plate into two separate parts - top and bottom. First all bottom bulkhead and the center keel are installed into the HDF plate (which has asymetric notches so you'd never be able to mix up left and right bulkheads):


2. After all bulkheads were installed, I planked the lower portion of the hull:

3. Next the upper section of the center keel need to be assembled along with the stern:


4. What I found really interesting about this build was that counter and taffrail were not glued to the stern. They were supposed to be shaped and assembled separately:


