The pirated Black Pearl

What a great build log!! I too have a cheap nock off of a nock off Black Pearl, without the interior and a super sweet, can you believe it 2d figurehead that is made of 2 peices of crapboard thats supposed to be glued together. Yeah, real junk. I'll definately be following along and Id love to get my mitts on a copy of the plans you procured to assist in my ash ache when I get to it. Bravo!!

Here try this...
No guarantees, but you should know that by now!!Screenshot_20200820-161118.jpg
 
Haha!! It worked, thanks a ton man. Thats going to help alot when I get to mine. Since it's such a horrible rendition of the BP
I plan to build it as though it's my pirate ship. I spent 20 years jamming gears in an 18 wheeler, so dont be surprised if you
see air horns on the beakhead and some cb antenna's waving off the top mast :p Gee, I wonder where I can sneak some chrome
into that build.

Thank you :)
 
What is the length of the keel from the far back to the frame with the hole for the bow sprit. I think I might have the same pirated version. I also have the real ZHL kit and it's huge in comparison.
 
What is the length of the keel from the far back to the frame with the hole for the bow sprit. I think I might have the same pirated version. I also have the real ZHL kit and it's huge in comparison.
410mm front to back of the lower straight section of the keel

IMG_20200821_144558.jpg
 
The Hull.

The kit came with 3mm thick strips of 5mm Balsa, pretty brittle but all in all quite standard stuff. This needs to be run along the length of the ship from the lower half to the keel. I'm guessing it may have been better to soak it first, the stress on the strip is pretty intense.
IMG_20200820_142954.jpg
One thing that certainly should have been done was painting the strip black first.
I had spent a couple of hours glueing and clamping before I realised....
IMG_20200820_145130.jpgIMG_20200820_145200.jpg
The internal wall was plain balsa and therefore ruining the essence that is the Black Pearl.. Blackness.
I decided not to use a paintbrush and delicately paint the inside black, instead I would spray paint it.
IMG_20200821_134644.jpg
IMG_20200821_134701.jpg
Starting with a quick squirt through the gap, I found that it wasn't really reaching the places other methods would.. I needed the Toilet Duck of spray cans.
IMG_20200821_134842.jpg
So Matt Black spray can and a PVC tube in hand, I toilet ducked the sh1t out of it!
IMG_20200821_135219.jpgIMG_20200821_135250.jpg
and then proceed to paint (ink) each strip from there on.
IMG_20200821_140604.jpg
IMG_20200821_144016.jpg
But this is going to be a slow an painful process.
IMG_20200819_144430.jpg
You may not be able to see, but the Aft/ Captains quarters wall (far left) is not going to be able to ben around the hull's profile. The Ply has been cut at a tangent to the grain direction thus not allowing it to bend. Means I'm going to need to change the back end slightly and shape the hull to fit.... at some point.
 

Attachments

  • IMG_20200821_134647.jpg
    IMG_20200821_134647.jpg
    154.3 KB · Views: 18
  • IMG_20200821_135246.jpg
    IMG_20200821_135246.jpg
    75.9 KB · Views: 18
The hull continues...
IMG_20200825_135909.jpg
This has been the longest yet most rewarding part so far.. The balsa is almost off cut standard, the knots make bending dry almost a gamble. Beams are snapping and cracking throughout the hull.

IMG_20200826_125607.jpgIMG_20200827_160851.jpg
The instructions are wild, the photos show what looks to be paint or plaster..? And the translations are strange.

IMG_20200827_160900.jpgIMG_20200909_172651.jpg
But the shape is taking place, the positive is that the balsa is about 3 mm thick, so any lumps and bumps can be sanded out easily. In some areas I've had to almost patch it up, but as long as the grain's in the the right direction I'm hoping it will add to the feel.
Important.. If I had to start this again, I would have boiled the kettle and steamed the living shit out of the beams.
 
And we draw to a close..
The photos (in this instance only) don't really do the build state justice, although the ship has been properly stress and manhandled over the last couple of weeks, the beams/ planks have been forced into shapes, nooks and crannies. If you eye the hull from Bow to Stern the profile is pretty shapely.
IMG_20200911_134004.jpgIMG_20200911_152226.jpg
The office is awash with bent modelling pins and splinters. It's as though The Kraken itself had awoken whilst on crack and gone on a bender.
Luckily the Gorilla helped tame the beast.
IMG_20200911_133927.jpgIMG_20200911_133941.jpg
Honestly, this glue has been outstanding.
 
I thought I'd keep a log of my experiences in; being cheap, buying third rate goods, being too lazy to ask for a refund and just trying to fix up what might simply be a floating lemon.

(I'm about 2 weeks in, so the tenses may change in a few posts time.)

Straight to the point -> I asked my wife to buy me a Black Pearl kit from a dodgy drop shipping company, she did, and when it arrived it was junk in a box. It was a "copy" of the ZHL full senario, but seeing as how they copy other companies I continued on the premise that two wrongs don't make a right but so what, it's most likely some poor factory worker raiding the bins.

It arrived.
View attachment 131039
Burnt out, stinking, ripped up and half there.

Challenge accepted!
You might like to check out this You tube channel, not sure if is the same kit as yours, there is a whole build series which may or may not be helpful.
 
And we draw to a close..
The photos (in this instance only) don't really do the build state justice, although the ship has been properly stress and manhandled over the last couple of weeks, the beams/ planks have been forced into shapes, nooks and crannies. If you eye the hull from Bow to Stern the profile is pretty shapely.
View attachment 178626View attachment 178627
The office is awash with bent modelling pins and splinters. It's as though The Kraken itself had awoken whilst on crack and gone on a bender.
Luckily the Gorilla helped tame the beast.
View attachment 178624View attachment 178625
Honestly, this glue has been outstanding.
Love the humor, "Kraken itself had awoken whilst on crack and gone on a bender" ROTF
 
Still on the hull but at least not still in Hull.. (I've never actually been to Hull so apologies if you're from there and it's nice, I've been to Gateshead though and it looks pretty similar, so once again apologies)

So I'm looking at the Stern of the ship, and as I had guessed, they'd given me a slab of chargrilled Ply with the grain in the wrong direction, It is as though they are doing this on purpose, and most likely pissing themselves whilst doing it. I imagine a factory floor in Guangzhou or somewhere, where everyone is laughing and sitting around, picking up random pieces of off cuts and throwing them into random boxes.

IMG_20200916_134052.jpg
There are two pieces, one that bends around from port to starboard and the other that sweeps from the deck to the keel.
IMG_20200916_134129.jpg
And you can see that the bend is a proper 80 degs and there is no way that this 'ply' is going to bend more than 2 degs.
IMG_20200916_134138.jpg
So out with the 0.8 mm 'hoop' Ply from Bagpress UK..
Check the curve on THAT!!
IMG_20200916_140048.jpgIMG_20200916_140055.jpg
This can be cut with a scalpel pretty quickly and the grain is tight enough not to splinter when doing so.
IMG_20200916_140322.jpgIMG_20200916_143112.jpg
So tracing around the copy of a copy of the original (That lets be honest, ZHL probably copied themselves... and BTW ZHL come at me, search around, your cover was blown years ago.. and I said "probably")
The next part was to trim the hull's planks, seeing as these were going to get a proper sanding and face lift, I wasn't too concerned with the delicacy.
IMG_20200916_135204.jpgIMG_20200916_135210.jpgIMG_20200916_135248.jpg
I know I know!
IMG_20200916_135719.jpgIMG_20200916_135732.jpg
Bare with me, it's going to get covered..
IMG_20200916_143116.jpgIMG_20200917_074501.jpg
I know I know, the glue will dry clear and I'll be covering that too.
IMG_20200929_141038.jpgIMG_20200929_142437.jpg
and as I'm here I may as well finish the hull
IMG_20200921_153248.jpgIMG_20200923_130843.jpgIMG_20200926_100041.jpgIMG_20201001_163115.jpg
Ok done!
Next up, the Captain's Table.
 
The build begins.
Now the instructions were obviously not included so I spent a few days searching online. I found a collection of word docs that I believe was made by someone on this forum. The funny thing was that I didn't get them from him, I got them from another supplier who linked them from yet another supplier!! What is going on over there?

View attachment 131046

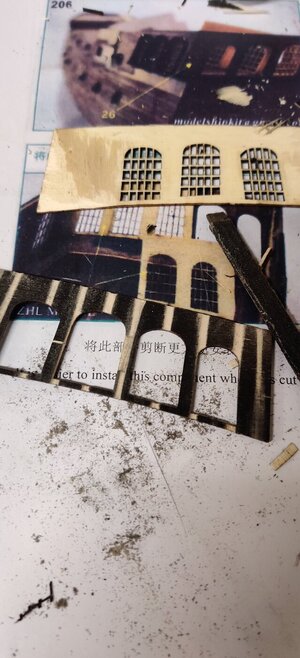
And no, my camera is 4K! These instructions are actually like this, all pixelated, hardly visible and painful to read.. Through out the 63 poorly rendered pages there was a reference to another ship name..
View attachment 131047
it wasn't spooky back then, but it's pretty god damn spooky now! The Black Pearls instructions were originally for the SPIRIT OF WUHAN! Obviously at the time I had never heard of the city containing 11 million people, a statement to my lack of detailing to come..

Ah yes the build.
View attachment 131048
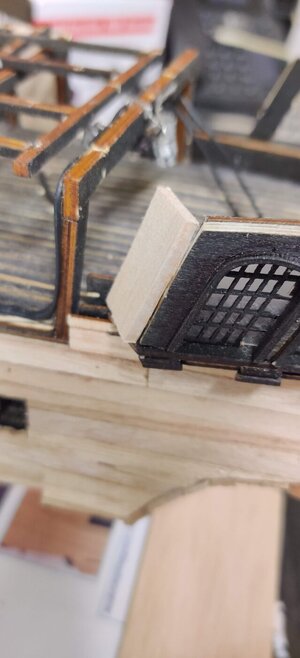
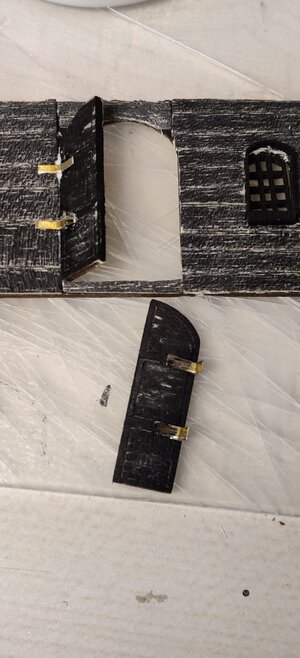
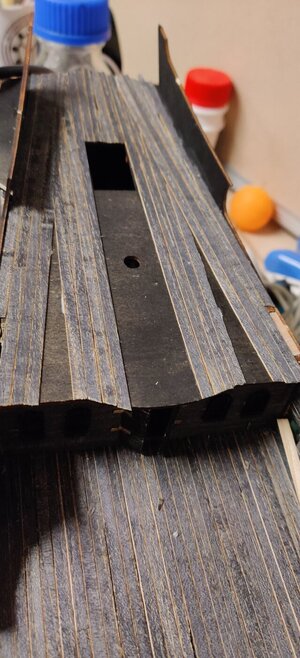
Using Gorilla Wood Glue, because of the mess free lid design, I started to slot the parts into place, the thicknesses were inaccurate and didn't match up to the widths of the slot (or vise versa)
View attachment 131049
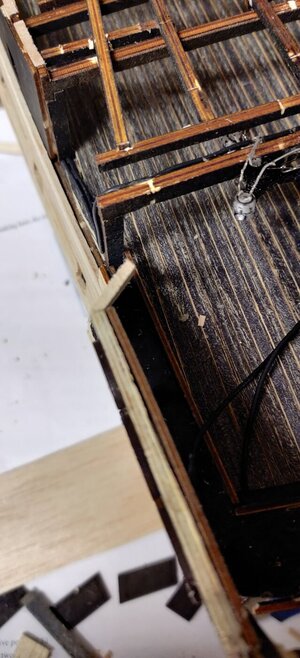
This led me to having to cut balsa wedges, jam them in the gaps and re orientate the parts so as to render them straight and at 90 degs.
View attachment 131050
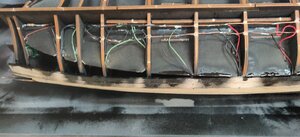
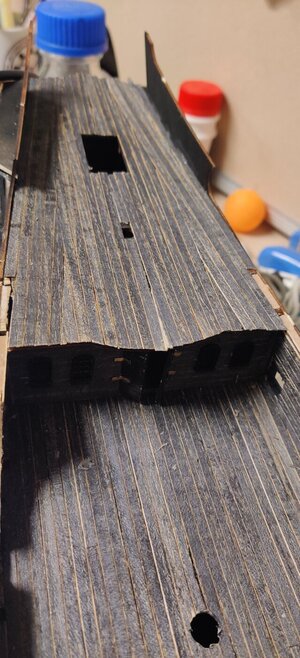
It was coming along nicely (or so I thought at the time.. I have now come to the understanding that are two support struts missing from the bottom, I know this because I am currently looking at them on my desk! (Yes I know the blade is dangerously extended, I had an itchy nostril)
View attachment 131051
Anyway, I left it to glue used tape to gently secure it parallel. Burnt ply wood warps and bows.
Love your sense of humor about the build. I think I would have returned it and got my money back. The kits are hard enough with the regular mistakes found in the plans. You have a jigsaw puzzle without a picture and some parts missing. you are a braver man than I.
 
Let there be light.. No! Actually let there be light, because even though the supplier claimed that the LEDs were included, they obviously weren't.

The first thing here was to find Orange LEDs, nothing fancy but they needed to be small. Managed to find a bag of 50 3mm Orange LEDs online. (After initially getting a bag of red ones..) I needed a dim glow NOT a sexy one!

Went about designing the lamps with what I had to hand, Copper wire 1mm, 0.8mm Hoop Ply and a laser cutter.
View attachment 131402
4 discs:
3.5mm DIA- 2 hole for the LED legs
5mm DIA- 4 hole for the Copper wire (rods) and a 3mm hole for the LED base
5mm DIA- 4 hole for the Copper wire (rods) and a 2mm hole for the LED top
5mm DIA- 4 hole for the Copper wire rods

Assembled:
View attachment 131403View attachment 131401
Tested:
View attachment 131400View attachment 131399
As soon as I saw the orange glow I knew I had to finish this build!
View attachment 131398
The LEDs were bent at 90 deg, soldered, insulated and glued into place using UHU modelling glue.
Now time for some beauty shots.
View attachment 131397View attachment 131396View attachment 131395
That looks great!
 
It was time to start focusing on the captains quarters. In the ZHL kit instructions, the windows appear to be constructed from 3 layers; 2 wood and a centre of brass. The metal provides the leaded lines decoration. Now obviously there was no trace of any brass, just 3 layers of burnt out ply all the same thickness.
IMG_20201026_124008.jpg
The first stage was too thin out the centre piece, this was whittled... badly.
IMG_20201027_143249.jpgIMG_20201027_143615.jpgIMG_20201027_144003.jpg
With regards to the back windows (array of 5) the ply needed to bend to the profile, and here we have our first issue. I couldn't be arsed creating the laser cut lines to re burn into a better sample of ply. So I gouged it.
IMG_20201029_114928.jpgIMG_20201029_114936.jpg

Gluing the layers together led to the realisation that neither this 'kit' nor the ZHL referred to any 'glass like material, and knowing that I had already placed the LED chandelier in the cabin, I need a diffuser of sorts.
So cutting up and scratching up an old ID pouch, I set to work making glass.
IMG_20201027_145501.jpgIMG_20201027_150104.jpgIMG_20201027_151308.jpg
There were diagonal plates that joined the main hull profile to the overhanging bay windows.
IMG_20201030_141741.jpg
I felt the need to redo these, a Captain needs to see where he's (or she, they, xem, they're) going, not just where he's (or she, they, xem, they've) been.
IMG_20201030_142203.jpgIMG_20201030_142612.jpgIMG_20201030_141807.jpg
 

Attachments

  • IMG_20201030_141803.jpg
    IMG_20201030_141803.jpg
    97.2 KB · Views: 5
  • IMG_20201030_142118.jpg
    IMG_20201030_142118.jpg
    178.1 KB · Views: 4
  • IMG_20201029_115442.jpg
    IMG_20201029_115442.jpg
    167.8 KB · Views: 3
Last edited:
Catch up Session
Placing the back half to the cabin, This was the thicker, non bending ply, I had to gouge strips out just to get it to bend.

IMG_20201029_121329.jpgIMG_20201029_115442.jpgIMG_20201030_142621.jpg
Next came the door to the cabin, 4 windows and a double door. I followed the previous ideas, added hinges made from split pins. Glass from plastic ID card wallets. I still had a bit of stained Ash, so I cladded the wall and sliced out the windows after.
IMG_20201103_140747.jpgIMG_20201103_141702.jpgIMG_20201104_133256.jpgIMG_20201104_134143.jpgIMG_20201104_140247.jpg
Next up a trip to Ikea.

IMG_20201104_152206.jpg
As you can only really see the cabin through scratched windows, the furniture is only really used to provide silhouettes. Basically put, I'm not decorating them.
 

Attachments

  • IMG_20201104_140247.jpg
    IMG_20201104_140247.jpg
    153.7 KB · Views: 6
Ok so now it's time to make this Pearl 'Black'!
Using rock hard plaster for walls and not lovely soft, powdery plaster for models, I proceeded to fill in the gaps at the bow and aft and the holes caused by the pins through out the hull.
IMG_20201110_153548.jpgIMG_20201110_153555.jpg
This dried straight away and became an absolute nightmare to sand down. Using the only Black Paint I could get my lazy hands on (Some filthy oil/ solvent based Black paint used to seal car radiators) I doused it in thinners then took to the hull with a very very small brush.
IMG_20201118_163511.jpgIMG_20201118_142616.jpg
Two coats to the lot, using the #2 brush gave the desired effect. Small brush strokes as if made by tiny little 'men'.
IMG_20201125_123641.jpgIMG_20201125_123624.jpg

IMG_20201126_142805.jpg

And the job was a goodun.
Now I'd like to share some proper sexy shot of my back aft!
IMG_20201208_101438.jpgIMG_20201208_101446.jpgIMG_20201208_101459.jpg
Noticed the two side glass panels? I left one clear so as to allow the viewer to see right inside the Captain Quarters. Sometimes it just works out.
 
Oooopps.. catch up time again.
Everyday, I do a tiny amount, but after a month or so it builds up, trouble is I forget to put the fruits of my labours up here!
So sit back and take a bite of my fruits.

Decking and work of the captains quarters.
The planks were the last of the Ash stained black, laser scored and snapped material from the beginning of the build. I'm running out of this and getting the same level of stain on a new piece is going to be tough. I'm trying to save as many resources as possible here, thus the diagonal layout, I'm be able to use the off cuts to fill in the gaps.
IMG_20201210_084627.jpgIMG_20201210_092313.jpgIMG_20201210_093725.jpgIMG_20201210_115649.jpg

Now the mismatched captains quarters needed filling in, the upper deck size and mid deck sizes weren't completely correct, as in they obviously weren't going to fit because this entire kit has been taken from the offcuts of various different scale models.
So out with the balsa, scalpel and glue.

IMG_20201211_075530.jpg

As long as I can get the layers to the same size, I should be able to fill later. Next up the lip, or curved roof? This was a block of Pine, shaped and cut then glued to make a U shape lip around the roof of the Captain area. The wires to the main Aft lamps were extended and run through the block on the side.
IMG_20201211_150123.jpgIMG_20201211_150203.jpgIMG_20201215_140326.jpgIMG_20201215_142716.jpg
 

Attachments

  • IMG_20201210_093725.jpg
    IMG_20201210_093725.jpg
    194.5 KB · Views: 1
  • IMG_20201210_115649.jpg
    IMG_20201210_115649.jpg
    214.8 KB · Views: 1
Back
Top