The Schooner Bluenose 1921, POF Yuanqing Models 1:72 [COMPLETED BUILD]

Good Sunday afternoon to all.
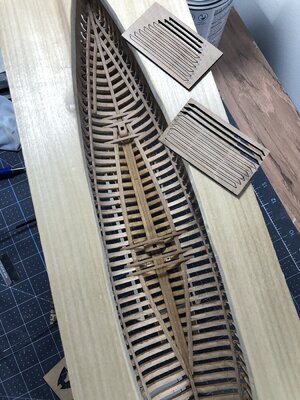
Finally finished my map project and am now back to work on the sleek beautiful Blue Nose. I have spent a few hours fairing the hull ribs, actually not near as many hours as I was anticipating. The interior fairing was made simple by covering some old flexible sanding sticks with some 220 and 320 grit paper plus a handle I made on it.
View attachment 372129View attachment 372130

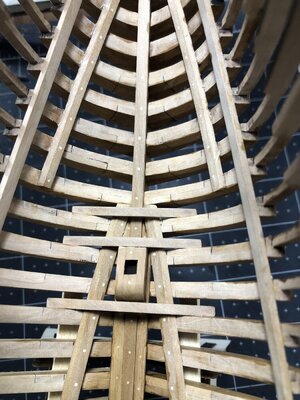
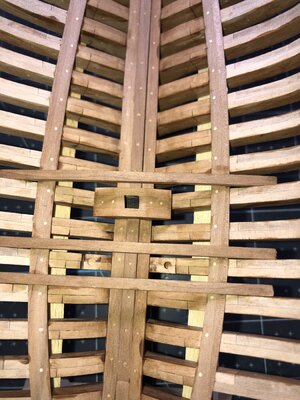
Next are a few pics of the upper deck support whalers and the hardware I fabricated to hold everything in place. Once all four runners were glued in, I removed the thin spacers you see which will be installed permanently later on in the build.

View attachment 372131View attachment 372132View attachment 372133

Next you will see the first half of the lower deck whaler beam support piece installed. Once I finish the other side and install the two sister keelsons, I'll go ahead, and clear coat mixed with a little stain everything before going any further.

View attachment 372135View attachment 372136View attachment 372137

Before I forget, here is a shot of the laminated nose piece.

View attachment 372141

That all for now, hope you all enjoy and happy modeling!
A nice progress, Daniel. Sanding the hull was no punishment for me. Wonderful to feel and see the flowing shape under your fingers is growing. And with the installing of the bearing beam for the lower floor, you feel the frames and the full hull gets more and more stiffness. The nailing looks also great.
Regards, Peter
Thanks Peter, the clamp idea came from looking at your build.
 
Good Sunday afternoon to all.
Finally finished my map project and am now back to work on the sleek beautiful Blue Nose. I have spent a few hours fairing the hull ribs, actually not near as many hours as I was anticipating. The interior fairing was made simple by covering some old flexible sanding sticks with some 220 and 320 grit paper plus a handle I made on it.
View attachment 372129View attachment 372130

Next are a few pics of the upper deck support whalers and the hardware I fabricated to hold everything in place. Once all four runners were glued in, I removed the thin spacers you see which will be installed permanently later on in the build.

View attachment 372131View attachment 372132View attachment 372133

Next you will see the first half of the lower deck whaler beam support piece installed. Once I finish the other side and install the two sister keelsons, I'll go ahead, and clear coat mixed with a little stain everything before going any further.

View attachment 372135View attachment 372136View attachment 372137

Before I forget, here is a shot of the laminated nose piece.

View attachment 372141

That all for now, hope you all enjoy and happy modeling!
Good morning Daniel. I just knew when you embarked on this project it was going to be something special. Looking so good. Cheers Grant
 
This looks very sleek and neat Daniel,, my compliments
Your tight assembly of the rear side will benefit you a lot later with the installation of the planks

Craftsmanship

Regards Henk
 
This looks very sleek and neat Daniel,, my compliments
Your tight assembly of the rear side will benefit you a lot later with the installation of the planks

Craftsmanship

Regards Henk
Thanks Henk, I'm at the point of getting ready to stain and clear coat before any more installation.
 
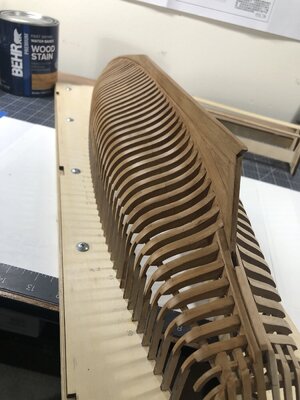
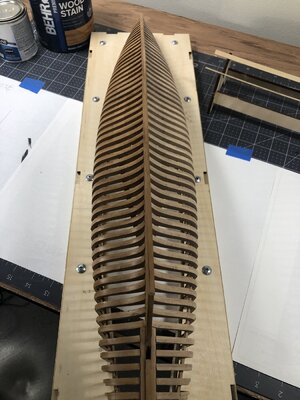
Good afternoon, I have a short update to post. I have stained and clear matte finished the starboard side which will be the exposed rib side. I'm quite happy with the results, a warm oak type of finish. I used a 2-parts clear matte poly and 1-part golden oak stain both water based. I let the first coat dry a day then hit it with steel wool and went with a second coat of just clear matte poly. On the port side which I'll plank over with their pear wood I only coated the sides of each rib so as to ensure a good bond between the planking and the face of the frames. You can see the contrast between finished and unfinished.

IMG_2516.jpgIMG_2517.jpgIMG_2520.jpg

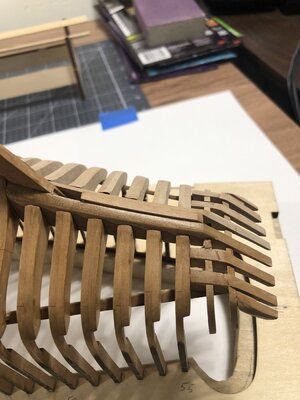
In this last macro shot you can see some repairs and strengthening I had to do to the transom frames. This will all be covered up when finished.

Thanks for checking in, have a great weekend.
 
Good afternoon, I have a short update to post. I have stained and clear matte finished the starboard side which will be the exposed rib side. I'm quite happy with the results, a warm oak type of finish. I used a 2-parts clear matte poly and 1-part golden oak stain both water based. I let the first coat dry a day then hit it with steel wool and went with a second coat of just clear matte poly. On the port side which I'll plank over with their pear wood I only coated the sides of each rib so as to ensure a good bond between the planking and the face of the frames. You can see the contrast between finished and unfinished.

View attachment 372956View attachment 372957View attachment 372958

In this last macro shot you can see some repairs and strengthening I had to do to the transom frames. This will all be covered up when finished.

Thanks for checking in, have a great weekend.
That's looking great, Daniel!
The transom parts are very fragile ánd exposed, accidents will happen.
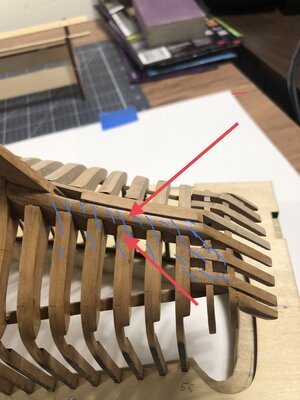
BTW, you might want to make sure the frames and the keel extension towards the transom align properly to have a uniform surface for the planks. See red arrows and the (blue) hatched area:

334A3A57-D7C5-45C5-A26D-EF0168816EA1.jpeg
 
That's looking great, Daniel!
The transom parts are very fragile ánd exposed, accidents will happen.
BTW, you might want to make sure the frames and the keel extension towards the transom align properly to have a uniform surface for the planks. See red arrows and the (blue) hatched area:

View attachment 372960
Yes, Johan, thanks for the heads up. I knew in the back of my mind there is probably going to be some sanding, refining to do in this area. Not on this side but the other side.
 
Good afternoon, I have a short update to post. I have stained and clear matte finished the starboard side which will be the exposed rib side. I'm quite happy with the results, a warm oak type of finish. I used a 2-parts clear matte poly and 1-part golden oak stain both water based. I let the first coat dry a day then hit it with steel wool and went with a second coat of just clear matte poly. On the port side which I'll plank over with their pear wood I only coated the sides of each rib so as to ensure a good bond between the planking and the face of the frames. You can see the contrast between finished and unfinished.

View attachment 372956View attachment 372957View attachment 372958

In this last macro shot you can see some repairs and strengthening I had to do to the transom frames. This will all be covered up when finished.

Thanks for checking in, have a great weekend.
Some layers of coat gives the pear wood always a warm appearance. Well done, Daniel.
Regards, Peter
 
Good afternoon, I have a short update to post. I have stained and clear matte finished the starboard side which will be the exposed rib side. I'm quite happy with the results, a warm oak type of finish. I used a 2-parts clear matte poly and 1-part golden oak stain both water based. I let the first coat dry a day then hit it with steel wool and went with a second coat of just clear matte poly. On the port side which I'll plank over with their pear wood I only coated the sides of each rib so as to ensure a good bond between the planking and the face of the frames. You can see the contrast between finished and unfinished.

View attachment 372956View attachment 372957View attachment 372958

In this last macro shot you can see some repairs and strengthening I had to do to the transom frames. This will all be covered up when finished.

Thanks for checking in, have a great weekend.
Good morning Daniel. You totally owned it ! I am not one for staining wood (always enjoy the natural finish) however the light oak finish you achieved is brilliant. Cheers Grant
 
Good morning Daniel. You totally owned it ! I am not one for staining wood (always enjoy the natural finish) however the light oak finish you achieved is brilliant. Cheers Grant
Thanks Grant, like you I normally don't like to stain wood either. I almost always end up with shading irregularities due to the stain time factor before wiping it off. This method of mixing stain with a topcoat sealant was much more like ordinary painting.
 
Hello everyone, continuing on with the lower section of this build I installed the mast bases and began the lower cross beam installation.
You can see I am stain/sealing as I am coming up from the keelson. At first, I couldn't find what happens to rib #31 with the two 2mm dia. holes just aft of the main mast base support but hiding in plain sight they are the anchor holes for two bollard supports that come all the way up through the main deck.

IMG_2523.jpgIMG_2525.jpgIMG_2526.jpg

Well, these macro shots sure show a lot of imperfections you wouldn't see at a normal observing distance. I suppose we all have to deal with this on occasion.
Hope you enjoy.
 
Back
Top