Totally agree. Using CA always seems to add an extra layer of stress to the process - you know you only have pretty much one shot at it and very little time to do it in!Thanks Mark, what's interesting to me is I have yet to use any CA glue, it's all PVA at this point and it gives me time to apply and spread it then position it and clamp.
-

Win a Free Custom Engraved Brass Coin!!!
As a way to introduce our brass coins to the community, we will raffle off a free coin during the month of August. Follow link ABOVE for instructions for entering.
-

PRE-ORDER SHIPS IN SCALE TODAY!
The beloved Ships in Scale Magazine is back and charting a new course for 2026!
Discover new skills, new techniques, and new inspirations in every issue.
NOTE THAT OUR FIRST ISSUE WILL BE JAN/FEB 2026
- Home
- Forums
- Ships of Scale Group Builds and Projects
- Bluenose PoF Group Build
- Bluenose Group Build Logs
You are using an out of date browser. It may not display this or other websites correctly.
You should upgrade or use an alternative browser.
You should upgrade or use an alternative browser.
The Schooner Bluenose 1921, POF Yuanqing Models 1:72 [COMPLETED BUILD]
For sure I enjoy! Looking very nice, Daniel. Some toothpicks through the scuppers can be helpful by the alignment.While waiting on my deck boards delivery I permanently placed the water boards. I will have some patch and repair in a few locations, but I will wait till I cut the ship out of its framing jig first.
View attachment 377086
I decided to begin application of the bulwarks while still in the jig as it provides a good stable base on its side.
View attachment 377088View attachment 377089
Perfect position for bulwark installs. By the way aligning the bottom of the drain scuppers with the top of the water boards give the corect elevation placement. From there you just have to endo with (in my case) the best average location as close to the plans as possible.
View attachment 377090
Hope you all enjoy. Happy modeling!
Regards, Peter
Thanks Dean, I'm almost ready to remove the jig.Looking good Daniel. You can free it from the jig now.
Thanks Peter, that's a great tip!For sure I enjoy! Looking very nice, Daniel. Some toothpicks through the scuppers can be helpful by the alignment.
Regards, Peter
I remember using square stock that was long enough to go through both sides, and taped it to the top of the waterway boards in about 4 places per deck. That established the height and the location bow to stern. I used the deck beams as a guide for alignment bow to stern.
- Joined
- Oct 11, 2021
- Messages
- 739
- Points
- 403

I've seen men and women becoming a millionair combining both.Makes sense…work smart, not hard!
Wow look at the progres you made and the beauty. Congrats on the results so far Daniel. A truely nice and detailed log to follow. Clean and crisp work. With your log you will guide new builders of BN in the near future..
Good morning, everyone.
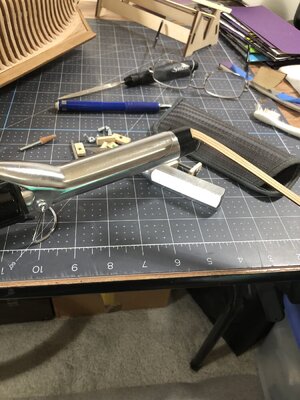
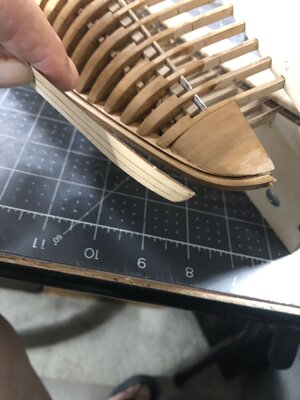
A little bit of progress and a possibly a better mouse trap. I began placing the hull planking and decided that leaving the jig frame in place provides the best stable platform for this operation. Once completed I will remove it. I use my trusty plank bender (womans hair curler) which works really well. Just dip the end in water a minute or two then heat and bend.


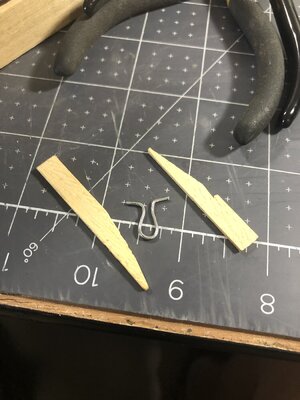
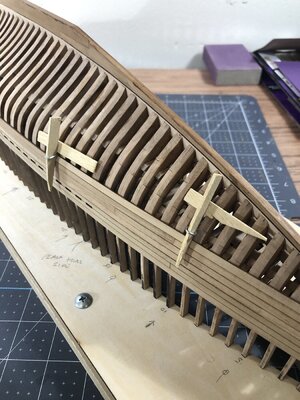
I tried several methods to hold some of the more argumentative planks fast to the frames and came up with this. It works great! Take a simple paperclip bend it as shown, insert between the ribs and turn it 90 deg then wedge it in place.


Hope you enjoy, and happy modeling.
A little bit of progress and a possibly a better mouse trap. I began placing the hull planking and decided that leaving the jig frame in place provides the best stable platform for this operation. Once completed I will remove it. I use my trusty plank bender (womans hair curler) which works really well. Just dip the end in water a minute or two then heat and bend.


I tried several methods to hold some of the more argumentative planks fast to the frames and came up with this. It works great! Take a simple paperclip bend it as shown, insert between the ribs and turn it 90 deg then wedge it in place.


Hope you enjoy, and happy modeling.
Clever!Good morning, everyone.
A little bit of progress and a possibly a better mouse trap. I began placing the hull planking and decided that leaving the jig frame in place provides the best stable platform for this operation. Once completed I will remove it. I use my trusty plank bender (womans hair curler) which works really well. Just dip the end in water a minute or two then heat and bend.
View attachment 377462View attachment 377463
I tried several methods to hold some of the more argumentative planks fast to the frames and came up with this. It works great! Take a simple paperclip bend it as shown, insert between the ribs and turn it 90 deg then wedge it in place.
View attachment 377464View attachment 377465
Hope you enjoy, and happy modeling.
Thank you for your kind words, Peter.I've seen men and women becoming a millionair combining both.
Wow look at the progres you made and the beauty. Congrats on the results so far Daniel. A truely nice and detailed log to follow. Clean and crisp work. With your log you will guide new builders of BN in the near future..
- Joined
- Sep 3, 2021
- Messages
- 5,152
- Points
- 738

Smart solution!Good morning, everyone.
A little bit of progress and a possibly a better mouse trap. I began placing the hull planking and decided that leaving the jig frame in place provides the best stable platform for this operation. Once completed I will remove it. I use my trusty plank bender (womans hair curler) which works really well. Just dip the end in water a minute or two then heat and bend.
View attachment 377462View attachment 377463
I tried several methods to hold some of the more argumentative planks fast to the frames and came up with this. It works great! Take a simple paperclip bend it as shown, insert between the ribs and turn it 90 deg then wedge it in place.
View attachment 377464View attachment 377465
Hope you enjoy, and happy modeling.
G
Good evening Daniel. “Good thinking Batman”. Those first set of planks are so good. It must be really rewarding working with good wood. Cheers GrantGood morning, everyone.
A little bit of progress and a possibly a better mouse trap. I began placing the hull planking and decided that leaving the jig frame in place provides the best stable platform for this operation. Once completed I will remove it. I use my trusty plank bender (womans hair curler) which works really well. Just dip the end in water a minute or two then heat and bend.
View attachment 377462View attachment 377463
I tried several methods to hold some of the more argumentative planks fast to the frames and came up with this. It works great! Take a simple paperclip bend it as shown, insert between the ribs and turn it 90 deg then wedge it in place.
View attachment 377464View attachment 377465
Hope you enjoy, and happy modeling.
Nice idea about the bended paperclips, Daniel. About the positioning of the planks, (and perhaps you already know): because of the laser cut, they have a slight chamfer on the sides: /___\. When you put 2 of them side by side /___\/___\ then you get a tight connection with almost no gap between the planks. Especially when you get to the curve of the frames.Good morning, everyone.
A little bit of progress and a possibly a better mouse trap. I began placing the hull planking and decided that leaving the jig frame in place provides the best stable platform for this operation. Once completed I will remove it. I use my trusty plank bender (womans hair curler) which works really well. Just dip the end in water a minute or two then heat and bend.
View attachment 377462View attachment 377463
I tried several methods to hold some of the more argumentative planks fast to the frames and came up with this. It works great! Take a simple paperclip bend it as shown, insert between the ribs and turn it 90 deg then wedge it in place.
View attachment 377464View attachment 377465
Hope you enjoy, and happy modeling.
Regards, Peter
Thanks Grant. Pear is a great wood to work with.G
Good evening Daniel. “Good thinking Batman”. Those first set of planks are so good. It must be really rewarding working with good wood. Cheers Grant
Thanks Peter, I'm aware of the laser chamfer and it does provide a good tight match up and in some of the curvier locations I even file a more angled chamfer to help with a tight fit.Nice idea about the bended paperclips, Daniel. About the positioning of the planks, (and perhaps you already know): because of the laser cut, they have a slight chamfer on the sides: /___\. When you put 2 of them side by side /___\/___\ then you get a tight connection with almost no gap between the planks. Especially when you get to the curve of the frames.
Regards, Peter
- Joined
- Sep 3, 2021
- Messages
- 5,152
- Points
- 738

Putting them on the other way around is clearly visible. Paying a little attention during dry fit is very helpful.When you put 2 of them side by side /___\/___\ then you get a tight connection with almost no gap between the planks.
The end result is worth your while.
I see what your seeing Johan, toward the bow what must appear as an open v joint is in reality a slightly horizontal offset which I hope will sand out smoothly prior to painting. Now at the stern section I may need some hairline fillers where there is a change in direction. Either way I will be painting the pearwood because I really like the red black (maybe dark blue) combo color.Putting them on the other way around is clearly visible. Paying a little attention during dry fit is very helpful.
The end result is worth your while.
- Joined
- Sep 3, 2021
- Messages
- 5,152
- Points
- 738

You're gonna paint both port- and starboard sides?Either way I will be painting the pearwood because I really like the red black (maybe dark blue) combo color.
Yes, however the starboard side only has 5 boards including the bulwarks. At least that's my plan for now, I may change my mind once I sand out the pearwood and get a good look at a more complete picture.You're gonna paint both port- and starboard sides?
- Joined
- Sep 3, 2021
- Messages
- 5,152
- Points
- 738

Regardless what you choose, one side will remain open, showing the beauty of the frames.Yes, however the starboard side only has 5 boards including the bulwarks. At least that's my plan for now, I may change my mind once I sand out the pearwood and get a good look at a more complete picture.
Personally I was impressed by the effect a stained port side had on the appearance.
In the end it boils down to ones personal preferences...
That is correct my friend.Regardless what you choose, one side will remain open, showing the beauty of the frames.


