Reading his post, the glue is probably PVA as he cleans the glue brushes in water.
-

Win a Free Custom Engraved Brass Coin!!!
As a way to introduce our brass coins to the community, we will raffle off a free coin during the month of August. Follow link ABOVE for instructions for entering.
-

PRE-ORDER SHIPS IN SCALE TODAY!
The beloved Ships in Scale Magazine is back and charting a new course for 2026!
Discover new skills, new techniques, and new inspirations in every issue.
NOTE THAT OUR FIRST ISSUE WILL BE JAN/FEB 2026
You are using an out of date browser. It may not display this or other websites correctly.
You should upgrade or use an alternative browser.
You should upgrade or use an alternative browser.
- Joined
- Mar 1, 2022
- Messages
- 694
- Points
- 308

Thanks Allan. That's exactly what I was looking for!Hi Paul,
For the anchor the following are from Lees Masting and Rigging page 188.
Sheet, best bower and bower anchor cable circumference is 0.62 X the diameter of the main mast.
Kedge anchor cable is 0.6 the size of the sheet anchor cable.
The spare cables were an inch or so smaller in circumference.
Other anchor rigging
cable messenger 0.75X main stay
Cat falls and cat head stopper 0.33X the main stay
Shank painter tail 0.4 X the main stay
fish pendant 0.5 X the main stay
fish pendant tackle 0.25 X the main stay
There are several other ropes concerning anchor handling related items as well.
Hope this is helpful.
Allan
I use a similar method of making wooden rings for mast hoops and the like. I'd encourage you to give it a try the next time you need some and see if you like my method better. It's primary advantage is the strength of the resulting hoops and the ease of making them.MAST HOOPS, RETAINING RINGS AND WOOLDINGS
The most common methods of making these seems to be thick cardboard such as poster board or card stock, brass, and wood. I have used all three methods depending on the scale and situation. Poster board is easy enough and metal rings, when appropriate, can be made from sheet or by slicing off rings from a brass tube if the diameter is correct for the mast,
Wood was the material used for wooldings and sail hoops and can be made with basic hand tools including a hobby knife and fit to any size needed.
Hoops for sails
To be clear, the following photo show the hoops I am referring to.
View attachment 486905
To make these I use a piece of dowel that is about 5% to 10% larger in diameter than the mast. The wood I like best is holly as it is tight grained and easy to shape. Basswood is a good choice as well and poplar is not a bad substitute as it is easy to find.
I first start by cutting strips to size. These strips can be cut using a saw or cut from sheet stock using a hobby knife if a saw is not available. The thickness varied but 1.25" to 1.5 inches for mast hoops and 1" to 1.25" is accurate.
Once the strips are made I soak them in water for an hour or so to make them pliable and so they will not split when bent.
Cut strip
View attachment 486907
Soaked strip
View attachment 486908
Wet strip wrapped around dowel rod
View attachment 486910
Hoops dried with hot air gun or hair drier
View attachment 486911
Dried and ready to cut into rings
View attachment 486912
Mast hoops
View attachment 486909
Woolding rings
For some unknown reason some kits neglect to show the wooden rings in their drawings and instructions. I do not recall ever seeing contemporary plans or models that have rope wooldings without the wooden rings. If there are cheeks or fish, the wooden rings and rope go over them. When metal rings came into use these went under the fish and cheeks. The rope was nailed in place, but to protect against wear and to help keep them in place, the wooden rings were nailed above and below to protect the rope winding. The size of the wooldings themselves was 0.2 X the main stay in all cases according to Lees in The Masting and Rigging of English Ships of War. I am guessing they would be similar for other nationalities. There were typically twelve wraps of woolding rope. I cannot find anything regarding the sizes of the wooden rings on top and under the rope of the wooldings but estimate these based on contemporary drawings and drawings in Lees.
If the wooden rings are too thick, chuck the mast in a drill or lathe and sand the rings so the thickness is similar to the diameter of the rope.
View attachment 486936
Rope in place. Note that I made these as a sample for this post. In reality there should be about 12 wraps of rope.
View attachment 486937
If anyone has more information on wooldings and rings in general, please add to the information above, or if I got anything wrong, please feel free to point this out.
Allan
I take a mandrel of doweling, tubing, or whatever of the desired hoop diameter and wrap some waxed paper, plastic wrap, or aluminum foil around it, securing the ends with rubber bands. I then set a plane to take a thin shaving and I plane long, continuous shavings from the edge of a clear plank edge with no grain runout. (The thicker the plank, the wider the shaving. The wider the shaving, the better.) I then wrap the shavings around the mandrel with each turn evenly laid upon one the previous turn as it's wrapped around the mandrel while applying a coating of thinned PVA adhesive to the face of the shaving as it's wrapped. When the thickness of the shaving laminations reaches the desired thickness, the shaving wrapping is secured with a rubber band or masking tape. When the PVA is cured, the mandrel is chucked in the lathe and sections of the laminated shavings are marked at the desired widths and parted with a razor knife. The resulting rings are slid off the mandrel and any adhesive adhering to the inside scraped off with a razor knife. (Which shouldn't be much if you are careful applying the adhesive.) The end of the lap on the face of the hoop is sanded fair to the rest of the hoop and the corners of the hoops rounded off, if desired. The hoops are then stained and they're good to go. These laminated hoops, made in the same manner as the full-scale hoops without any joint, are surprisingly strong, as well.
Miscellaneous Bodges
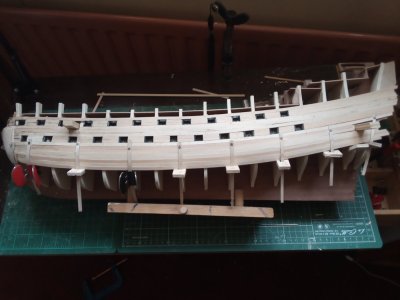
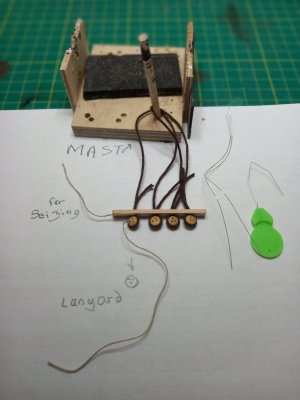
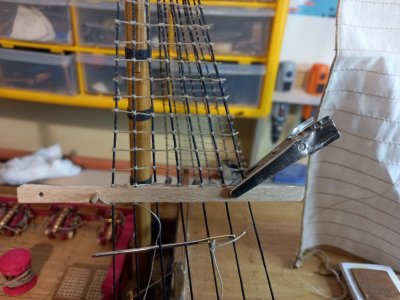
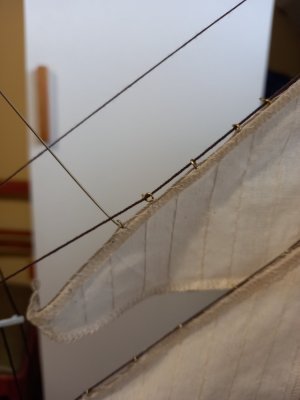
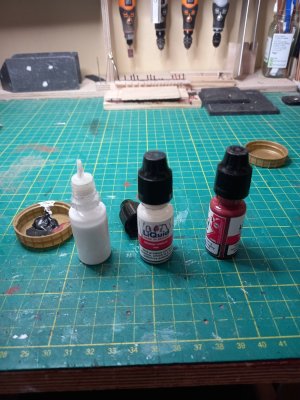
In what I take to be the spirit of this thread have summarised some minor tips that I have posted in more detail in other posts. In Picture Order:
1) Using thin plywood strips to hold planking until glue sets. Fixed at one end; clipped or pinned at the other
2) Making small blocks by bashing a strip of wood through a draw plate. Drill from end or side then cut off.
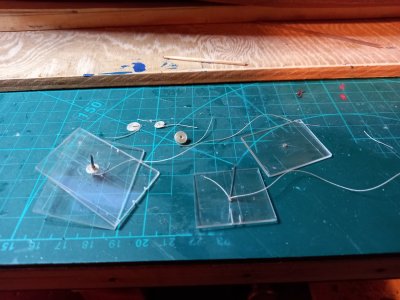
3) Forming deck coils by winding glued thread between two sheets of perspex
4) Assembling shrouds and deadeyes with a dummy, break-off upper "chain plate"
5) Tying ratlines top down so that loops of thread hang down out of the way. shroud access progressively improves.
6) Fixing staysails after stays fitted using looped length of wire subsequently closed and trimmed. Easier then fiddly small rings.
7) Using old vape bottles for dispensing liquids (glue, varnish, paint) extracted from larger tins.
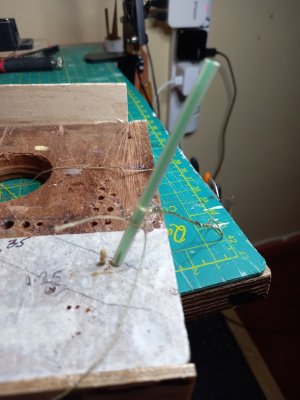
8) Sliding a clove hitch (or other loop) down a drinking straw placed over an installed belaying pin. (off ship demo picture)
9) (no picture) It is often easier to fit a length of running rigging by starting at the belaying pin.
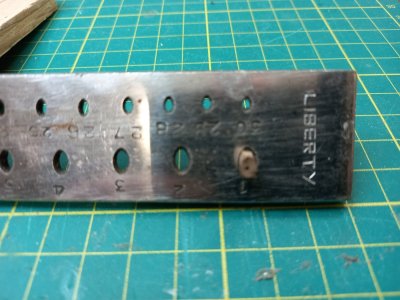


Hi, where du tout Found the drawplate? Is IT à regular ovale drawplate for jewellery?Miscellaneous Bodges
In what I take to be the spirit of this thread have summarised some minor tips that I have posted in more detail in other posts. In Picture Order:
1) Using thin plywood strips to hold planking until glue sets. Fixed at one end; clipped or pinned at the other
2) Making small blocks by bashing a strip of wood through a draw plate. Drill from end or side then cut off.
3) Forming deck coils by winding glued thread between two sheets of perspex
4) Assembling shrouds and deadeyes with a dummy, break-off upper "chain plate"
5) Tying ratlines top down so that loops of thread hang down out of the way. shroud access progressively improves.
6) Fixing staysails after stays fitted using looped length of wire subsequently closed and trimmed. Easier then fiddly small rings.
7) Using old vape bottles for dispensing liquids (glue, varnish, paint) extracted from larger tins.
8) Sliding a clove hitch (or other loop) down a drinking straw placed over an installed belaying pin. (off ship demo picture)
9) (no picture) It is often easier to fit a length of running rigging by starting at the belaying pin.
View attachment 514691View attachment 514692View attachment 514693View attachment 514694View attachment 514695View attachment 514696View attachment 514697View attachment 514717
Thanks, so I assume IT is a regular wire drawplate not necessary for wood and IT work.
Most jewelry draw plates for wire are for sizing/forming not cutting. There are a lot of cutting types from China but the holes are not always accurate to say the least. The one from Byrnes is excellent. While they are still not fully back in operation, they may still have some available. If you are in the market
Byrnes Model Machines - Drawplate
Byrnes Model Machines produces precision-engineered miniature Table Saws and Thickness Sanders for Ship Modelers, Dollhouse Makers and Model Railroad Builders; every machine has an accuracy measured in thousandths of an inch.
www.byrnesmodelmachines.com
Thanks Allan, Il am Aware, but I am juste surprises that the ovale drawplate works.Most jewelry draw plates for wire are for sizing/forming not cutting. There are a lot of cutting types from China but the holes are not always accurate to say the least. The one from Byrnes is excellent. While they are still not fully back in operation, they may still have some available. If you are in the market
Byrnes Model Machines - Drawplate
Byrnes Model Machines produces precision-engineered miniature Table Saws and Thickness Sanders for Ship Modelers, Dollhouse Makers and Model Railroad Builders; every machine has an accuracy measured in thousandths of an inch.www.byrnesmodelmachines.com
- Joined
- Oct 1, 2023
- Messages
- 2,017
- Points
- 488

I bought these and now I can't find them.Using shop-made form scrapers as described above is often much easier if they are mounted in a jeweler's hand vise.
See: https://www.fdjtool.com/vs8115-jewelers-adjustable-hand-vise-with-adjustin.html
View attachment 483928
Also, for those of us who lack the patience, skill, and eyesight to grind the impressively microscopic shapes Allan has, Artisania Latina has three different sets of three "store boughten" scrapers each about the size of said razor blades.
See: https://www.amazon.com/Artesania-Latina-S-Shapers/dp/B01LYYX1JY/ref=sr_1_3?adgrpid=1333708168532099&dib=eyJ2IjoiMSJ9.nd8GWoABOwDdnxNv1XKVxrSOFZq5q5Cf-CHIvh8gsjc2GT2q8XOUAnMvxGF3rO6NFhFxWFcZH6PKXbNKnGGBOr_AMy3a4Lj4Un15DTWJ6vJjluPX3B3pCieKrp2SsFfSrlmJjeINqsW2ncHv1jYhGrkV3_qCT33T3yNsqJpemErI5Qii0TX6QzIfcol_ftCQLhCiWKOwvI62fLYxsB8wucZ4EdFaRiIpTtwYN8cR8kqbyur3Q6GqUkTghEajLFDJfRqEHk19BJr0jTZux8If5MyQwvSZmdlVJsx5WiC3Krg.CtJ5Ilq9utdPn9Q7R2EEyP4a9PRav3IZCR_aaotkLjQ&dib_tag=se&hvadid=83356831335996&hvbmt=bp&hvdev=c&hvlocphy=88716&hvnetw=o&hvqmt=p&hvtargid=kwd-83357102575866:loc-190&hydadcr=4094_10317816&keywords=artesania+latina&msclkid=4ec0a09dc7511baae6e1c7a9b89158a4&qid=1731493867&sr=8-3
View attachment 483926
I bet that ga never happened to anybody else on this site.
I bet that ga never happened to anybody else on this site.
That has never happened to me, not even once,,,,,,,,,, in the past 11 days. Cleaned up the shop area a week and a half ago and put things in order which was a big mistake. Now that it is a bit of a mess again, I found what was missing and all is well.
I envy (hate) seeing those posted photos of an immaculate shop. I take solace in a comment from one of my old work partners that was responsible for the machining part of our own factory. He used to say that other than in an operating room if you go into a work area and there are no little bits and pieces and such laying around, they don't have many customers.
Allan
That's true in a data center too.He used to say that other than in an operating room if you go into a work area and there are no little bits and pieces and such laying around, they don't have many customers.
Allan
A place for everything and everything in its place
I wish!
I wish!
- Joined
- May 25, 2025
- Messages
- 68
- Points
- 58

Being in the business end of model building and repair I have found that an organized shop is more efficient when “time is money”.
Most every tool lives in a certain area and gets put away pretty much every evening.
I always know where my best tweezers are,
I always know where my files are.
And I always know where my pliers and cutters are.
Most every tool lives in a certain area and gets put away pretty much every evening.
I always know where my best tweezers are,
I always know where my files are.
And I always know where my pliers and cutters are.
- Joined
- Oct 1, 2023
- Messages
- 2,017
- Points
- 488

How correct. I'm working off a small dining table in my bedroom. The amount of tools and supplies has grown past my storage area and I don't have room for another cabinet. Just constantly rearranging nearly but really need to dispose of some of the excess.Being in the business end of model building and repair I have found that an organized shop is more efficient when “time is money”.
Most every tool lives in a certain area and gets put away pretty much every evening.
I always know where my best tweezers are,
I always know where my files are.
And I always know where my pliers and cutters are.
Happy modeling
If a cluttered desk is indicative of a cluttered mind, contemplate if you will the implications of an empty desk.That has never happened to me, not even once,,,,,,,,,, in the past 11 days. Cleaned up the shop area a week and a half ago and put things in order which was a big mistake. Now that it is a bit of a mess again, I found what was missing and all is well.
I envy (hate) seeing those posted photos of an immaculate shop. I take solace in a comment from one of my old work partners that was responsible for the machining part of our own factory. He used to say that other than in an operating room if you go into a work area and there are no little bits and pieces and such laying around, they don't have many customers.
Allan
- Joined
- Oct 1, 2023
- Messages
- 2,017
- Points
- 488

TrueIf a cluttered desk is indicative of a cluttered mind, contemplate if you will the implications of an empty desk.
Very useful, Yuri, I can see me doing this with my Vic (1:72) as the walnut used in the kit is poor, & tends to split with the grain VERY easily. Some longer parts eg; chess trees & fenders have been cut cross grain! Replaced with Swiss pear, plus some other parts. At times, I've found the Caldercraft kit disappointing in quality of materials. The walnut plywood is very coarse grained, much like oak.AlanKP69 asked me to post this here. This is from my Victory build log. This is how I make open hearts blocks. Closed hearts are made same way.
View attachment 495862
View attachment 495863
View attachment 495864
View attachment 495865
View attachment 495866
View attachment 495867
View attachment 495868
View attachment 495869
Stuart
If trains STOP at a train station & buses STOP at a bus station, what happens at a 'work station'?If a cluttered desk is indicative of a cluttered mind, contemplate if you will the implications of an empty desk.

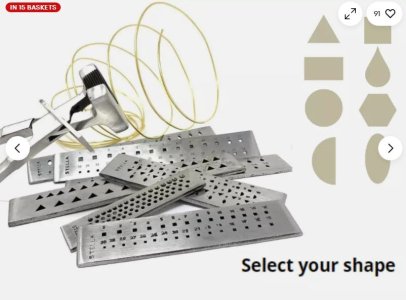
ebay! various silly shapes available
View attachment 532556
You'd be suprised how much they are used. Making jewellery produces lots of filings. These are collected and melted into small gold ingots which are repeatedly annealed and hammered into long thin rods until they can fit into the drawplate. Then the process begins. The range of wire shapes is particulalry useful for making complex stone mounts. An almost infinite range of shapes can be assembled from those wires
.
Last edited:


