Tricks of the trade

Joined
May 9, 2024
Messages
1,370
Points
433

After posting a picture on rounding axles a member had the idea of a thread with little "how-to" items or tricks of the trade that might be of interest for both kit and scratch builders.. Hope this is of interest for one and all to contribute their little tricks.
If this subject has already been started, please let me know, I looked and could not find anything.

First up
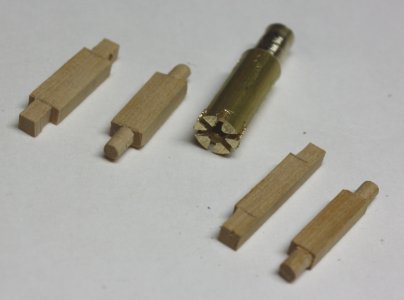
Rounding truck axles on cannon carriages. Too many times we are relegated to having axles that are not round. To round them by hand is tedious and not consistent but I came up with a little device some years ago that is simple to make and easy to use .

Take a small piece of brass or aluminum rod and drill a hole in one end that is the diameter that is needed. Typically the width of the trucks is the same as the thickness of carriage brackets and the axle diameter is about the same as well. Once the hole is drilled, make a couple cross cuts with a hack saw which will create cutting edges in the drilled hole.

The axles were not usually square so you will feel the cutter stop when it hits the shoulder which takes a second or less in time. It may take a little cleaning up of peelings. If they are square, a little care needs to be taken not to round too far down. Marking the cutter with ink or tape as an indicator is easy and effective.

Allan
1728747667203.jpeg
 
Last edited:
Thanks guys, I hope others have some good ideas to help all of us.

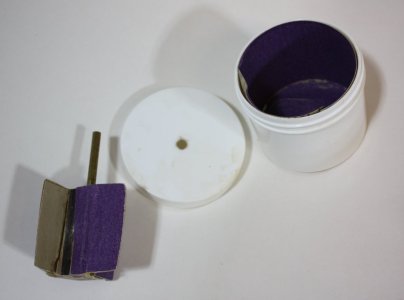
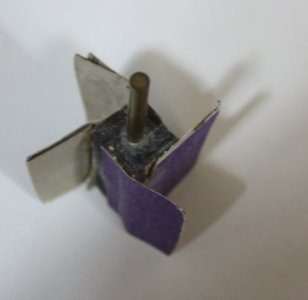
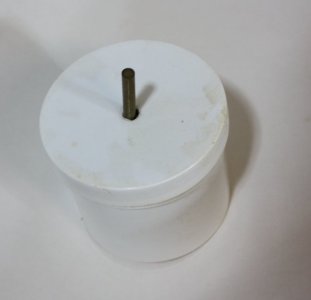
Another trick that I had posted some weeks back deals with the problem of squarish blocks found in many kits. One fix is to make or buy a small block tumbler. Line the can with sand paper, throw in the blocks, close it up, use any kind of drill and spin away. The squared edges will round nicely yielding much more realistic looking blocks after about 20 to 30 seconds using fine grit sand paper. Test a few to see how much time/rounding looks best.
1728755342389.jpeg
1728755342399.jpeg1728755367116.jpeg
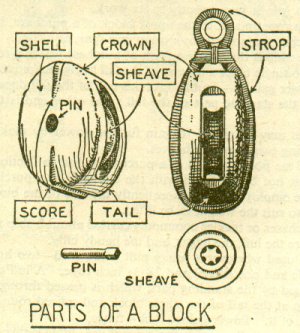
In addition, for blocks, many are supplied with only one hole (for a single block) rather than a pair of holes. When rigged at our scales, the second hole is usually blocked from view by the line passing over it, but by drilling a second hole it can serve as a reminder not to rig the block upside down which seems to be a somewhat common mistake. The line should go over the would-be sheave and under the crown, not under the sheave and over the tail piece. The picture of the parts of a block may help.
1728755189600.jpeg

Again, I hope others might expand on any of these or post some of your own tricks to help all of us. We should never be too old to learn something new :)
 
Last edited:
I'd like to share the way I manage my glue when I'm building. It's very efficient and economical.

PA120068.JPG


First you need a small pot with a lid that you can remove and replace with only one hand.

PA120070.JPG


It needs to be heavy enough to stay on the bench when you lift the lid off and poke a brush inside. I weighted mine with putty. It doesn’t need to stick to the bench.

PA120069.JPG


Inside is a milk bottle top, secured with BluTac putty.

I half fill the bottle top and immediately put the lid on the pot. When I need to use it, I pick up one of my many cheap glueing paint brushes. I but them a hundred at a time and they cost pennies that way. Off with the lid and into the glue. I apply the glue and before putting the parts together I throw the brush into a jar of water and close the lid of the pot.

PA120071.JPG


The brushes clean themselves and at the end of the session I swish them out and replace them in the ready-use tool tray..

The glue in the pot stays useable for up to a week, depending on how often I open the lid. It gradually thickens which is great because when it's thick it grabs like an aligator and sets quickly. When it gets too thick I simply add more glue to thin it down.

If I take a week off and the weather is warm it might set hard. I throw the milk bottle lid away and use another one. Actually, one time I ran out of bottle tops and found that when the resin wood glue has set hard, it can be levered out of the pot leaving it clean.

Sometimes I forget to dunk my brush but it's ok because even after it's set hard, a couple of days in the water cleans it as fresh as new.
 
Last edited:
I pick up one of my many cheap glueing paint brushes. I but them a hundred at a time and they cost pennies that way. Off with the lid and into the glue. I apply the glue and before putting the parts together I throw the brush into a jar of water and close the lid of the pot.
I WILL be trying the application with a small brush. I have been using pharmaceutical squeeze bottles but even with the small nozzle opening, your way is likely much easier to control the amount and location. Thank you for this!!
Allan
 
I'd like to share the way I manage my glue when I'm building. It's very efficient and economical.

PA120068.JPG


First you need a small pot with a lid that you can remove and replace with only one hand.

PA120070.JPG


It needs to be heavy enough to stay on the bench when you lift the lid off and poke a brush inside. I weighted mine with putty. It doesn’t need to stick to the bench.

PA120069.JPG


Inside is a milk bottle top, secured with BluTac putty.

I half fill the bottle top and immediately put the lid on the pot. When I need to use it, I pick up one of my many cheap glueing paint brushes. I but them a hundred at a time and they cost pennies that way. Off with the lid and into the glue. I apply the glue and before putting the parts together I throw the brush into a jar of water and close the lid of the pot.

PA120071.JPG


The brushes clean themselves and at the end of the session I swish them out and replace them in the ready-use tool tray..

The glue in the pot stays useable for up to a week, depending on how often I open the lid. It gradually thickens which is great because when it's thick it grabs like an aligator and sets quickly. When it gets too thick I simply add more glue to thin it down.

If I take a week off and the weather is warm it might set hard. I throw the milk bottle lid away and use another one. Actually, one time I ran out of bottle tops and found that when the resin wood glue has set hard, it can be levered out of the pot leaving it clean.

Sometimes I forget to dunk my brush but it's ok because even after it's set hard, a couple of days in the water cleans it as fresh as new.
I hate to say this but I've been modelling for 30 years and never thought of using a brush for gluing! I will be doing it from now on. Thanks! What stopped me are the issues your system solves.
 
never thought of using a brush

After decades of plastic modelling, it never occurred to me to use a squeezy bottle. :D The great advantage of brushing glue on is that you can scrub the glue into the wood surface, even when there's dust around, giving a better bond with less glue and therefore, less squeeze out and mess.
 
After decades of plastic modelling, it never occurred to me to use a squeezy bottle. :D The great advantage of brushing glue on is that you can scrub the glue into the wood surface, even when there's dust around, giving a better bond with less glue and therefore, less squeeze out and mess.
Exactly! No more blobs!
 
Making Moldings- If anyone wants to make their own molding from wood it is pretty simple and cheap.
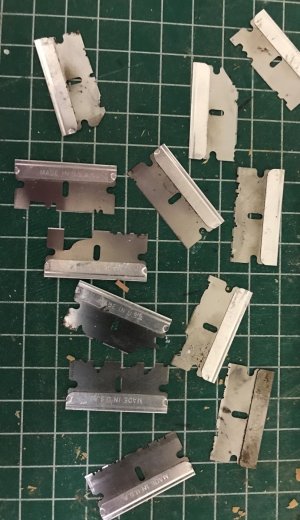
Any scrap piece of a hacksaw blade or stiff back razors are great for making molding scrapers. Clamp the piece of metal in a vise and with an abrasive wheel chucked in a drill or rotary tool, the groove shapes that will form the molding are easily cut. A lathe is a little more steady for making the scrapers, but both methods work well.
1729162908249.jpeg
 
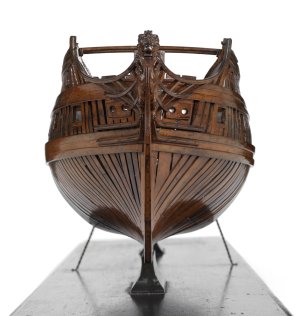
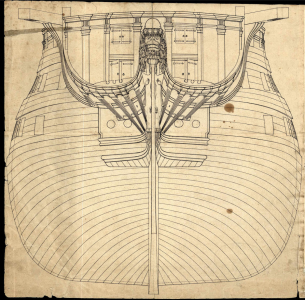
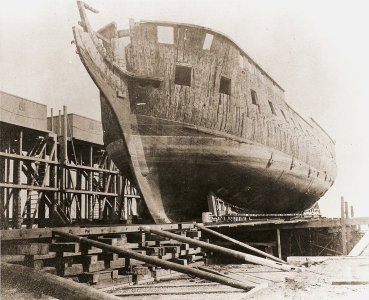
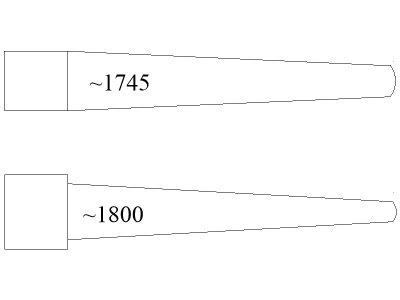
With a few exceptions kits provide a knee of the head that is incorrect. They tapered drastically from the stem to the seat of the figurehead. This is easily done with files and sandpaper or just and paper if done prior to installation. There was also a taper reducing the thickness as it approached to the keel, because the keel was tapered fore and aft as well but would more difficult and not as noticeable. The taper allows the figurehead to seat without being bowlegged person or lion or whatever the figurehead might be.
Examples can be seen below as well as a sketch.
Allan
English 50 gun
1731073254142.jpeg
Danish ship of the line
1731073753445.png
Constitution
1731073798546.jpeg
1731073861395.jpeg
 
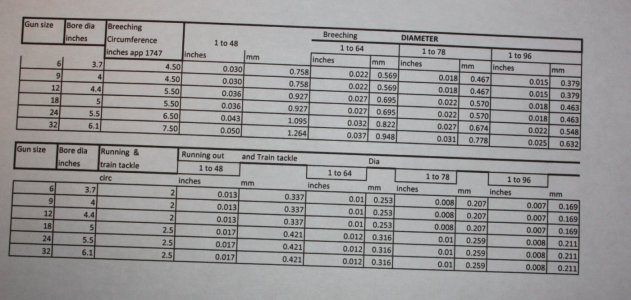
Not really a trick of the trade but hopefully a little help. There is a lot of discussion on gun rigging as there were variations in time, size, nation, etc. I put together the following chart as it might be of interest and a little help when it comes to sizing the breeching, running out, and train tackle. I tried to post as an Excel sheet but with no luck to get it to work. PDF is more clear, but the photo of the printed copy shows what is included.
AllaN
1731338520533.jpeg
 

Attachments

Last edited:
Not really a trick of the trade but hopefully a little help. There is a lot of discussion on gun rigging as there were variations in time, size, nation, etc. I put together the following chart as it might be of interest and a little help when it comes to sizing the breeching, running out, and train tackle. I tried to post as an Excel sheet but with no luck to get it to work. PDF is more clear, but the photo of the printed copy shows what is included.
AllaN
View attachment 483639
Nice. Downloaded.

Have you ever considered reporting on anchor rope sizes for various size ships (or size of anchor)?
 
Have you ever considered reporting on anchor rope sizes for various size ships (or size of anchor)?
Hi Paul,

For the anchor the following are from Lees Masting and Rigging page 188.
Sheet, best bower and bower anchor cable circumference is 0.62 X the diameter of the main mast.
Kedge anchor cable is 0.6 the size of the sheet anchor cable.
The spare cables were an inch or so smaller in circumference.
Other anchor rigging
Anchor cable messenger 0.75X main stay
Cat falls and cat head stopper 0.33X the main stay
Shank painter tail 0.4 X the main stay
fish pendant 0.5 X the main stay
fish pendant tackle 0.25 X the main stay

There are several other ropes concerning anchor handling related items as well.
Hope this is helpful.
Allan
 
Sometimes when I type the word anchor, the anchor icon comes up. Any ideas on how to stop this?
Thanks
 
FLAGS
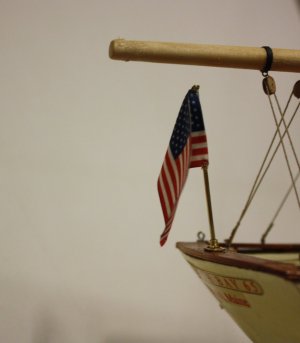
On models with furled sails or no sails where the ship is not represented with wind in her sails, the flags would be hanging down. Accurate cloth sails made to scale are difficult for me to make so that the lines of color are distinct, but I found that paper sails are a good substitute. I found that the best paper for me is silk span which is cheap and receptive to printing with any computer printer. I have drawn flags and copied in place several times so it prints the same thing several times and the ink will go through and show the same on both sides most of the time. I have also had success printing with a mirror image then folding it over. Once this is all done I wet the flag with matte medium and then fold it on a vertical stick smf put on a clamp to weigh the flag down so it drapes in a natural shape. Once the matte medium dries it is ready to go and looks like any full size flag. Anyone with Windows can draw the flags with the Paint program if a CAD program is not available. I just did a quick sketch of the Betsy Ross flag below in under 10 minutes with my simple TurboCad program. Markers can also be used to draw the flag by hand but for me this is more difficult. A finished flag can be seen on the second pic below.
Allan
1731408447740.png
1731408474486.jpeg
 
Last edited:
Making Moldings- If anyone wants to make their own molding from wood it is pretty simple and cheap.
Any scrap piece of a hacksaw blade or stiff back razors are great for making molding scrapers. Clamp the piece of metal in a vise and with an abrasive wheel chucked in a drill or rotary tool, the groove shapes that will form the molding are easily cut. A lathe is a little more steady for making the scrapers, but both methods work well.
View attachment 477893

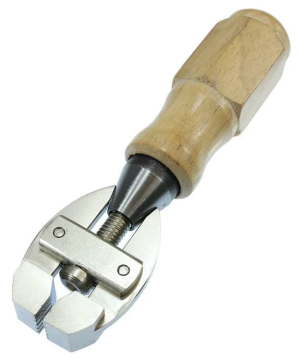
Using shop-made form scrapers as described above is often much easier if they are mounted in a jeweler's hand vise.
See: https://www.fdjtool.com/vs8115-jewelers-adjustable-hand-vise-with-adjustin.html
1731494381441.png

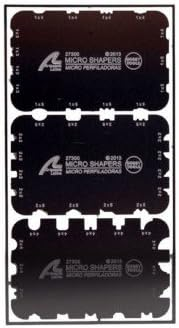
Also, for those of us who lack the patience, skill, and eyesight to grind the impressively microscopic shapes Allan has, Artisania Latina has three different sets of three "store boughten" scrapers each about the size of said razor blades.

See: https://www.amazon.com/Artesania-Latina-S-Shapers/dp/B01LYYX1JY/ref=sr_1_3?adgrpid=1333708168532099&dib=eyJ2IjoiMSJ9.nd8GWoABOwDdnxNv1XKVxrSOFZq5q5Cf-CHIvh8gsjc2GT2q8XOUAnMvxGF3rO6NFhFxWFcZH6PKXbNKnGGBOr_AMy3a4Lj4Un15DTWJ6vJjluPX3B3pCieKrp2SsFfSrlmJjeINqsW2ncHv1jYhGrkV3_qCT33T3yNsqJpemErI5Qii0TX6QzIfcol_ftCQLhCiWKOwvI62fLYxsB8wucZ4EdFaRiIpTtwYN8cR8kqbyur3Q6GqUkTghEajLFDJfRqEHk19BJr0jTZux8If5MyQwvSZmdlVJsx5WiC3Krg.CtJ5Ilq9utdPn9Q7R2EEyP4a9PRav3IZCR_aaotkLjQ&dib_tag=se&hvadid=83356831335996&hvbmt=bp&hvdev=c&hvlocphy=88716&hvnetw=o&hvqmt=p&hvtargid=kwd-83357102575866:loc-190&hydadcr=4094_10317816&keywords=artesania+latina&msclkid=4ec0a09dc7511baae6e1c7a9b89158a4&qid=1731493867&sr=8-3


1731493902293.png
 
Last edited:
I'd like to share the way I manage my glue when I'm building. It's very efficient and economical.

PA120068.JPG


First you need a small pot with a lid that you can remove and replace with only one hand.

PA120070.JPG


It needs to be heavy enough to stay on the bench when you lift the lid off and poke a brush inside. I weighted mine with putty. It doesn’t need to stick to the bench.

PA120069.JPG


Inside is a milk bottle top, secured with BluTac putty.

I half fill the bottle top and immediately put the lid on the pot. When I need to use it, I pick up one of my many cheap glueing paint brushes. I but them a hundred at a time and they cost pennies that way. Off with the lid and into the glue. I apply the glue and before putting the parts together I throw the brush into a jar of water and close the lid of the pot.

PA120071.JPG


The brushes clean themselves and at the end of the session I swish them out and replace them in the ready-use tool tray..

The glue in the pot stays useable for up to a week, depending on how often I open the lid. It gradually thickens which is great because when it's thick it grabs like an aligator and sets quickly. When it gets too thick I simply add more glue to thin it down.

If I take a week off and the weather is warm it might set hard. I throw the milk bottle lid away and use another one. Actually, one time I ran out of bottle tops and found that when the resin wood glue has set hard, it can be levered out of the pot leaving it clean.

Sometimes I forget to dunk my brush but it's ok because even after it's set hard, a couple of days in the water cleans it as fresh as new.
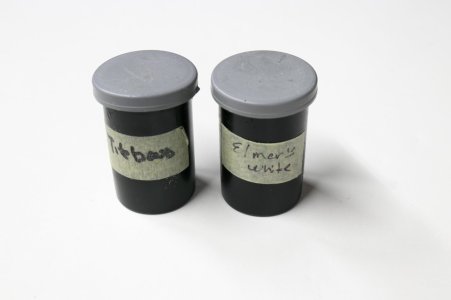
I have gone for something a bit simpler for holding glue for easy access. I use plastic film canisters. They are nearly airtight and can be cleaned out once empty. Downsides relative to the original post include:
1. They can tip over more easily. Since these glues are fairly thick, this generally isn't a problem.
2. They are more difficult to open one handed, although it can be done if you don't mind the top getting out of your grasp.

IMG_8085.jpg
 
Back
Top