Awesome, Mikes!

-

SUBSCRIBE TO SHIPS IN SCALE TODAY!
The beloved Ships in Scale Magazine is back and charting a new course for 2026!
Discover new skills, new techniques, and new inspirations in every issue.
NOTE THAT OUR NEXT ISSUE WILL BE MARCH/APRIL 2026 -

Win a Free Custom Engraved Brass Coin!!!
As a way to introduce our brass coins to the community, we will raffle off a free coin during the month of August. Follow link ABOVE for instructions for entering.
You are using an out of date browser. It may not display this or other websites correctly.
You should upgrade or use an alternative browser.
You should upgrade or use an alternative browser.
U.S.S. CONSTITUTION, 1:82 SCALE, "OLD IRONSIDES"
- Thread starter Sgtmik
- Start date
- Watchers 19
-
- Tags
- constitution

Excellent, looking forward to the build.

Thanks for visiting my build log and for your kind comments.Excellent, looking forward to the build.
Ahoy Shipmates,
More progress to show. As I said in my last installment I had come across another method of assembling frames.

In this method after the frames parts have been fabricated and you are happy with your rough sanding. Using the bolt hols in the frame parts pin the parts to your pattern.

When you are satisfied with your dry fit glue your parts together then retreat to the glass overlay for final assembly.
I also did some experimenting with the first frame I built to find out what looks better. Treenails or bolts.


I think the bolts look better for the frames and I will use treenails on the planking.
Capt. Mike41 has sent me some new plan sheets fort frames so I will get after it and have something more to show for next time.
Thanks for visiting my build log.
More progress to show. As I said in my last installment I had come across another method of assembling frames.
In this method after the frames parts have been fabricated and you are happy with your rough sanding. Using the bolt hols in the frame parts pin the parts to your pattern.
When you are satisfied with your dry fit glue your parts together then retreat to the glass overlay for final assembly.
I also did some experimenting with the first frame I built to find out what looks better. Treenails or bolts.
I think the bolts look better for the frames and I will use treenails on the planking.
Capt. Mike41 has sent me some new plan sheets fort frames so I will get after it and have something more to show for next time.
Thanks for visiting my build log.
Last edited by a moderator:
- Joined
- Aug 10, 2017
- Messages
- 1,707
- Points
- 538

This is a small update on the design drawings. The Chief Construction Manager has about half of the frame drawings and is well on the way to becoming a framing specialist.
I finished the body plan this morning and will be drawing the rest of the frames for a while. I am looking forward to drawing the gun deck, Mike decided he want to use full carriage guns for the 32 ponders instead of the stub-barrels provided with the kit. I believe this will make a nice improvement.
Mike.jpg")
I finished the body plan this morning and will be drawing the rest of the frames for a while. I am looking forward to drawing the gun deck, Mike decided he want to use full carriage guns for the 32 ponders instead of the stub-barrels provided with the kit. I believe this will make a nice improvement.
Mike
Ahoy Shipmates,
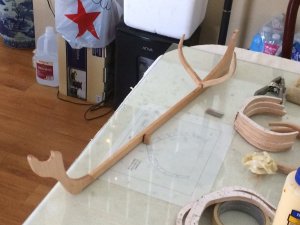
Allot going on in the ship yard. Capt Mike41 has given me all the frame Keel and cannon plans and my crew is hard at it. These are a few of the frames I have completed.

I at first was going to leave the keel scarphs and just fake it but when I ran into problems with the stern I scrapped that Idea. I have never made a scarph joint before so I referred to Tosti's book and I am using what he calls the modelers scarph.


I used 0.032 brass rods for the bolts.
Everything fits together on the keel in dry fit so next will be to glue it up and mount it in my gantry.

Thanks for visiting my build log.
Allot going on in the ship yard. Capt Mike41 has given me all the frame Keel and cannon plans and my crew is hard at it. These are a few of the frames I have completed.
I at first was going to leave the keel scarphs and just fake it but when I ran into problems with the stern I scrapped that Idea. I have never made a scarph joint before so I referred to Tosti's book and I am using what he calls the modelers scarph.
I used 0.032 brass rods for the bolts.
Everything fits together on the keel in dry fit so next will be to glue it up and mount it in my gantry.
Thanks for visiting my build log.
That looks fantastic, Mike! Makes me want to join in the fun!
Hi Dave,
Thanks for visiting my build log, and your kind comments. This has been allot of fun.
Thanks for visiting my build log, and your kind comments. This has been allot of fun.
Hi
Mike I'm using Walnut for the false keel.
Mike I'm using Walnut for the false keel.
Ahoy Shipmates,
I have been busy building frames for the last week or so and only 8 more to go. In addition to the basic construction I drilled bolt holes an installed brass rods for bolts.

I started with the stern half frames working forward from 21 to 12 then I went to the dead flat and worked forward to the stem.

On the full frameas I used my mill to cut the notches to fit on the keel.

I was getting a little bored, so while assembling this frame I found a Samurai hiding in my wood.

Here is where I stand with all the frames.

Now I need to figure out the notches in the keel and my ship will start to take shape.
Thanks to Capt Mike41 for all of his efforts in this project.
I have been busy building frames for the last week or so and only 8 more to go. In addition to the basic construction I drilled bolt holes an installed brass rods for bolts.
I started with the stern half frames working forward from 21 to 12 then I went to the dead flat and worked forward to the stem.
On the full frameas I used my mill to cut the notches to fit on the keel.
I was getting a little bored, so while assembling this frame I found a Samurai hiding in my wood.
Here is where I stand with all the frames.
Now I need to figure out the notches in the keel and my ship will start to take shape.
Thanks to Capt Mike41 for all of his efforts in this project.
You are on the move Mike,I will be here when you are instaling those frames!
Zoltan
Zoltan
Many thanks for the update of the work.......like Zoltán mentioned......I will follow with big interest
Ahoy Zoltan and Uwe,
Thanks to you both for visiting my build log. I am anxious to see a ship in my dry dock.
Thanks to you both for visiting my build log. I am anxious to see a ship in my dry dock.
Great progress, Mike. I’ve got a question: Are you guys planning to frame the decks in the conventional way, or as you would for a POB model? If so (conventional beams, knees, carlings, etc.) this is really a full POF scratch build and not a kit-bash!
- Joined
- Aug 10, 2017
- Messages
- 1,707
- Points
- 538
Hi Dave,
That is a good question, up to now the Master Shipwright hasn’t foraged in the box for parts and pieces but he plans on utilizing some of the stuff when he gets to the main deck. All the framing will be scratch built, we have a sketch of the gun deck and are working on the main deck. Master Mike is driving his crew to the limit, he wants to get the guns in place before spring break.
That is a good question, up to now the Master Shipwright hasn’t foraged in the box for parts and pieces but he plans on utilizing some of the stuff when he gets to the main deck. All the framing will be scratch built, we have a sketch of the gun deck and are working on the main deck. Master Mike is driving his crew to the limit, he wants to get the guns in place before spring break.
Attachments
Ahoy Dave,
Thanks for visiting my build log and for your kind comments. Yes it is beginning to look that way. What I plan to do is to build the POB Kit as the USS UNITED STATES.
Thanks for visiting my build log and for your kind comments. Yes it is beginning to look that way. What I plan to do is to build the POB Kit as the USS UNITED STATES.
Ahoy Shipmates,
I planned to start off this installment to my build log by saying I'm done with frames. But that unfortunately is not the case. I have cut and assembled all of the frames but as I said before that I don't plan to use bamboo but brass pins in the frames for tree nails.


Now with all the frames done I am turning my attention to the keel, notching and dry fitting frames.


I did buy a new tool for my band-saw. They call it "The little Ripper" and it works like a champ.


It cuts a perfect straight lines very time. It comes from a place in Canada.
I planned to start off this installment to my build log by saying I'm done with frames. But that unfortunately is not the case. I have cut and assembled all of the frames but as I said before that I don't plan to use bamboo but brass pins in the frames for tree nails.
Now with all the frames done I am turning my attention to the keel, notching and dry fitting frames.
I did buy a new tool for my band-saw. They call it "The little Ripper" and it works like a champ.
It cuts a perfect straight lines very time. It comes from a place in Canada.