USRC Harriet Lane Model Shipways 1:96 scale circa 1863

Joined
May 25, 2020
Messages
367
Points
228

What ho, shipmates!

I suppose there are any number of reasons motivating our choices of ships to model. For those of you who supported my Lovely Renee nee Fair American build, you know my story. My surviving models include the Lovely Renee based on the Model Shipways Fair American kit. I also built Constructo's Enterprise. I won't repeat what I wrote in my Lovely Renee nee Fair American build log about why these ships are important to me. I'll focus on what I planned to do for my next kit and why I'm building Harriet Lane instead.

My plan was driven by a combination of scale and the evolution of fighting ships (including the evolution of armament and propulsion) from the mid 1700's to the later 1800's. To be honest, I love the ships as miniature works of art and my plan is also motivated by populating my home port with wonderful art.

Before now, my preferred scale was 1:48 (likely because of the 1:48 scale warplanes I built as a kid and hung from my bedroom ceiling). I like the size of the models and my ability to do some detailing on them. As you all know, however, there are a relatively limited number of kits in 1:48 scale and short of living in an actual museum, there would be no place to keep them. I know that the actual Lovely Renee would never let me use the dining room for a 1:48 scale model of H.M.S. Warrior or the U.S.S. Kearsarge. So, the plan was to build the Panart Royal Caroline (1:50 scale) and then Krik's Gulnara an 1834 paddle warship (1:50 scale). The objective being for visitors to Shangri-la (my home port) to be able to see how much the size of ships changed from the mid-1700s to 1830's without having to use their imaginations to double the size of a ship built in 1:96 scale. They would also see the beginning of the transition from sail to steam propulsion. After completing Gulnara I was going to start on a series of 1:96 scale ships to show the continued evolution of ships from paddle warships to stern screw warships. It was the plan to then build L'Orenoque (1848), U.S.R.C. Harriet Lane (1861), U.S.S. Kearsarge (1861) and H.M.S. Warrior (1860).

However, as I started on Royal Caroline I noticed some things that I would never be able to tolerate particularly because of the inspiring and beautiful work you've done on your builds of this Panart kit, in particular Nigel Brooke's work. Then, because of a series of broken hose bibs, a flooded lower level, and, therefore, a flooded shipyard, I gave up ship building for most of the summer and fall. Now, things are practically shipshape again and a funny thing happened.

I was standing in my front entry and thought "that's a great place for the Harriet Lane!"
Harriet Lane namesake.jpg

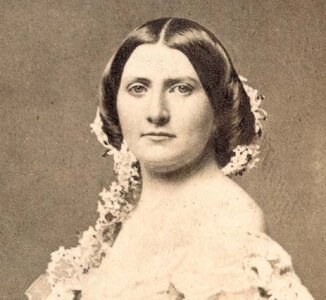
This, friends, is Harriet Lane! She was a notable beauty on both sides of the Atlantic. Harriet was orphaned young and became the ward of her uncle, James Buchanan. Buchanan held a variety of senior posts in the government, including Ambassador to the Court of St. James. Harriet accompanied her uncle to London, met Queen Victoria and was accorded by Her Majesty the rank of "ambassadors wife" to ease her social engagements as Buchanan's niece. When Buchanan became the 15th and only ever bachelor President of The United States of America, Harriet Lane was his "First Lady" officially managing the White House during the four years leading up to the Civil War.

So, I started the kit and have been reading every build log I could find. I found Pete Gutterman's lovely version of Harriet Lane circa 1863 and am using that model for my muse. https://shipsofscale.com/sosforums/...log-by-peter-gutterman-completed-build.11909/

Frankly, it's because of Pete's kind responses to my questions about his masterpiece that I'm starting this log. Thank you again, Pete! I will post more and include some pictures in the next short while in the hope that my shipmates will help me with their knowledge, skill and wisdom.

Blessings. Peace. Gratitude.
Chuck
 
Last edited:
Harriet Lane had a short, but heroic career. She was built for the Treasury Department in 1857. There was no USCG at the time.
She was part of the fleet of the U.S. Revenue Cutter Service. She was quickly detached to the U.S. Navy as part of a squadron sent to negotiate reparations with Paraguay. After a short second stint with the Revenue Service, Harriet Lane returned to the Navy where she remained until the end of her career in Galveston, Texas on January 1, 1863. The Harriet Lane was present at almost every major naval action of the Civil War before she was captured during a successful Confederate attack to retake Galveston. Her captain, Commander. J. M. Wainwright and executive officer, Lt. Commander. Edward Lea, were killed in action that day defending their ship.

Today the Harriet Lane has the distinction of being claimed by the USCG and the USN. You can read more about her here:
https://www.history.navy.mil/our-co...-listing/h/uss-harriet-lane--1861-1863-0.html
or here:
https://www.history.uscg.mil/Browse-by-Topic/Assets/Water/All/Article/2054643/harriet-lane-1858/


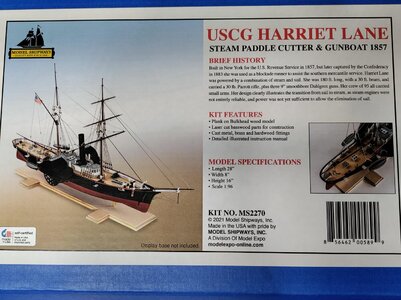
Harriet Lane Box.jpg
 
Last edited:
Good evening shipmates!

As you can see from the huge picture, the Harriet Lane box. Any help on posting smaller will be appreciated ;)

I like the kit and took some time to learn from your builds about the issues. There are always issues.

As many observed, fitting the keel to the bulwarks was a straight forward operation. Unlike other kits I've built, the bulwarks are split. So, to form a complete bulwark you have to attach the port side and then attach the starboard side. There are also a couple of internal pieces fore and aft that were new to me. The idea, I believe, was to add to the rigidity of the frame. I had no significant issues in achieving a fairly square frame. This was also a really easy hull to fair because there are fewer significant angels.

The kit includes laser cut planking that is pre-shaped and easy to form to the hull after a short soak in water. The planks are 1/32" thick. Before planking the lower hull, however, the instructions call for installing the stern counter and the outer bulwarks.
 
Last edited:
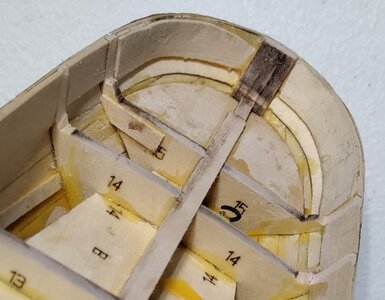
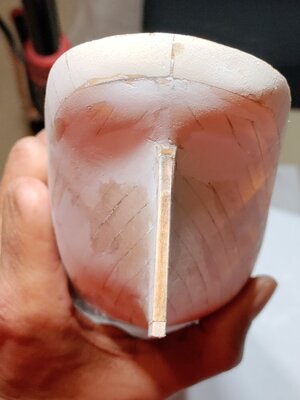
Although the precut planks are a nice hack for a model that will be painted, the bulwarks and stern counter are also pre cut for the gunports! The pre-cuts were so deep in the stern counter that the counter pieces came apart as I was taking them out of the sheet. What you will see next is the stern interior and exterior built by laminating 1/8th x 1/32 stock to try to capture the complex curves of the stern counter on this ship. I have more sanding and filling to do, but I'm pretty happy with how things turned out. Because the model is intended to be painted in and outboard, I wouldn't bother with the frustration of trying to use tape, as others with greater skill have done, to try to hold the pieces together, before or after soaking, so that they dry in the right shape.

HL Inner Stern Counter.jpg

HL Stern.jpg
 
Last edited:
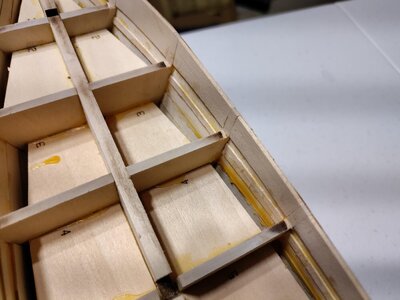
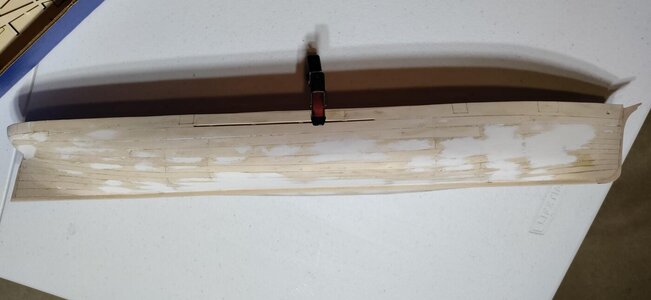
After completing the stern counter and the upper bulwarks, the instructions call for installing filler pieces between the bulwarks and then removing the excess bulwark material. I wish I had not removed the excess material! Nothing terrible happened, but I could hear some of the, now very thin, bulwarks crack as I worked on sanding and filling the hull after planking. I recommend leaving the bulwark at full thickness until you're happy with your lower hull.

Also note that the ship is designed for display on a stand supported by 1/8" round dowels. The keel has precut slots, the inner keel pieces and the keel, once planking is completed need to be built to accommodate these holes. In the "I wish I had . . ." section, I wish I had glued some scrap to either side of the slots to form a 1/8" x 1/8" box. If I had done that I wouldn't have to worry about the ship ever listing to port or starboard.

Here's a picture of the bulwarks and hull at this stage.

HL Bulwark.jpg

HL Hull.jpg
 
Last edited:
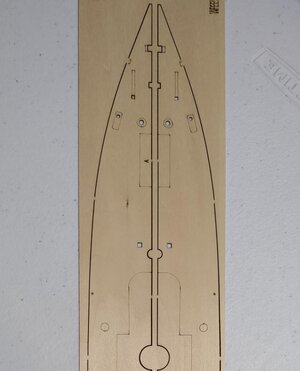
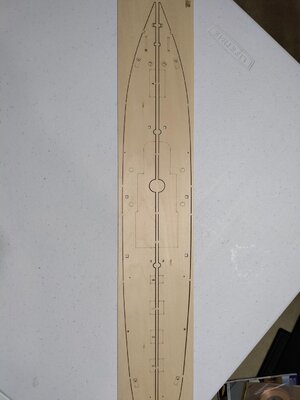
The instructions also call for the inner bulwarks to sit 1/32" proud of the frame so that the precut deck can be slid under the bulwarks. I have several thoughts about this. It's one thing to have a false deck that you then plank, but it's a totally different animal when the deck supplied is printed with the locations of all deck fixtures BUT NO PLANKING LINES! Others have taken the time to scribe lines to simulate deck planking into the supplied parts. Importantly, however, I have yet to read a log where the printed locations for deck fixtures were fully covered by the deck fixtures.

You'll see in these pictures the effort to help the modeler properly locate deck fixtures. The absence of scribing really, I think, detracts from what should be a very handsome model of a very gallant ship. For me, I'm planning on planking with 1/32" strips about 3/32" wide.

HL Deck detail.jpg

HL Deck.jpg
 
Last edited:
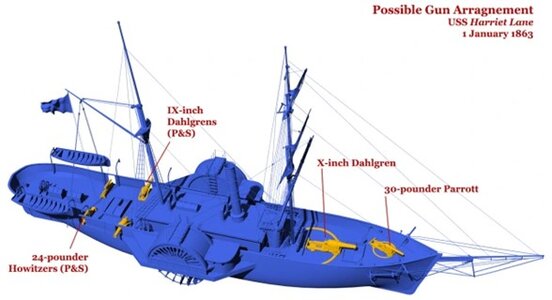
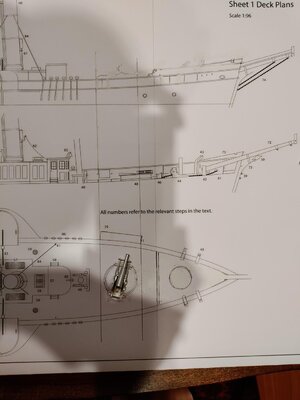
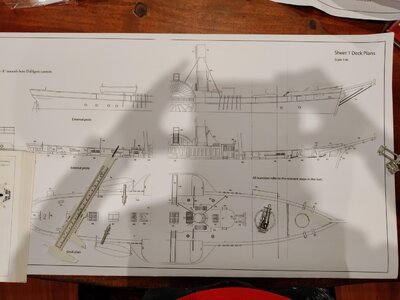
My next steps in the build include more filling and sanding of the lower hull and installing the inner bulwarks. Notably, once the inner bulwarks are completed, the bulwarks are 1/8" thick. In this scale, the bulwarks would be 1 foot thick! I have been working on the problem of adding a foredeck to support a Parrott rifle like Pete's version of Harriet Lane. Here's a rendering of the information about Harriet Lane's armament circa 1863

HL Guns.jpg
 
The foredeck would cover the windlass and pipes that receive the anchor chain. As it designed the bulwarks are 4 scale feet tall. My original thought was to increase the bulwark height forward to 5-6 feet forward and add another 2 feet to surround the foredeck and another two feet for the fairlead. After making some drawings, I scrapped this idea. It entirely destroys the ships lines. I am thinking to make it "look good" rather than making it to scale. Here are a couple of pictures of my alterations on a full size copy of the plans.

Design forward.jpg

HL design full.jpg
 
Last edited:
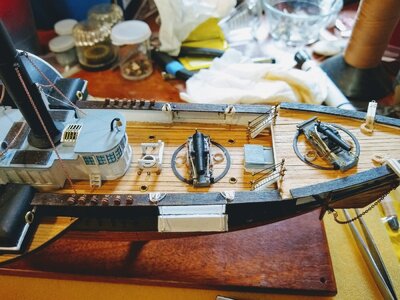
This is Pete Gutterman's wonderful work that I am trying to follow. I took the liberty of adding it here so that Pete and other shipmates might comment on my design without switching back and forth between our logs.

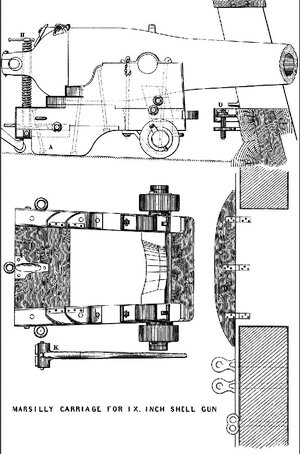
You can see in the image immediately above that I have a carriage and suitable X inch Dahlgren sourced from Bluejacket Shipcrafters. The aft pair of IX inch Dahlgrens came with the kit and are a very very nice casting. I still need to source the aft howitzers and the 30 lbr Parrott. I will probably make the Parrott from wood and it's carriage. The aft Dahlgren's were on Marsilly carriages.

Pete's HL.jpg

Marsilly.jpg
 
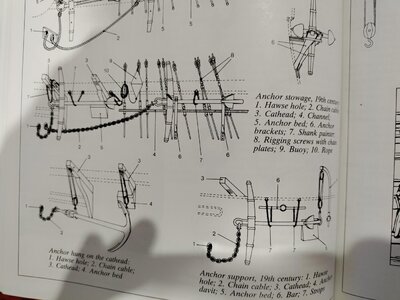
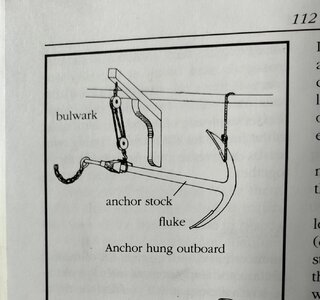
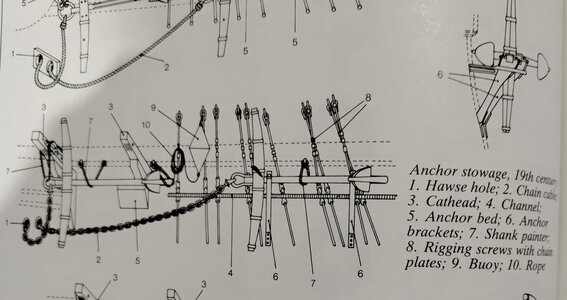
In my design drawing you'll see that I am thinking about a double cathead to deal with the problem of anchor stowage as opposed to Pete's solution. I got the idea from zu Mondfeld's Historic Ship Models. I leave you, shipmates, to ponder and make suggestions tonight so I can have the advantage of your insights when I get back to the shipyard tomorrow!

anchor stowage.jpg
 
Thank you, Paul! You are doing amazing work on the Kingfisher! I'm almost over-awed. I'm hoping for something like your work once I get the Royal Caroline build going.

Funny thing about Harriet Lane being designed to be painted is that modelers are put in a position to treat the kit as a plastic kit. I say this because other modelers logs show the use of a lot of putty, priming, sanding etc. and finally needing to use an airbrush. I was almost embarrassed to post pictures of the hull because of all of the putty. Next time I will probably think more about whether to plank with scale planks so that I might show the wood. On the other hand, probably because the muscle memory of my childhood modeling, I like my models to look like the real ships and they were painted. I will probably lean toward painting them when they are models of the sail to steam transition period and lean toward exposed wood for my other models.
 
Last edited:
What ho, shipmates!

I suppose there are any number of reasons motivating our choices of ships to model. For those of you who supported my Lovely Renee nee Fair American build, you know my story. My surviving models include the Lovely Renee based on the Model Shipways Fair American kit. I also built Constructo's Enterprise. I won't repeat what I wrote in my Lovely Renee nee Fair American build log about why these ships are important to me. I'll focus on what I planned to do for my next kit and why I'm building Harriet Lane instead.

My plan was driven by a combination of scale and the evolution of fighting ships (including the evolution of armament and propulsion) from the mid 1700's to the later 1800's. To be honest, I love the ships as miniature works of art and my plan is also motivated by populating my home port with wonderful art.

Before now, my preferred scale was 1:48 (likely because of the 1:48 scale warplanes I built as a kid and hung from my bedroom ceiling). I like the size of the models and my ability to do some detailing on them. As you all know, however, there are a relatively limited number of kits in 1:48 scale and short of living in an actual museum, there would be no place to keep them. I know that the actual Lovely Renee would never let me use the dining room for a 1:48 scale model of H.M.S. Warrior or the U.S.S. Kearsarge. So, the plan was to build the Panart Royal Caroline (1:50 scale) and then Krik's Gulnara an 1834 paddle warship (1:50 scale). The objective being for visitors to Shangri-la (my home port) to be able to see how much the size of ships changed from the mid-1700s to 1830's without having to use their imaginations to double the size of a ship built in 1:96 scale. They would also see the beginning of the transition from sail to steam propulsion. After completing Gulnara I was going to start on a series of 1:96 scale ships to show the continued evolution of ships from paddle warships to stern screw warships. It was the plan to then build L'Orenoque (1848), U.S.R.C. Harriet Lane (1861), U.S.S. Kearsarge (1861) and H.M.S. Warrior (1860).

However, as I started on Royal Caroline I noticed some things that I would never be able to tolerate particularly because of the inspiring and beautiful work you've done on your builds of this Panart kit, in particular Nigel Brooke's work. Then, because of a series of broken hose bibs, a flooded lower level, and, therefore, a flooded shipyard, I gave up ship building for most of the summer and fall. Now, things are practically shipshape again and a funny thing happened.

I was standing in my front entry and thought "that's a great place for the Harriet Lane!"

So, I started the kit and have been reading every build log I could find. I found Pete Gutterman's lovely version of Harriet Lane circa 1863 and am using that model for my muse. https://shipsofscale.com/sosforums/...log-by-peter-gutterman-completed-build.11909/

Frankly, it's because of Pete's kind responses to my questions about his masterpiece that I'm starting this log. Thank you again, Pete! I will post more and include some pictures in the next short while in the hope that my shipmates will help me with their knowledge, skill and wisdom.

Blessings. Peace. Gratitude.
Chuck
Thanks, I'm honored!:)
Pete
 
This is Pete Gutterman's wonderful work that I am trying to follow. I took the liberty of adding it here so that Pete and other shipmates might comment on my design without switching back and forth between our logs.

You can see in the image immediately above that I have a carriage and suitable X inch Dahlgren sourced from Bluejacket Shipcrafters. The aft pair of IX inch Dahlgrens came with the kit and are a very very nice casting. I still need to source the aft howitzers and the 30 lbr Parrott. I will probably make the Parrott from wood and it's carriage. The aft Dahlgren's were on Marsilly carriages.

View attachment 411431

View attachment 411439
It isn't Immediately obvious, but the railings above the pivot gun's gunports are scribed to indicate that they were removable to facilitate the elevation of the gun and ease of rapid firing and re-aiming without blowing the ship's railings off in the process. I'm sure they were cleared for action during battle, then replaced after, as my model depicts. The Parrot rifle sits above the forecastle deck bulwarks sufficiently to avoid this issue.

Pete
 
Last edited:
In my design drawing you'll see that I am thinking about a double cathead to deal with the problem of anchor stowage as opposed to Pete's solution. I got the idea from zu Mondfeld's Historic Ship Models. I leave you, shipmates, to ponder and make suggestions tonight so I can have the advantage of your insights when I get back to the shipyard tomorrow!

View attachment 411440
I really like these options, especially having the benefit of precedent, rather than guesswork.
 
It isn't Immediately obvious, but the railings above the pivot gun's gunports are scribed to indicate that they were removable to facilitate the elevation of the gun and ease of rapid firing and re-aiming without blowing the ship's railings off in the process. I'm sure they were cleared for action during battle, then replaced after, as my model depicts. The Parrot rifle sits above the forecastle deck bulwarks sufficiently to avoid this issue.

Pete
Aha! I did not look closely enough to see the scribing. I will keep that in mind when it comes to the railings. The opening for the X inch Dahlgren gunport scales out to 15 feet on my drawing. I will probably start somewhat smaller, maybe 10 feet (1.25 inches) and work my way outwards from the center of the opening to achieve a good "look" for the ports. 15 feet seems like a big opening in the bulwarks and the weight of the port (4 ft x 15 ft) say 6 inches thick would have been considerable.
 
I really like these options, especially having the benefit of precedent, rather than guesswork.
Thank you, Pete! I'm still noodling the configuration. I'm thinking about how the anchors were secured to the hull tightly enough to prevent banging and chafing and possibly dangerously damaging the hull. This drawing from zu Mondfeld looks like a good solution using the example of the first anchor. I like the solution for the second anchor, but the fore chains on Harriet Lane are pretty far aft and there would be a long section of anchor chain slapping the hull if the anchors were stowed in the chains. I'll work on a drawing and see what it looks like in 2 dimensions.anchor stowage.jpg
 
Last edited:
Back
Top