USRC Harriet Lane Model Shipways 1:96 scale circa 1863

Thanks! Just this minuet posted update on "Flying Cloud" kitbash.
I look forward to your "Harriet Lane" progress. Thumbs-Up :D

Pete
 
I think it's only fair to share that one of the reasons I don't maintain my log as diligently as I want to is how long it takes me to do it! I never really learned to type. Then, about 21 years ago I sawed off my left index and middle fingers on my table saw. And, I have to take pictures on my phone. Send the pictures to my email. Open the pictures. Edit the pictures. Write the post. Insert the pictures.

So, right now I'm posting a (yes, just the one) photo of what my Harriet Lane looks like today to whet your appetites while you wait for me to transfer my pictures, from phone to computer, etc. . . .
 
Last edited:
I stopped posting just after finishing the upper deck for the Parrott rifle.

Because I planned to plank the deck, I decided to build the paddle wheel assemblies so that I could test fit them and make adjustments. I'm not sure what adjustments I was thinking exactly. I knew that the deck material I was going to use was 1/16" thick rather than the 1/32" sheet supplied with the kit. So, I think I was mainly concerned with height.

Little did I know, but the less-than-workman-like job I did on the hull was going to require major adjustments to the inboard sides of the sponsons and the slots and the tabs. I did not take pictures of that mess. Let's just say that I'm happy that the kit is made of wood which can be glued and sanded into shape :D
 
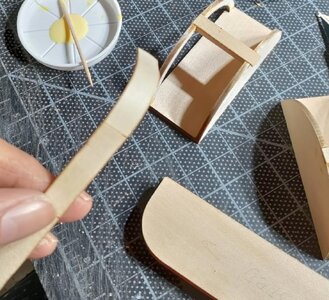
The sponsons and wheel coverings are underway. I mentioned earlier that laser scoring of 1/32" thick wood, in effect, cuts the wood. The part I'm holding is meant to wrap around the curve of the sponsons. It almost came to pieces when I took it out of the parts sheet. If anyone from ModelShipways reads this: I love you guys, but this would be a much easier build without pre-scoring the 1/32" lumber.
Sponson Build 1.jpg
 
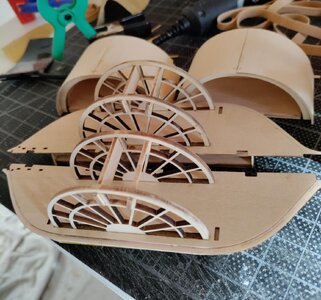
Here are the sponsons and wheels getting their paddles. According to the instructions you need to be careful that all of the paddles go on the same side of each spoke. That makes sense. It then dawned on me to wonder whether it was important which side of the spoke you put the paddle? There are no instructions for this question. A little research later and I found that the answer is: YES! The paddles need to be on the side of the spoke that allows the whole face of the paddle to hit and push the water. I'm happy that I wasn't my usual impatient self at that moment.
Sponson & wheels during assembly.jpg
 
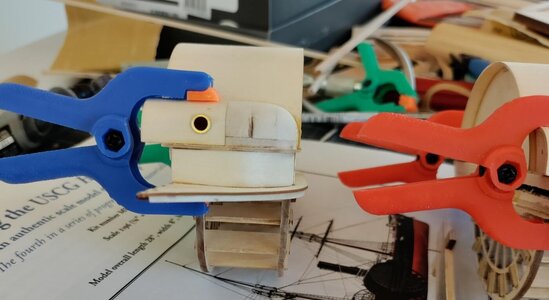
Here is the assembled wheel cover with water closets. The instructions remind the builder to paint the inside of the wheel cover black before adding the p.e. cover. The instructions didn't remind the builder to do that with the water closets. So, future builders, paint the interior of the section of the water closet that includes the port before you attach the water closet to the wheel cover assembly!
Wheel and waterclosets.jpg
 
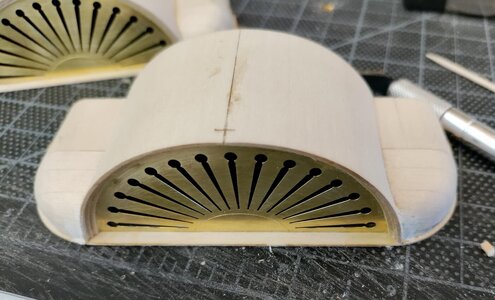
The complete paddle wheel assembly. In the end on view you can see the port I mentioned above. It looks black because of the bad lighting I use to take pictures. In person (despite my best efforts) you can still see some unpainted wood in there.
Full Paddle Wheel Assembly.jpgPaddle Wheel Assembly Side View.jpg
 
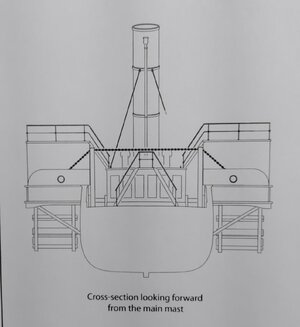
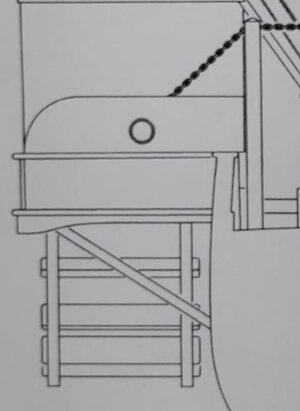
I think things will work out height-wise when I permanently attach the sponsons and wheel covers. Here's the plan showing a cross-section from aft and the side-view of the unit as I built it. You can see that the water closet sits on top of the sponson and the rail. The unit I built seems to accommodate the 1/32" thickness of the rail! Excellent work, Chuck!!!!:p


Cross-section plan.jpgCross-section detail.jpgPaddle Wheel Assembly Side View.jpg
 
Thats a nice looking model, and an interesting ship to build.
Thank you, Bryian! I'm enjoying it now. I went through a stretch of frustration. Sadly, I think the kit is designed to produce something like a plastic model. I say this because of the emphasis the instructions give to air-brushing the hull and other parts. I don't own an airbrush. It took me a while to simply give up the idea of trying to achieve that kind of finish. In the end, I saved the cost of the airbrush and am happy with the results. :)
 
I think it's only fair to share that one of the reasons I don't maintain my log as diligently as I want to is how long it take me to do it! I never really learned to type. Then, about 21 years ago I sawed off my left index and middle fingers on my table saw. And, I have to take pictures on my phone. Send the pictures to my email. Open the pictures. Edit the pictures. Write the post. Insert the pictures.

So, right now I'm posting a (yes, just the one) photo of what my Harriet Lane looks like today to whet your appetites while you wait for me to transfer my pictures, from phone to computer, etc. . . .
Golly! She looks spectacular! love the copper bottom!
Your process for posting AND typing sounds exactly like mine, ONLY I"VE GOT ALL MY FINGERS! Redface
 
Here's how she stood just before I started planking the decks. Port holes, rub-rail, hawse holes and bowsprit. I had to get the bowsprit and it's step fitted because of the foredeck. At this point I also opened the forward port beneath the foredeck.
Before planking 1.jpgBefore planking 2.jpg
 
Back
Top