• Ships of Scale has incorportated an extra level of security when you log In. Please follow on-screen prompts to acknowledge that you are not a robot via a "Check Box" or a "Pictorial Check Box Puzzle". This is needed due to higher level of AI Activity Security.
  • SUBSCRIBE TO SHIPS IN SCALE TODAY!

    The beloved Ships in Scale Magazine is back and charting a new course for 2026!
    Discover new skills, new techniques, and new inspirations in every issue.

    NOTE THAT OUR NEXT ISSUE WILL BE July/August 2026
  • Win a Free Custom Engraved Brass Coin!!!
    As a way to introduce our brass coins to the community, we will raffle off a free coin during the month of August. Follow link ABOVE for instructions for entering.

USS Constitution by BlueJacket 1:96

Well, it has been nearly a month since I actually posted any work on the ship, so I am long overdue for an update. Despite my lack of posts, I have actually been busy. After languishing a bit over the placement of eyebolts around the masts, I finally decided to just go with what Olaf had on his belaying plans. I also included all the ring bolts for the outhaul tackle, even though I do not plan on installing the tackle. Whether used or not, they should be there and it gives the deck some visual interest. Once all the eyebolts had been glued in and I was satisfied that there was nothing more to add to the deck itself, I took the plunge and permanently glued down the spar deck
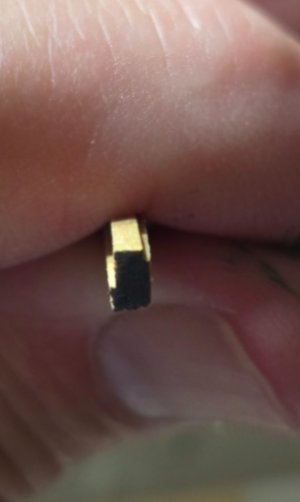
With that done, next up were the hatch coamings. Like the gun deck, I used the Persimmon wood I harvested form my property. I started with the main hatch and first had the brilliant idea to use my Byrnes saw to cut the inside and outside profiles. The Byrnes is a great machine, and is very precise. here's a view of the result. In the second photo, I colored the end to give some contrast and show the profile a little better
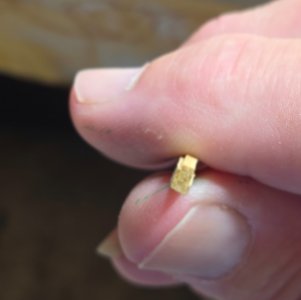
20260805_115231.jpg 20260805_115442.jpg

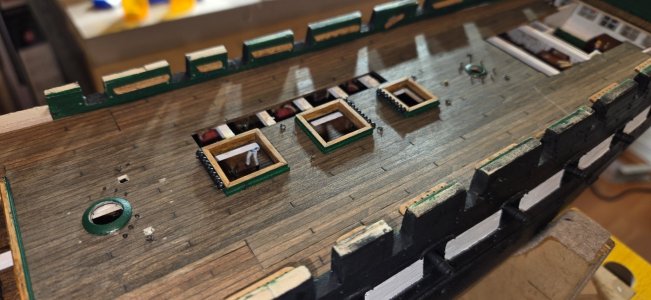
After doing this with the main hatch, I realized it would be much easier to just glue thin strips to the inside and outside of the coaming, which is what I did for the rest of the hatches. In 1812, the hatch coamings were painted green. I didn't want to completely cover up the wood since I really like the way it looks, so I compromised and painted just the sides, which is pretty much how they are today (only black). Here tey are just laid in place
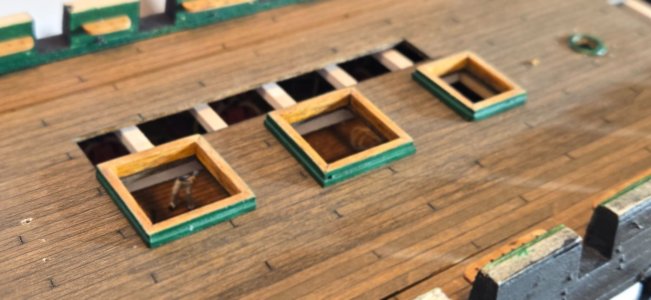
20260805_130207.jpg

If you zoom in on the photo, you can get a good look of the base molding and the grain of the persimmon, which is very fine and tight, and at least IMO looks good at scale. You can also see that all the joints are 45's. According to the BJ manual and everything else I've read, the shot lockers in 1812 were mounted on the bulwarks. I decided to take some liberty here make the shot lockers as they are now, mounted on the hatch coamings. For one thing, there is not a lot of room on the bulwarks and I thing it will just look cluttered, and two, I like the look on the coamings. To make them, I used fish hooks for eyebolts and 26 ga. wire for the bars. The dimensions were taken from the Navy plans found on the museum website.
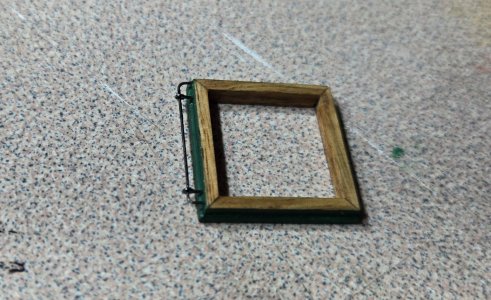
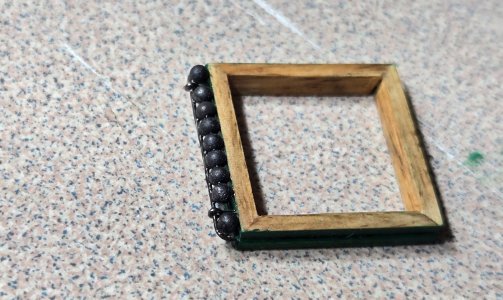
20260808_130528.jpg 20260808_131416.jpg

For the shot, I used 2mm SS ball bearings purchased on amazon, painted black.
And here they all are finished and permanently glued down20260824_112338.jpg
Next up, the forward hatches and the Charlie Noble
 
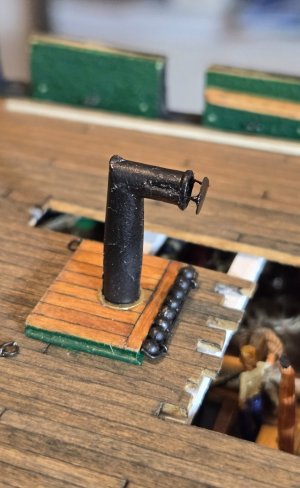
Based on everything I could find, it seems there were no hatch gratings over the main hatch in 1812. The BJ instructions do not show gratings here, the Revell model does not and the Hull model at the Peabody does not, so no gratings here. Forward of that, we have the Charlie Noble, which comes up through a planked hatch with an adjacent grating. Then there is another grating just in front of the foremast. In 1812, there was no grating next to the bowsprit. Instead, this area had a set of steps for getting up onto the bowsprit. So, only two gratings to consider. I thought about purchasing some from Etsy. There is a guy there from the Ukraine who makes very nice looking ones. The idea of making my own from interlocking strips just seemed too difficult at my scale. So I did like I did with the gun deck and used my laser engraver to cut them. I used maple veneer that is .020" thick. The pattern is to scale, with the individual cross pieces being .020" thick. From more than a foot away, they look pretty good. For the planking around the Charlie Noble, I used a leftover piece of the decking. Of course I had to add the arrestor plate (?) in front of the stack as well as the flange at the base. These were made from 36 ga. brass sheet. I took a picture before painting the brass flange to make it easier to see
20260813_232311.jpg

I actually thought about leaving this as bare brass because I liked the way it looked, but in the end I painted it.
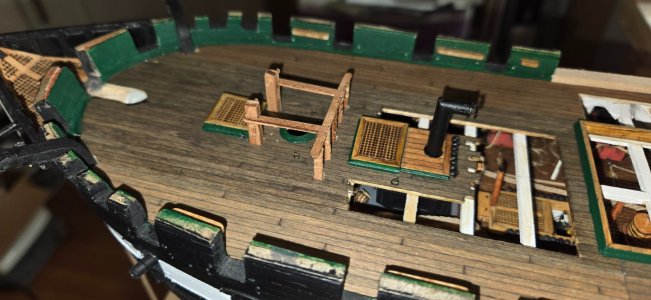
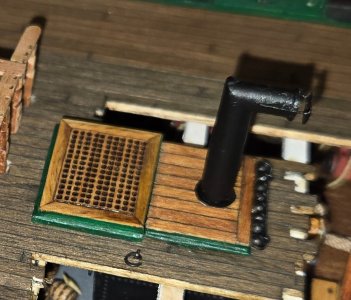
Here's everything after finishing up the gratings

20260824_112328.jpg 20260824_112328.2.jpg

You'll notice I also opened up the deck on the port side of the Charlie Noble
 
Thanks Gregg. Still not sure about some of those higher number eyebolts we talked about, but at least the ones on the deck are accounted for, whether I use them or not
 
Your Charlie Noble looks great. I have kept mine off the model while I install most of the other stuff that goes on the deck. I fear that I bump into it and damage it. I am doing the same thing with the my gun port covers. I will put them on only when I must (which is real soon), again to ensure I don't knock them off inadvertently.

Jon
 
Thanks Gregg. Still not sure about some of those higher number eyebolts we talked about, but at least the ones on the deck are accounted for, whether I use them or not

Sorry I couldn't be of much help with Olaf's information, Frank. All that rigging comprehension is still a bit Greek to me. I'm hoping once I get to my own rigging, it'll be one of those forehead-slapping "THAT'S what those are for" moments. <shrug>

Your Charlie Noble looks great. I have kept mine off the model while I install most of the other stuff that goes on the deck. I fear that I bump into it and damage it. I am doing the same thing with the my gun port covers. I will put them on only when I must (which is real soon), again to ensure I don't knock them off inadvertently.

Yep, When I built my Bluenose, I had a whole bunch of pieces that I held off securing on the deck until the rigging was done. With what I have seen with others' Constitution rigging and how busy the lines get going down to various belay points, I'm thinking pieces like the Charlie Noble will need to be permanently placed before the rigging. Nice work on all of this, Frank!
 
So, only two gratings to consider. I thought about purchasing some from Etsy. There is a guy there from the Ukraine who makes very nice looking ones. The idea of making my own from interlocking strips just seemed too difficult at my scale. So I did like I did with the gun deck and used my laser engraver to cut them. I used maple veneer that is .020" thick. The pattern is to scale, with the individual cross pieces being .020" thick. From more than a foot away, they look pretty good.

Frank, it looks like you got your grating concerns addressed, but FWIW, when I was needing to make gratings for the gun deck, I found some on Dry Dock Modelers website (https://drydockmodelsandparts.com/search?type=product&q=grating) that I thought came out pretty nice for scale. Yours came out "grate"-looking, though! ;) Right tools for the right job!
 
Thanks guys. Gregg no worries, you were a great help. I'll figure out the lines eventually. Part of the problem is all the terminology, which I still have a lot to learn. Still want to get that book.

Jon, I hear ya. As I did on the gun deck, my plan is to work from the outside inward to avoid breaking stuff. The exception of course is the hatch coamings. I don't plan on putting the fife rails, or ships wheel or anything else on the deck until the carronades are in place. The fife rail in the photo above is not glued in. Just put it there for the pic. Way too fragile, and if rigging the carronades is anything like the gun deck, I'm going to need all the room I can get. I'm hoping I don't regret gluing in the CN. Guess I'll just have to be careful around that area of the deck. It is set with epoxy, so I'd have to hit it pretty hard to do any damage. Guess we'll see.

Next post I get started on the carronades. I found a pretty good deal on Craigslist and bought a new toy - 3D printer. This thing is amazing. Can't wait to show off the results
 
Thanks Peter, I'm sure I will. I would imagine the folks here are just as friendly and helpful as those I got to know on MSW.
Having gotten the spar deck planking all figured out, it was time to get started on all the furniture. I have a fairly good sized piece of wood taken from the Constitution during the '73-'76 overhaul. I wanted to use this wood to fabricate all the parts of the deck that would be stained or varnished and not painted. Mostly this includes the fife rails, pin rails, hatches and the ships wheel. The ships wheel was going to be the most challenges for sure, especially at 1/96 scale, so I got started on that first.
At first, I thought the wood I had was pine because of the large grain pattern, but then realized it was Douglas Fir by the typical redish color.
View attachment 597387
Considering the grain is very close to that of pine, I used a pine 2x4 with a similar grain pattern to practice with. The plan was to cut a thin strip, sand it down to proper thickness and then use the laser engraver to cut the parts. According to the Navy plans, the wheel is 2- 3/4" thick. At scale, that would be .028", which is not much to work with. I decided to try .040", as I didn't think the difference we be too noticeable. The first problem encountered was the grain. Turns out the heartwood doesn't burn as easily as the softwood. To get enough power to cut through the heartwood, the softwood would get excessively scorched. The solution was to cut the wood in a manner that would provide me with a small strip that was mostly the softwood. After many failed trials, I finally got things tweaked to where I could get nice clean wheels with out too much scorching
View attachment 597452 View attachment 597453

With the center hole removed, I could place the wheel on a dowel and using a jig I put together, I could drill the holes around the perimeter for the spokes. The spokes were made by cutting a very thin strip from the heartwood and placing that in a dremel. With the dremel turned on I squeezed the piece between a folded piece of sandpaper to create a very small dowel - about .020" in diameter
View attachment 597457 View attachment 597458

Once the holes were drilled in the wheel, the center could be punched out and then spokes installed
View attachment 597459 View attachment 597460

Then repeat with another wheel
View attachment 597461 View attachment 597477

Once the two wheels were attached to the drum, I could easily cut the dowel flush
View attachment 597479
I got a little lazy at the end and used some .020" styrene rod for a few spokes. The point of this was proof of concept. Since I was already happy with my ability to make wooden spokes, I didn't bother with the last few. You can also see in this photo that I had drilled a hole in the center of the dowel to place a pin to help position the side frames. The frames were cut using the laser and turned out pretty nice
View attachment 597478
And finally, a complete wheel assembly

View attachment 597480

Once stained, the scorch marks from the laser will blend in. Overall, I was very pleased with the result, especially considering the size. Now to do it all over again with the wood piece from the real ship
WOW! What OUTSTANDING attention to detail and scale! I'm impressed!
 
Hello All,
Another victim here of the MSW disaster. Two and a half years into my build and sadly, I did not keep a personal copy of my log. So, instead of trying to re-do the entire thing from the beginning, I am going to start up my log from where I am. As it stands, I am just getting started on the spar deck. Here are a few photos of the ship currently
View attachment 596698 View attachment 596699


View attachment 596705

View attachment 596704
May I ask about the MSW disaster? I have spent the past several years dealing with several personal injuries, hospitalizations, and surgeries. Therefore, I have been "out of the loop" so to speak. Thank you for any information!
 
Bill, at the end of April 2026, Model Ship World got hacked and by hacked, I mean wiped out...everything including all the backups. I don't know the details of how, why or who, but the end result was that ALL of the build logs were GONE. I was lucky as I had a copy of my build log so I could rebuild back on MSW which I did. I also rebuilt it here as a mirror build. It was my habit to copy every build log that I followed into a Microsoft Word document so I could use them offline. I also knew that the internet is not permanent. Things change, get added, removed, moved, get lost or abandoned etc.

I made it be known to anybody I could reach who had a USS Constitution build log on MSW and didn't have a copy of their own log, I could offer my MS Word document copy of their log. I was able save a number of people's logs.

Jon
Jon,

Thank you for responding. That is a devastating loss! Who could be so malicious? It's sickening.
 
Bill, at the end of April 2026, Model Ship World got hacked and by hacked, I mean wiped out...everything including all the backups. I don't know the details of how, why or who, but the end result was that ALL of the build logs were GONE. I was lucky as I had a copy of my build log so I could rebuild back on MSW which I did. I also rebuilt it here as a mirror build. It was my habit to copy every build log that I followed into a Microsoft Word document so I could use them offline. I also knew that the internet is not permanent. Things change, get added, removed, moved, get lost or abandoned etc.

I made it be known to anybody I could reach who had a USS Constitution build log on MSW and didn't have a copy of their own log, I could offer my MS Word document copy of their log. I was able save a number of people's logs.

Jon
Thank you for thinking ahead and using your forethought to help others. We need people like you!
 
Back
Top