• Ships of Scale has incorportated an extra level of security when you log In. Please follow on-screen prompts to acknowledge that you are not a robot via a "Check Box" or a "Pictorial Check Box Puzzle". This is needed due to higher level of AI Activity Security.
  • SUBSCRIBE TO SHIPS IN SCALE TODAY!

    The beloved Ships in Scale Magazine is back and charting a new course for 2026!
    Discover new skills, new techniques, and new inspirations in every issue.

    NOTE THAT OUR NEXT ISSUE WILL BE July/August 2026
  • Win a Free Custom Engraved Brass Coin!!!
    As a way to introduce our brass coins to the community, we will raffle off a free coin during the month of August. Follow link ABOVE for instructions for entering.

USS Constitution - Model Shipway’s 5/32” = 1 ft. (1:76.8) Kit No.: MS2040

Main Hatch Pinnace Boat Chocks

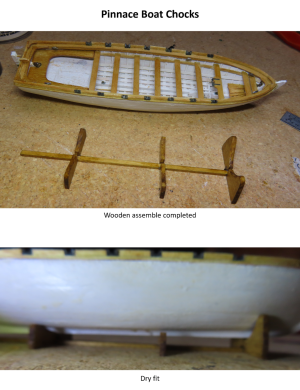
And since I was trying to add as much remaining stuff onto the spar deck before access becomes too restricted, I decided to fabricate and install the Pinnace boat chocks that sits atop the main hatch.

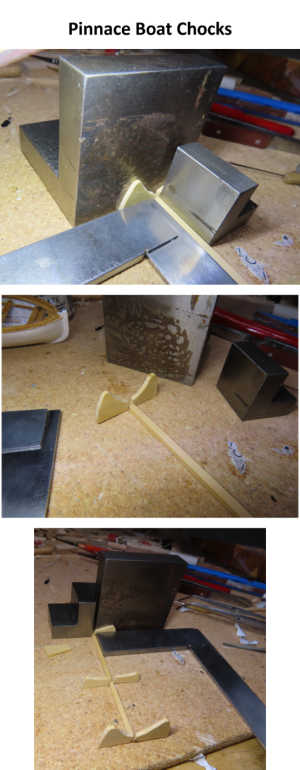
Because the chock wood was to remain unpainted, I used Boxwood instead of the kit’s basswood like the practicum did. The keel rest was 3/32” x 1/16” x 4 1/8”. The six chocks were cut from a 5/64” x 5/8” x 5/8” piece. Typically, boats are stored with their rudders removed and tucked away inside the boats, but because I had installed the rudder when I fabricated the Pinnace so long ago, the keel stop would not fit, so it was left off.

Initially, the chocks were roughly cut out as three pieces using the shapes printed in the plans as a template with my Dremel jigsaw. Then I shaped the chocks with files and sandpaper to custom fit my model Pinnace. Once I was satisfied that I had a good fit, the chocks were cut apart resulting in six pieces.
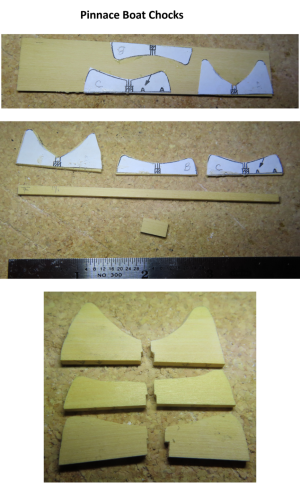
Pinnace Boat Chocks 01.png

Pinnace Boat Chocks 02.png

Pinnace Boat Chocks 03.png
 
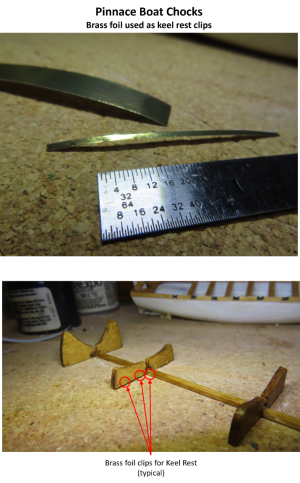
In contemporary life, the chocks and keel rest are fastened to the main hatchway via metal clips. According to the US Navy plan 23860, these are made of galvanized steel. Somehow, this modern material doesn’t sound like what would have been originally used. I suspect the material of choice would have been brass, if they used metal clips back in the day. Because these modern clips are ¾” thick or 0.0097” at scale, which is essential metal foil, I used brass colored foil tape to give the illusion of the clips. The US Navy plan calls for the chocks to be made of white oak. I used Minwax Early American 230 stain because I didn’t have any white oak stain on hand, and it was close enough in appearance. Installed, they are difficult to see due to their location and low contrast of the chocks’ wood color and the brass. However, under the proper lighting, the brass foil might glint a bit to reveal its existence. My model, for the most part reflects what the ship looks like today (less tourist accruements), with a “tip of the hat” to 1812 on select items (e.g., carronades).

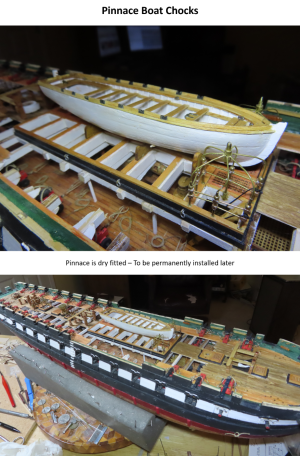
The chocks were installed onto the model, but the Pinnace now posing for the camera will be removed until such time as I think it time to permanently install it. The last thing I want to do is damage it.

Pinnace Boat Chocks 04.png

Pinnace Boat Chocks 05.png
 
The rings of this section were a bit more delicate. They are only 1/32” thick with the edge about 1/32” and 3/64” wide. The trick to making them is to drill the center hole first in the wood stock, then cut the circle around the hole. That way the stresses of drilling won’t break the ring.

The whelps were almost too small to handle. Those were roughly shaped and glued into place, then filed into its final shape. In the first image, you can see the bottom ring partially in place on the capstan. The capstan axle will be trimmed later. All the gun deck items will be glued into place after the guns have been fabricated. The pumps are next.

View attachment 599802

View attachment 599803

View attachment 599804

View attachment 599805
DId you use a stained varnish for the deck? It looks wonderful
 
The practicum calls for ¼” stock or 1/8” layered stock if you didn’t have the ¼” stock. Not having any ¼” stock at my immediate disposal, I glued and clamped two pieces of 1/8” stock, enough to make the two rails. Then as directed by the practicum, rubber cemented the images of the port and starboard rails from their fiddlehead tip to just where it turns upward to meet the cathead for the first rail component. The second component starts from under the cathead to where it overlaps the first to create a diagonal joint. I had to reapply the paper elevation and plan templates to the pieces that came from under the cathead so I could cut the wood in both the X and Y planes. Those parts curve in two directions.

These are fragile pieces when they are cut out of the stock which made filing and sanding them to form their required shape, a delicate task.

View attachment 601015

View attachment 601016

View attachment 601017

View attachment 601018

View attachment 601019

View attachment 601020
I had one heck of a time with the bow components. I should have done more research before attempting it.
 
Things are going to get crowded on the gun deck. To install the guns, the anchor ropes and chain might need to be installed first, as the guns’ tackle will lie on top of the anchor cables. Also, the structural elements such as the diagonal knees, stanchions, and spar deck beams and braces all need to be installed in concert as I move down the length of the gun deck. Additionally, all the gun deck furniture that was fabricated earlier needs to be installed as well.

So, to start off simply, gun rigging also requires six hooks per gun which need to be either fabricated or purchased. Syren offers plastic hooks but unfortunately, there is a problem. The problem exists not only with Syren’s product, but with other manufactures as well, be it plastic or photo etched. The eye of the hooks is parallel with the hook itself. In the picture below, you can see the actual hooks have the eye turned at a right angle to the hook. It appears I will have to fabricate at least 132 1/8” hooks just for the gun deck. I haven’t checked out what the kit has supplied for the spar deck. If anyone knows a cheap supply of properly formed hooks, I would be very interested.

View attachment 601445
Etsy might be a place to look.
 
Construction of the Commodore’s pantry was made from three identical pieces of 1/32” plywood based on the US Navy plans and four vertical glueing surfaces. Using a four-way clamp, the three pantry walls were glued together. Next the two corners were filed to rounded them off. The partition was then dry fitted on the gun deck again for the image below.

View attachment 601519

View attachment 601520

View attachment 601521

View attachment 601522
amazing. where did you get that 4way clamp from? It's exactly what I need.
 
that`s great, thanks. How many clamps do you get, one set of 4? I think I need 2 sets and not sure if I need to order qty at 2 or 1.
Not entirely sure. I never ordered them. Just remember seeing them in Jon Gerson's build log so I recalled that Micro-Mark had them. I'm assuming by the description that you'd get just one set of four (4) clamps... enough to clamp a square or rectangular box. Since you quoted Jon's post, I'm sure he will chime in when he logs in and sees the post. Jon is excellent about responding to these things. He's been an awesome resource for many of us!
 
Jack Sparrow asked:
DId you use a stained varnish for the deck? It looks wonderful
I used MinWax stains, not varnish. I had quite the discussion as to what the actual color of the spar deck was at the time (see Post 661). The answer was "it depends." The abrupt color change you see on the deck is due to light and heavy foot traffic, where there is more orange shade, is light traffic. The the color also depends on whether the deck was wet or dry and whether the weather was sunny or cloudy. I based mine on a sunny dry day look.

I had one heck of a time with the bow components. I should have done more research before attempting it.
The rails drove me crazy. I just couldn't visualize how the parts connected.

I originally remarked:
If anyone knows a cheap supply of properly formed hooks, I would be very interested.
I eventually made my own. The ones you can buy have the eye parallel to the plane of the hook. I needed the eye to be turned 90 degrees from the plane of the hook. They were simple enough to make, but there was just so many of them.

How many clamps do you get, one set of 4? I think I need 2 sets and not sure if I need to order qty at 2 or 1.
You get a set of four to clamp a rectangle or square frame. But you really need 2 sets if you are going to make a tall structure. One set for the base and the other for the top. I only have one set.

I hope this helps

Jon
 
Jack Sparrow asked:

I used MinWax stains, not varnish. I had quite the discussion as to what the actual color of the spar deck was at the time (see Post 661). The answer was "it depends." The abrupt color change you see on the deck is due to light and heavy foot traffic, where there is more orange shade, is light traffic. The the color also depends on whether the deck was wet or dry and whether the weather was sunny or cloudy. I based mine on a sunny dry day look.


The rails drove me crazy. I just couldn't visualize how the parts connected.

I originally remarked:

I eventually made my own. The ones you can buy have the eye parallel to the plane of the hook. I needed the eye to be turned 90 degrees from the plane of the hook. They were simple enough to make, but there was just so many of them.


You get a set of four to clamp a rectangle or square frame. But you really need 2 sets if you are going to make a tall structure. One set for the base and the other for the top. I only have one set.

I hope this helps

Jon
thank you sir. appreciate the feedback
 
I originally remarked:
I eventually made my own. The ones you can buy have the eye parallel to the plane of the hook. I needed the eye to be turned 90 degrees from the plane of the hook. They were simple enough to make, but there was just so many of them.
You can split the difference by buying premade eyebolts, and bending them into hooks. I too make my own now, and it's not too bad, as long as you have the right sized needle nosed pliers. After a making a few dozen, you just get into a zone. Do it while watching TV.
 
At this point, the templates were removed, and new ones for the notches were put on the top surface. These were for the gunports and head access frames. These were delicately cut out with an X-axto knife with a fresh blade. Even then, I managed to crack one of the blocks near the big edge notch. PVC glue was used for the repair and I waited 24-hours for it to set to ensure a strong bond. These were then glued into place.

View attachment 598773

View attachment 598774

View attachment 598775
Jon, Thank you for all the detail on the filler blocks (stern and bow). I am preparing for the arrival of the kit again (sadly sold the first one..). I dont remember but think that you bought some extra basswood filling blocks to use. Lots of complex angles indeed.
Guy
 
Guy, I don't remember purchasing any extra basswood for the filler blocks.

At the time I purchased my MS kit sometime in 2016-17, Robert Hunt who wrote the practicum that is being used by a large number of builders, was in a business relationship with the model wood supplier, HobbyMill. HobbyMill offered supplemental wood packages where the kit's bass wood was substituted with boxwood, swiss pearwood, holly, cherry, among other choices. Basically, where Mr. Hunt noted in the practicum he substituted the kit's basswood, that substitution was offered in the supplement wood packages. You could buy wood say for just the ship's boats or just the hatchways or everything Mr. Hunt changed. I purchased the complete set. They did the same thing for the Mamoli Rattlesnake which I made first.

Unfortunately, not to long after I started to construct the USS Constitution, HobbyMill closed due to the retirement of its owner. I have no idea whether Mr. Hunt collaborated with another wood supplier or even updated the practicum to remove HobbyMill from it's text.

Jon
 
Jon, Thank you for all the detail on the filler blocks (stern and bow). I am preparing for the arrival of the kit again (sadly sold the first one..). I dont remember but think that you bought some extra basswood filling blocks to use. Lots of complex angles indeed.
Guy
If all you're looking for is basswood, I was able to get quite a bit of that at my local Ace Hardware Store, back in the day where I thought Basswood was decent material to work with. For filler blocks, it still is..

But for just about anything else, I came to realize that boxwood is the better wood. I too purchased supplies in various sizes from the now closed Hobby Mill. I seem to recall that someone else is filling that niche these days, but I don't remember off the top of my head who that is.

Paul, do you have a supplier for all the Exotic materials you're using?
 
If all you're looking for is basswood, I was able to get quite a bit of that at my local Ace Hardware Store, back in the day where I thought Basswood was decent material to work with. For filler blocks, it still is..

But for just about anything else, I came to realize that boxwood is the better wood. I too purchased supplies in various sizes from the now closed Hobby Mill. I seem to recall that someone else is filling that niche these days, but I don't remember off the top of my head who that is.

Paul, do you have a supplier for all the Exotic materials you're using?
For milled strips and such I order from a guy in Estonia. I can look it up when I get home if someone is interested.

For board lumber I prefer Rare Woods USA.
 
Since I had to run home to do a quick bit of research, I reached out to my A/I agent (Grok). Having checked every possible site below, I can confirm that Paul has already located the only two sources where you can get all three - boxwood, Swiss pear and American yellow cedar. These would be, hobbymill.eu and rarewoodsusa.com

I present the reply from Grok for those looking for other species.

Modeler’s Sawmill (Joe Volpe) did close permanently in early 2026. There isn’t a single one-to-one replacement for precision-milled boxwood/pear/AYC strips and sheets, but several U.S. suppliers sell exotic hardwoods in small quantities—individual boards, thin stock, cutoffs, and blanks—without large minimums .Best matches for hobby / small-quantity buyers
  • Ocooch Hardwoods (Viola, WI) — ocoochhardwoods.com
    Thin, project-ready hardwood in 1/16", 1/8", 3/16", 1/4", and 3/8" thicknesses, exact sizes, many exotics (bloodwood, Bolivian rosewood, purpleheart, etc.). Good for scroll work, laser, inlay, and model-scale stock. They also sell inexpensive “seconds” and mixed packs.
  • Exotic Woods USA (East Northport, NY) — exoticwoodsusa.com
    100+ species, lumber, turning squares, pen/knife blanks, and custom sizes. They explicitly say you can order any amount.
  • Rare Woods USA (Mexico, ME) — rarewoodsusa.com
    Large inventory of exotic and figured lumber sold as individual boards, turning squares, and project packs. No minimum; a small service fee applies under $100. They will select pieces for you and ship smaller orders via UPS/USPS.
  • Cook Woods (southern Oregon) — cookwoods.com
    Individually photographed pieces, pre-cut sizes including smaller “micro-lumber,” turning blanks, and slabs. Strong on rare and figured stock.
  • Bell Forest Products (northern Michigan) — bellforestproducts.com
    Craft-wood cutoff packs (15–30 lb mixed sizes, often including thin stock) plus holly, figured maple, and many exotics. Useful when you need a variety of small pieces rather than full boards.
  • Exotic Wood Zone (Missouri) — exoticwoodzone.com
    Hobby blanks, cutoffs, and small-dimension stock aimed at makers and instrument builders.
Other useful U.S. options
  • California Exotic Hardwoods (Anaheim, CA) — californiaexotichardwoods.com — custom requests and turning/luthier stock.
  • DomEx Hardwoods — especially strong on American holly plus turning squares in many species.
  • Griffin Exotic Wood (Colorado) — craft, pen, and bowl blanks in rarer species.
  • Local/retail: Woodcraft stores and dealers listed on hardwooddirectory.com often sell single boards or small lots with no minimum.
Notes for model-scale workPrecision-milled boxwood, Swiss pear, and Alaskan yellow cedar strips/sheets are still the hardest items to source in the U.S. after Hobby Mill and Modeler’s Sawmill closed. Syren Ship Model Company previously offered some milled sheets; check current stock. Many ship modelers now use Ocooch for other species or buy from Hobbymill.eu (Estonia), which ships tracked parcels to the U.S. and is frequently recommended on Model Ship World.
 
Back
Top