USS Constitution - very old Mamoli kit - by first time builder - build log

I wish had the money to buy this model with laser cut bulkheads. None match the drawing. I hope when planking they align, but I am beginning to doubt. I have to make decision to continue for the next 4 years or get Revell's plastic model. I built the Revell 40 years ago (destroyed during a move).20191214_135331_HDR.jpg
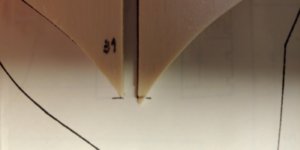
I take and make duplicates of all my plans at office max, staples, kinko's, etc... they only charge a couple. bucks per sheet. I make duplicates because they all seem to eventually get buggered up. Plus, I keep all my plans
Hey John,
Welcome and pleased to see we are both working similar builds. You can find my build log under ‘From scratch or plans. I can also send you digital plans is the Connie if you are interested.
Regards. Dan H
Are you working on the Connie? If so, are the bulkheads hand cut? If hand cut have checked the shape to chart 13? I did and many do not have same cut on both sides. I don't know if this can be corrected during planking. I am at a decision point now.
Good luck on your build.
 
Yes, I am working on the Connie 1/76 scale, from plans and scratch. I cut the bulkheads with my scroll saw and mini table saw. They’re not perfect but minor adjustments prior to planking should do the trick.
Do you have an old kit? You can reshape/cut if needed?
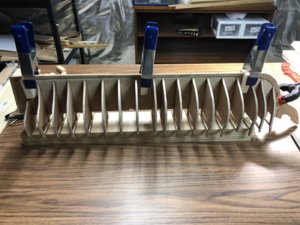
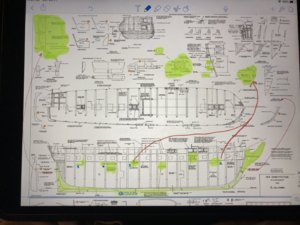
I attached a few photos, the bulkheads and keel being installed and digital photo so I can edit and make notes. If you zoom in, my bulkheads aren’t perfect.
Many issues arise but I like working through them. Let me know if I can help.927C9FA7-908E-4E49-A98D-AC762C5D81CF.jpeg7DA79DEE-A56A-43D9-8F2D-08FDF344C11E.jpeg
 
Question for the people have made a mamoli kit. Based on the fact that the many bulkheads that are in my kit are off from what the chart. Would you continue work on the USS Constitution, or cut my loses.
 
Don't worry about the plans, they're an extra set I didn't need, and it cost less than $2 to send them to you. I have 6 lines to add and I'll be done rigging my Constiution. I'm really confident I won't build another one.
Thank you.
 
My kit actually pre-dated yours. I know because the plans were printed on different paper and even with the two large sheets on one piece of paper back to back. I'm sure mine was as inaccurate as yours and the hull came out looking fine. Because nothing in the kit is laser cut to fit together, the small variation from piece to piece isn't that big of a deal. You can't make everything match the paper plan and have it fit exactly even if every other piece matches the plan. The plans just aren't that good or complete.

A small amount of variation from side to side isn't going to be noticeable. If I remember correctly they have you use a sanding block to sand the bulkhead edges after it's all glued together so the planking lays flat across the bulkheads, being as this is done freehand, there is going to be some variation anyway.

My uncle used to tell a story about a guy that did pinstriping on cars at car shows. Someone noticed he didn't do it the same on both sides of the car. His response was, "What difference does it make, you can't see both sides of the car at the same time." My point is, building a ship model isn't entirely a technical exercise, there is an artistic point where you have to just make it work and not sweat the minor technical differences.

The older kits are definitely more like scratch building, than the new ones with all the laser cut stuff.
 
Last edited:
Yes, I am working on the Connie 1/76 scale, from plans and scratch. I cut the bulkheads with my scroll saw and mini table saw. They’re not perfect but minor adjustments prior to planking should do the trick.
Do you have an old kit? You can reshape/cut if needed?
I attached a few photos, the bulkheads and keel being installed and digital photo so I can edit and make notes. If you zoom in, my bulkheads aren’t perfect.
Many issues arise but I like working through them. Let me know if I can help.View attachment 123910View attachment 123911
Thank you. I most certainly will.
 
My kit actually pre-dated yours. I know because the plans were printed on different paper and even with the two large sheets on one piece of paper back to back. I'm sure mine was as inaccurate as yours and the hull came out looking fine. Because nothing in the kit is laser cut to fit together, the small variation from piece to piece isn't that big of a deal. You can't make everything match the paper plan and have it fit exactly even if every other piece matches the plan. The plans just aren't that good or complete.

The small amount of variation from side to side isn't going to be noticeable. If I remember correctly they have you use a sanding block to sand the bulkhead edges after it's all glued together so the planking lays flat across the bulkheads, being as this is done freehand, there is going to be some variation anyway.

My uncle used to tell a story about a guy that did pinstriping on cars at car shows. Someone noticed he didn't do it the same on both sides of the car. His response was, "What difference does it make, you can't see both sides of the car at the same time." My point is, building a ship model isn't entirely a technical exercise, there is an artistic point where you have to just make it work and not sweat the minor technical differences.

The older kits are definitely more like scratch building, than the new ones with all the laser cut stuff.
Good words of wisdom. Even for life!
 
My point is, building a ship model isn't entirely a technical exercise, there is an artistic point where you have to just make it work and not sweat the minor technical differences.
@MystRacing I have to disagree with you, Jodie :( While modeling definitely has an artistic point, building a nice model, the technical knowledge (exercise) is a must to have! The stripes on the car might not be the same on both sides, and this can be well dictated by design. However, if you made asymmetrical waterline on port and starboard this would be an error and will look ugly on the model. If you are building a POB (Plank On Bulkhead) model hull, you can somehow cheat, but if your type of model POF (Plank On Frame) you have to follow the plans and frame pattern of the ship by that Period\Country of origin. More of it: you can not build 'French' style frames on English vessels, and vise-verse, they are simply different. Those were defined way before we were born, we just follow. Most of us make a thorough research about the vessel we about to build, to make sure it as close match.

You have to build it right - or... make stripes on the car (no one can see both sides at the same time...anyway) :p
 
Welcome to the community! Just hearing you talk about the keel gives me confidence that you have the temperament to do a great job. Metal projects have put my Connie on hiatus. I've got the same kit, and I'm not much further into it. I'm in the beginning stages of planking.
If you're making the model for a museum, or if part of your enjoyment is picking a configuration from a particular year and making it exactly match, then the details are worth it. One thing I found out early is that this kit doesn't exactly match any exact configuration of the Connie. Some people have done amazing work including 3D printing the correct stern to match what it looked like in the 1800's. Others have opened up the forecastle to match the modern configuration. I plan to build the parts I have in the kit configuration and if there are color or design choices that I can make, it will be influenced heavily by the 3D tour of her available online and pictures of her most recent restoration. My goal is to make a loving tribute to an amazing vessel to the best of my ability. If you want to capture a precise moment in time, then you will need to do a boatload of research.
I found that the fit of all the parts had to be tweaked a great amount. I would assemble two steps ahead before gluing anything in case I needed to adjust shape or position. Assume that every single piece will require some amount of adjustment and you will be ready to tackle this project. You will do a lot of sanding, period. Even if you get a laser cut kit, you'll still have to angle the edges of your frames in order to prepare for planking. I found that the deck boards required me to make adjustments to the frames. The slots to align the gun ports are not in line. All the little fidgety sanding tasks are part of the process. To the best of my ability means that I stare at the frames from all directions and sand carefully to create symmetry. I have a caliper that measures to the thousandth of an inch and can drive me insane. I picked up a cheap plastic caliper that does metric and is an order of magnitude less precise. When I am working on my lathe or mill in metal, thousandths come easily. For wood, your eyes and fingers are your best gauges, and sandpaper on a stick will allow you to create the desired angles between edges of frames. The single thing I wish I knew a lot more about before starting this project is planking.
Much of the shape of your ship is going to be from your hand work. I love the feeling when I realize that the last little bit of sanding I did made something fit or line up. I've worked in metal and plastic. Wood is an entirely different creature. Grain must be obeyed. The plastic and metal work I do feels dead by comparison. I now understand the charm of the wood kit, and plan to fully experience the process. I hope you will too.
 
Need help again. Bought Model Expo's FAIR-A-JIG Building Jig for aligning the bulkhead. The written instructions call for two parallel lines each 1-5/16" from a center line; however figure one shows the distance of the two lines being 1-3/8". If anyone has assembled this jig does it make a difference? I have glued them at 1-3/8". If it is critical that it be 1-5/16" then I will have to add 1/16" strip to both rails. I sent a request to Model Expo for clarification.
Received call from Model Expo the instructions are in error. The 1-5/16" is the correct measurement figure one at 1-3/8" is in error. In an attempt to save the jig I am going to try adding a 1/16" strip to each side. If that does not work I will try to get Model Expo to replace the jig or a least send me the two 10x10x10x10mm so I can rebuild.
 
Need help again. Bought Model Expo's FAIR-A-JIG Building Jig for aligning the bulkhead. The written instructions call for two parallel lines each 1-5/16" from a center line; however figure one shows the distance of the two lines being 1-3/8". If anyone has assembled this jig does it make a difference? I have glued them at 1-3/8". If it is critical that it be 1-5/16" then I will have to add 1/16" strip to both rails. I sent a request to Model Expo for clarification.
I am trying to correct the jig.View attachment 124386
 
Received call from Model Expo the instructions are in error. The 1-5/16" is the correct measurement figure one at 1-3/8" is in error. In an attempt to save the jig I am going to try adding a 1/16" strip to each side. If that does not work I will try to get Model Expo to replace the jig or a least send me the two 10x10x10x10mm so I can rebuild.
Gave up trying to salvage the jig. Good learning lesson.
 
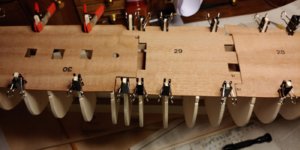
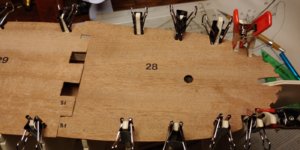
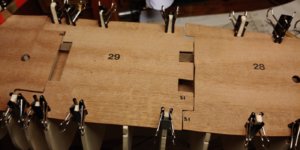
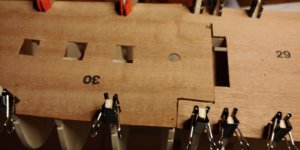
" Check that the three parts 28, 29, and 30 forming the deck fit to the hull without forcing, glue them on the frames, fix them in position with little nails which shall be removed when the glue is dry." Pretty straight forward. But what does the following instruction mean "strengthen connection lines of the deck gluing under it some cardboard strips."
How thick?
The entire length or just where they join?
I believe is is just where they join, but could be mistaken.
20191221_123003.jpg20191221_123019.jpg20191221_123029.jpg20191221_123036.jpg20191221_123003.jpg20191221_123019.jpg20191221_123029.jpg20191221_123036.jpg20191221_123003.jpg20191221_123019.jpg20191221_123029.jpg20191221_123036.jpg
 
Back
Top