This post delights me to no end Kurt! Coming from the master of inventing workarounds I couldn't be happier with your kind words. You are my muse when it comes to figuring stuff out when you can't do it 'according to Hoyle'.SO VERY clever! This is the kind of trick you can come up with when you truly know your materials. Bravo, Paul!
You are using an out of date browser. It may not display this or other websites correctly.
You should upgrade or use an alternative browser.
You should upgrade or use an alternative browser.
Vasa - 1:65 DeAgostini [COMPLETED BUILD]
- Thread starter dockattner
- Start date
- Watchers 145
My guess, they are there for the main course sheets. The protruding sheave block gets the lines outboard far enough to clear the mizzen deadeyes. When you get your rigging diagrams out, check to see if my guess is right. The sheets will be some of the last lines you rig because they are the farthest outboard lines next to the tack lines.Bonus posting. The Wasa has these wonky looking deals at the channel associated with the mizzen:
View attachment 273576
So I made some. I won't explain the process because I trust it will be intuitive.
On the port:
View attachment 273571
And on the starboard:
View attachment 273572
View attachment 273573
I have no idea what is rigged here. I'm guessing something to do with controlling sails but that part of the build is still a year away so I'll figure it out later.
When I need a break I have also been making rope, and then more rope, and then more rope. And I also made some rope. And after that I made some rope...
If anyone cares - I'm getting pretty good at it.
Paint the sections of the brass that wrap around the wood brown so they blend in. Yeah.. that plywood provided by DeAgostini is soft crumbly crap. It doesn't even look good painted because of the rough grain.This post delights me to no end Kurt! Coming from the master of inventing workarounds I couldn't be happier with your kind words. You are my muse when it comes to figuring stuff out when you can't do it 'according to Hoyle'.
Last edited:
Hi Paul. Your work is outstanding. Really .
.
 .
.Great solution! I have also seen a pic of notching the rim(dark wood in your pic) and keeping those chainplates flat so the deadeyes are on the outside.Hello Friends,
Recently I have been trying to develop a workaround for installing the deadeyes at the tops. Ordinarily the chain plate would pass through the outer rim (the darker ring in the image below):
View attachment 273560
Unfortunately, when I tried to drill or cut through the plywood rim (I used a part from the kit), it just crumbles. At first I thought it was because the part was so narrow (on the upper tops the rim is barely 2.0 mm wide). But on the lower tops the rim is almost 3 mm wide and it just crumbles too.
I considered several options and the leading contender in my mind was to drill through the planked portion (the base) and install the deadeyes there. But before I did that, I attempted a trial where I bent a piece of brass strip around the rim. The trial went well so I put that into production. Here is a photo tour of my approach.
Brass strips cut to length:
View attachment 273561
The end was rounded with a file and then smashed between two plates of steel to make a ring:
View attachment 273562
I then drilled through that ring (thanks @Jimsky - the Busch bits worked perfectly - and in my vise drill no less):
View attachment 273563
I then bent the brass strip into a shape that wrapped around the rim of the top:
View attachment 273564
These are 4 mm deadeyes:
View attachment 273567
And these are 3 mm deadeyes:
View attachment 273568
Comparing the 3mm and 4 mm ones I just made with the 5mm ones already installed at the channels (the deadeyes get smaller the higher they are on the ship):
View attachment 273569
The first ones I installed (I did get better at this over time...):
View attachment 273570
I am not completely satisfied with these results but the parts seem secure enough so I think I will run with it. As you know the macro images make everything look worse than it does at normal size but that's part of the game. I'm confident there is a better solution but this one is mine (for better or for worse).
Sadly, I counted wrong and I am 6x of the 3mm size short so I need to go back and make some more (super frustrating).
Thanks for stopping by to see what I have been up to. I am enjoying following your builds as well!
A small update today that represents hours and hours and hours of work.
I've mentioned several times that I have been making rope while working on other tasks. In studying other build logs I've noticed that some builders choose to make rope on an as-needed basis (well, assuming they didn't just use the kit-supplied rope or purchase rope on the aftermarket). I decided to pre-make rope in various sizes ahead of time so I would be locked and loaded when the need arose.
There is probably not a right or wrong way to approach this, though my solution did require a great deal of research on the front end to determine what sizes of rope would be needed for my build (thus far I have largely limited myself to the standing rigging). There are several tables and spreadsheets available to assist the builder though they sometimes don't agree (though I suspect much of that is user error on my part). In addition, I needed to estimate the lengths I would need of each size. Of course there is no way I got all this right...
Here is what I have done so far:
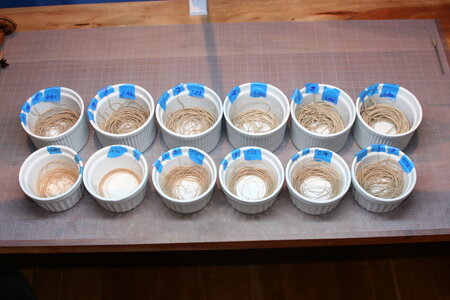
I still need two more sizes and will also need more of several of the sizes that I have started (the 0.36 for example). A man can only take so much rope-making at a time...
Here are some closer looks at several of the sizes:
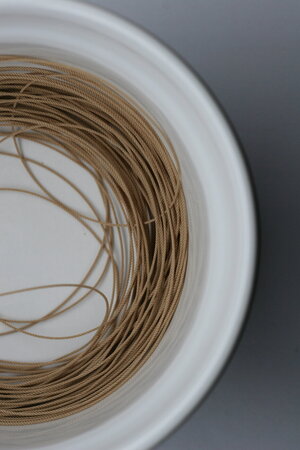
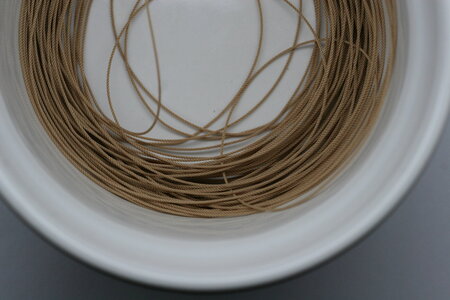
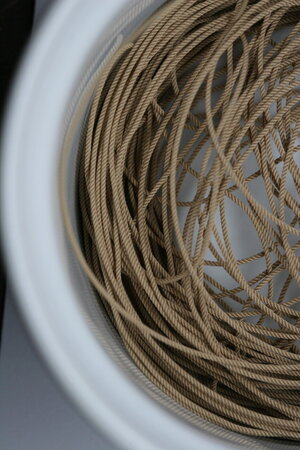
As you can see I have selected polyester source threads. For anyone interested, most of these began as Gutermann Skala 240 or Guterman E121 (though some are from Gutermann Mara 120, 70, or 30).
Before you panic, while almost everything you see is intended for standing rigging, nothing has been tinted yet. I will be tinting on an as-needed basis because many of these sizes will show up in the running rigging as well (untinted). There is also material for ratlines in what has been produced and that will remain hemp colored for this build.
You may have also noticed that everything you see here is right handed (hawser laid). I am well aware that some builders think all the standing rigging should be left handed - others think it should be right handed. Others believe only the largest ropes from the standing rig should be left handed with the smaller ropes being right handed. I have even read that port and starboard sides should use different handed-ness on the shrouds. Unless something changes in my thinking everything will be right handed on this model (well, the anchor rope will be cable laid). Don't hate me.
Poly vs cotton vs silk vs... is open to debate and the preferences of the individual builder. I chose poly because it produces cleaner (less fuzzy) rope - perhaps too clean for some of you though if you have been following this build for long you know I wasn't going to be OK with fuzzy rope.
Poly has one major reported downside that I will need to sort out - it is marginally stretchy - the thicker ropes more so than the thinner ones (that's not a scientific conclusion - just my personal stretch test...). The other thing poly does is unravel when it is cut. Care must be taken to 'burn' the ends or use CA or some other binder before cutting the ropes.
And when I say it unravels I mean it unravels with enthusiasm - almost violently. I intend to use CA but I was still worried that I would lose control of some of the ends. My solution (not my invention) was to bake all the ropes in the oven (350 degrees Fahrenheit for 5 minutes or so). This helps a lot.
In the image below the rope on the right is uncooked. All I did is cut it with an XActo and it fell apart in the blink of an eye. The rope on the left was baked and cut with the same knife.
I learned (the painful lesson) that you can't just throw loose rope into the oven and bake it because the rope will take the 'pattern' of however it is sitting in the oven. My remedy was to wrap the rope around a soup can and then bake it.
I'm still a ways off from doing any rigging - but it is now on the visible horizon so rope-making will continue in the weeks ahead.
Thank you for checking in on my build. The simple fact that you visit now and again is more encouraging than I can put words to.
Oh, and thank you to @Daniel20 and @mati.n who offered helpful advice (along with several others). It takes a village...
I've mentioned several times that I have been making rope while working on other tasks. In studying other build logs I've noticed that some builders choose to make rope on an as-needed basis (well, assuming they didn't just use the kit-supplied rope or purchase rope on the aftermarket). I decided to pre-make rope in various sizes ahead of time so I would be locked and loaded when the need arose.
There is probably not a right or wrong way to approach this, though my solution did require a great deal of research on the front end to determine what sizes of rope would be needed for my build (thus far I have largely limited myself to the standing rigging). There are several tables and spreadsheets available to assist the builder though they sometimes don't agree (though I suspect much of that is user error on my part). In addition, I needed to estimate the lengths I would need of each size. Of course there is no way I got all this right...
Here is what I have done so far:

I still need two more sizes and will also need more of several of the sizes that I have started (the 0.36 for example). A man can only take so much rope-making at a time...
Here are some closer looks at several of the sizes:


As you can see I have selected polyester source threads. For anyone interested, most of these began as Gutermann Skala 240 or Guterman E121 (though some are from Gutermann Mara 120, 70, or 30).
Before you panic, while almost everything you see is intended for standing rigging, nothing has been tinted yet. I will be tinting on an as-needed basis because many of these sizes will show up in the running rigging as well (untinted). There is also material for ratlines in what has been produced and that will remain hemp colored for this build.
You may have also noticed that everything you see here is right handed (hawser laid). I am well aware that some builders think all the standing rigging should be left handed - others think it should be right handed. Others believe only the largest ropes from the standing rig should be left handed with the smaller ropes being right handed. I have even read that port and starboard sides should use different handed-ness on the shrouds. Unless something changes in my thinking everything will be right handed on this model (well, the anchor rope will be cable laid). Don't hate me.
Poly vs cotton vs silk vs... is open to debate and the preferences of the individual builder. I chose poly because it produces cleaner (less fuzzy) rope - perhaps too clean for some of you though if you have been following this build for long you know I wasn't going to be OK with fuzzy rope.
Poly has one major reported downside that I will need to sort out - it is marginally stretchy - the thicker ropes more so than the thinner ones (that's not a scientific conclusion - just my personal stretch test...). The other thing poly does is unravel when it is cut. Care must be taken to 'burn' the ends or use CA or some other binder before cutting the ropes.
And when I say it unravels I mean it unravels with enthusiasm - almost violently. I intend to use CA but I was still worried that I would lose control of some of the ends. My solution (not my invention) was to bake all the ropes in the oven (350 degrees Fahrenheit for 5 minutes or so). This helps a lot.
In the image below the rope on the right is uncooked. All I did is cut it with an XActo and it fell apart in the blink of an eye. The rope on the left was baked and cut with the same knife.

I learned (the painful lesson) that you can't just throw loose rope into the oven and bake it because the rope will take the 'pattern' of however it is sitting in the oven. My remedy was to wrap the rope around a soup can and then bake it.

I'm still a ways off from doing any rigging - but it is now on the visible horizon so rope-making will continue in the weeks ahead.
Thank you for checking in on my build. The simple fact that you visit now and again is more encouraging than I can put words to.
Oh, and thank you to @Daniel20 and @mati.n who offered helpful advice (along with several others). It takes a village...
Last edited:
Kurt Konrath
Kurt Konrath
Do you do your can of rope soup baking with the Admiral present, or maybe while she is on a voyage to town!
"What is that smell?" was heard from the sunroom....Do you do your can of rope soup baking with the Admiral present, or maybe while she is on a voyage to town!
Kurt Konrath
Kurt Konrath
I knew a guy who painted brass model railroad items, and then baked for better finish.
His wife bought him an old used stove to put in garage for his hobby work, as she forbid baking painted items in the kitchen due to smell that "never went away".
Of course he didn't tell the wife the smell stayed from more use than admitted to, before new stove was installed.
His wife bought him an old used stove to put in garage for his hobby work, as she forbid baking painted items in the kitchen due to smell that "never went away".
Of course he didn't tell the wife the smell stayed from more use than admitted to, before new stove was installed.
Paul that's some of the best-looking rope I've seen yet. I'm really curious to see how it takes the staining. Charlie @STGCS put me onto a thread sealing cutter that has worked really well on very small dia. rope in a few tests I've done. I can see using your annealing method lends itself well to having nice clean-cut ends which would look the best on larger dia. rope.A small update today that represents hours and hours and hours of work.
I've mentioned several times that I have been making rope while working on other tasks. In studying other build logs I've noticed that some builders choose to make rope on an as-needed basis (well, assuming they didn't just use the kit-supplied rope or purchase rope on the aftermarket). I decided to pre-make rope in various sizes ahead of time so I would be locked and loaded when the need arose.
There is probably not a right or wrong way to approach this, though my solution did require a great deal of research on the front end to determine what sizes of rope would be needed for my build (thus far I have largely limited myself to the standing rigging). There are several tables and spreadsheets available to assist the builder though they sometimes don't agree (though I suspect much of that is user error on my part). In addition, I needed to estimate the lengths I would need of each size. Of course there is no way I got all this right...
Here is what I have done so far:
View attachment 274378
I still need two more sizes and will also need more of several of the sizes that I have started (the 0.36 for example). A man can only take so much rope-making at a time...
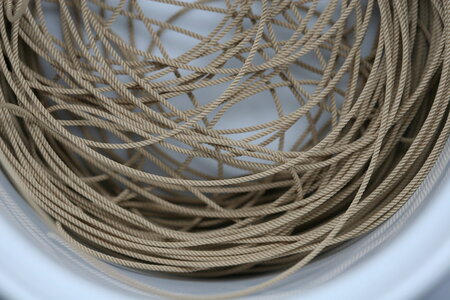
Here are some closer looks at several of the sizes:
View attachment 274374
View attachment 274375
View attachment 274376
View attachment 274377
As you can see I have selected polyester source threads. For anyone interested, most of these began as Gutermann Skala 240 or Guterman E121 (though some are from Gutermann Mara 120, 70, or 30).
Before you panic, while almost everything you see is intended for standing rigging, nothing has been tinted yet. I will be tinting on an as-needed basis because many of these sizes will show up in the running rigging as well (untinted). There is also material for ratlines in what has been produced and that will remain hemp colored for this build.
You may have also noticed that everything you see here is right handed (hawser laid). I am well aware that some builders think all the standing rigging should be left handed - others think it should be right handed. Others believe only the largest ropes from the standing rig should be left handed with the smaller ropes being right handed. I have even read that port and starboard sides should use different handed-ness on the shrouds. Unless something changes in my thinking everything will be right handed on this model (well, the anchor rope will be cable laid). Don't hate me.
Poly vs cotton vs silk vs... is open to debate and the preferences of the individual builder. I chose poly because it produces cleaner (less fuzzy) rope - perhaps too clean for some of you though if you have been following this build for long you know I wasn't going to be OK with fuzzy rope.
Poly has one major reported downside that I will need to sort out - it is marginally stretchy - the thicker ropes more so than the thinner ones (that's not a scientific conclusion - just my personal stretch test...). The other thing poly does is unravel when it is cut. Care must be taken to 'burn' the ends or use CA or some other binder before cutting the ropes.
And when I say it unravels I mean it unravels with enthusiasm - almost violently. I intend to use CA but I was still worried that I would lose control of some of the ends. My solution (not my invention) was to bake all the ropes in the oven (350 degrees Fahrenheit for 5 minutes or so). This helps a lot.
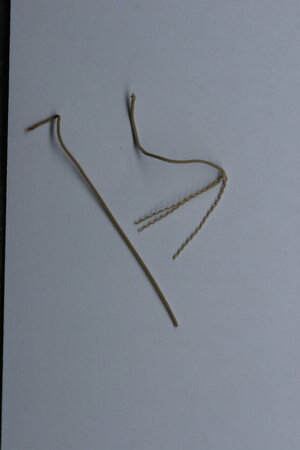
In the image below the rope on the right is uncooked. All I did is cut it with an XActo and it fell apart in the blink of an eye. The rope on the left was baked and cut with the same knife.
View attachment 274373
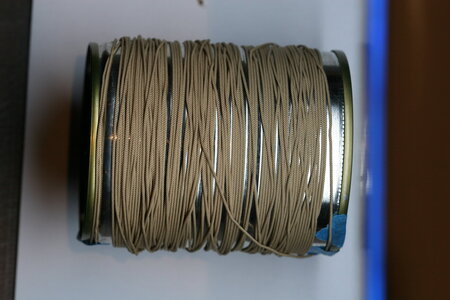
I learned (the painful lesson) that you can't just throw loose rope into the oven and bake it because the rope will take the 'pattern' of however it is sitting in the oven. My remedy was to wrap the rope around a soup can and then bake it.
View attachment 274372
I'm still a ways off from doing any rigging - but it is now on the visible horizon so rope-making will continue in the weeks ahead.
Thank you for checking in on my build. The simple fact that you visit now and again is more encouraging than I can put words to.
Wow. That is some nice work. CongratulationsA small update today that represents hours and hours and hours of work.
I've mentioned several times that I have been making rope while working on other tasks. In studying other build logs I've noticed that some builders choose to make rope on an as-needed basis (well, assuming they didn't just use the kit-supplied rope or purchase rope on the aftermarket). I decided to pre-make rope in various sizes ahead of time so I would be locked and loaded when the need arose.
There is probably not a right or wrong way to approach this, though my solution did require a great deal of research on the front end to determine what sizes of rope would be needed for my build (thus far I have largely limited myself to the standing rigging). There are several tables and spreadsheets available to assist the builder though they sometimes don't agree (though I suspect much of that is user error on my part). In addition, I needed to estimate the lengths I would need of each size. Of course there is no way I got all this right...
Here is what I have done so far:
View attachment 274378
I still need two more sizes and will also need more of several of the sizes that I have started (the 0.36 for example). A man can only take so much rope-making at a time...
Here are some closer looks at several of the sizes:
View attachment 274374
View attachment 274375
View attachment 274376
View attachment 274377
As you can see I have selected polyester source threads. For anyone interested, most of these began as Gutermann Skala 240 or Guterman E121 (though some are from Gutermann Mara 120, 70, or 30).
Before you panic, while almost everything you see is intended for standing rigging, nothing has been tinted yet. I will be tinting on an as-needed basis because many of these sizes will show up in the running rigging as well (untinted). There is also material for ratlines in what has been produced and that will remain hemp colored for this build.
You may have also noticed that everything you see here is right handed (hawser laid). I am well aware that some builders think all the standing rigging should be left handed - others think it should be right handed. Others believe only the largest ropes from the standing rig should be left handed with the smaller ropes being right handed. I have even read that port and starboard sides should use different handed-ness on the shrouds. Unless something changes in my thinking everything will be right handed on this model (well, the anchor rope will be cable laid). Don't hate me.
Poly vs cotton vs silk vs... is open to debate and the preferences of the individual builder. I chose poly because it produces cleaner (less fuzzy) rope - perhaps too clean for some of you though if you have been following this build for long you know I wasn't going to be OK with fuzzy rope.
Poly has one major reported downside that I will need to sort out - it is marginally stretchy - the thicker ropes more so than the thinner ones (that's not a scientific conclusion - just my personal stretch test...). The other thing poly does is unravel when it is cut. Care must be taken to 'burn' the ends or use CA or some other binder before cutting the ropes.
And when I say it unravels I mean it unravels with enthusiasm - almost violently. I intend to use CA but I was still worried that I would lose control of some of the ends. My solution (not my invention) was to bake all the ropes in the oven (350 degrees Fahrenheit for 5 minutes or so). This helps a lot.
In the image below the rope on the right is uncooked. All I did is cut it with an XActo and it fell apart in the blink of an eye. The rope on the left was baked and cut with the same knife.
View attachment 274373
I learned (the painful lesson) that you can't just throw loose rope into the oven and bake it because the rope will take the 'pattern' of however it is sitting in the oven. My remedy was to wrap the rope around a soup can and then bake it.
View attachment 274372
I'm still a ways off from doing any rigging - but it is now on the visible horizon so rope-making will continue in the weeks ahead.
Thank you for checking in on my build. The simple fact that you visit now and again is more encouraging than I can put words to.
Oh, and thank you to @Daniel20 and @mati.n who offered helpful advice (along with several others). It takes a village...
- Joined
- Jan 9, 2020
- Messages
- 10,377
- Points
- 938

Your rope is looking beautiful Paul and - funny thing is - I think your current color looks beautiful. I understand that it has to be colored for that dreaded HA (Historical Accuracy), but it doesn't take anything away from the fact that they look incredible just the way they look now.
Thanks, Heinrich. Recall this post in a few months. I hope you will be pleased with the decision I will be making with regard to color of the standing rigging.Your rope is looking beautiful Paul and - funny thing is - I think your current color looks beautiful. I understand that it has to be colored for that dreaded HA (Historical Accuracy), but it doesn't take anything away from the fact that they look incredible just the way they look now.
- Joined
- Jan 9, 2020
- Messages
- 10,377
- Points
- 938

Paul I have no doubt that I will. But to give you an idea - the color that your rope is now, would have been absolutely the perfect color for the rope on my sampan build. So, even in their current color, I am sure that they will have applications - it just depends on the build.Thanks, Heinrich. Recall this post in a few months. I hope you will be pleased with the decision I will be making with regard to color of the standing rigging.
- Joined
- Aug 30, 2020
- Messages
- 639
- Points
- 308

It's no surprise the ropes look as beautiful as your ship, thank you for spelling out your reasons for doing them this way as I was getting so confused reading various sources they should be done one way or another, make your decision and go with it, I like it.A small update today that represents hours and hours and hours of work.
I've mentioned several times that I have been making rope while working on other tasks. In studying other build logs I've noticed that some builders choose to make rope on an as-needed basis (well, assuming they didn't just use the kit-supplied rope or purchase rope on the aftermarket). I decided to pre-make rope in various sizes ahead of time so I would be locked and loaded when the need arose.
There is probably not a right or wrong way to approach this, though my solution did require a great deal of research on the front end to determine what sizes of rope would be needed for my build (thus far I have largely limited myself to the standing rigging). There are several tables and spreadsheets available to assist the builder though they sometimes don't agree (though I suspect much of that is user error on my part). In addition, I needed to estimate the lengths I would need of each size. Of course there is no way I got all this right...
Here is what I have done so far:
View attachment 274378
I still need two more sizes and will also need more of several of the sizes that I have started (the 0.36 for example). A man can only take so much rope-making at a time...
Here are some closer looks at several of the sizes:
View attachment 274374
View attachment 274375
View attachment 274376
View attachment 274377
As you can see I have selected polyester source threads. For anyone interested, most of these began as Gutermann Skala 240 or Guterman E121 (though some are from Gutermann Mara 120, 70, or 30).
Before you panic, while almost everything you see is intended for standing rigging, nothing has been tinted yet. I will be tinting on an as-needed basis because many of these sizes will show up in the running rigging as well (untinted). There is also material for ratlines in what has been produced and that will remain hemp colored for this build.
You may have also noticed that everything you see here is right handed (hawser laid). I am well aware that some builders think all the standing rigging should be left handed - others think it should be right handed. Others believe only the largest ropes from the standing rig should be left handed with the smaller ropes being right handed. I have even read that port and starboard sides should use different handed-ness on the shrouds. Unless something changes in my thinking everything will be right handed on this model (well, the anchor rope will be cable laid). Don't hate me.
Poly vs cotton vs silk vs... is open to debate and the preferences of the individual builder. I chose poly because it produces cleaner (less fuzzy) rope - perhaps too clean for some of you though if you have been following this build for long you know I wasn't going to be OK with fuzzy rope.
Poly has one major reported downside that I will need to sort out - it is marginally stretchy - the thicker ropes more so than the thinner ones (that's not a scientific conclusion - just my personal stretch test...). The other thing poly does is unravel when it is cut. Care must be taken to 'burn' the ends or use CA or some other binder before cutting the ropes.
And when I say it unravels I mean it unravels with enthusiasm - almost violently. I intend to use CA but I was still worried that I would lose control of some of the ends. My solution (not my invention) was to bake all the ropes in the oven (350 degrees Fahrenheit for 5 minutes or so). This helps a lot.
In the image below the rope on the right is uncooked. All I did is cut it with an XActo and it fell apart in the blink of an eye. The rope on the left was baked and cut with the same knife.
View attachment 274373
I learned (the painful lesson) that you can't just throw loose rope into the oven and bake it because the rope will take the 'pattern' of however it is sitting in the oven. My remedy was to wrap the rope around a soup can and then bake it.
View attachment 274372
I'm still a ways off from doing any rigging - but it is now on the visible horizon so rope-making will continue in the weeks ahead.
Thank you for checking in on my build. The simple fact that you visit now and again is more encouraging than I can put words to.
Oh, and thank you to @Daniel20 and @mati.n who offered helpful advice (along with several others). It takes a village...
Kurt Konrath
Kurt Konrath
Doc, what rope making machine did you use to produce the fine ropes you displayed.
Ok, Paul... How much money do you want for you to make my ropes? I don't have a rope walk and the line I have is not good.
Paul, what a huge venture. Probably unless you make your own rope, people do not appreciate how long it takes, even with a top quality planetary rope walk.
My experience is limited to a 2 metre vertical, weighted ropewalk and while this works OK and produces good rope, a second one I have built is horizontal and can be up to 5 metres for each winding. Obviously the faster the ropewalk spins, the faster you will make rope, but beware, when running at speed, overturning and tension buildup can result in breakages, poor quality and catastrophe. My 5m ropewalk takes about 15 minutes per length.
Also in my experience most ‘off the shelf’ threads such as Gutterman are left handed and so to produce the preferred right handed rope means it has to be wound backwards (to unwind the left handed winding) then rewound to be right handed. This takes longer and the tension applied becomes important.
I have found the CA application at cut ends the best way to stop it unraveling but it is always a nuisance as you never know where, in a length, you want to cut, until it is sized for length and applied. This therefore tends to waste a lot of made rope, and so you always need more than you think you do. As I progress through my Vasa, and I have now finished my standing rigging, I am amazed at how much rope is required - it is many, many metres.
Colour too, is a variable thing. I have chosen a wide range of colours but tend to come back to four or five ‘standard’ colours, with a darker colour preference for standing rigging and lighter colours for running rigging.
Size too is highly variable on a ship. There are spreadsheet guidelines but in general there seems to be a preference by many modellers to use rope thicknesses too great and out of scale for their models. To get this right takes time and a study of a number of sources, but it is worth the effort. Making a list for the many ropes and their sizes is a good start, and you will be surprised how many different sizes are required. Then as you produce lengths, categorise and label them. I store all my rope hanging vertically off a nail in a length of suspended wood. This tends to keep the rope straight although it will tend to twist around itself. Applying tension before hanging relieves a lot of the twisting and works better than storing on a reel or winding endless loops.
To estimate rope size, using multiple rope turns around a dowel then measuring the width of the winding and estimating the circumference I have found is the most accurate method, but use a lot of turns (30-40 is best).
Great work Paul, but I suspect the challenge is just beginning!!
Regards
PeterG
Last edited:


