Thank you Bluebeard for your very kind comments, I'm happy you checked in on me!Daniel,
That is a greta introduction my friend.
Your model will be a spectacular masterpiece.
You are using an out of date browser. It may not display this or other websites correctly.
You should upgrade or use an alternative browser.
You should upgrade or use an alternative browser.
VASA 490 Build Log - Billing Boats, 1:75 [Completed Build]
- Thread starter Daniel20
- Start date
- Watchers 64
-
- Tags
- billing boats vasa
Hey Sasha thank you for your comments and keen observations. You are absolutely correct about out of scale fittings on my build here. This scale business really jumped out at me when I looked at the finished canons, deck grating, and capstan. They are not in scale with each other, while I do like the 'look' of it all, in my next build I will follow your advice and pay much closer attention to these details.Daniel, excellent job of strapping the implements. Only the gun carriages look disproportionately larger than the guns themselves. I understand that this is how it is done in the kit, this is definitely not your fault. But it catches the eye. I don’t think that something needs to be changed, but considering how your level of work has risen, I ask you to take into account such nuances on the following models. I repeat: the work is excellent.
These look great Daniel! I think the rope really makes a big difference!Good morning I have a canon update. I finally managed to complete the canon rigging and installation even with those 2.5mm blocks. All the remaining block work will seem huge after dealing with the tiny things. The canon barrel extension beyond the outer hull has been reduced to just barley sticking out. This is the result of an unintended consequence from installing a 'box' along the inside bulwarks at the base of the railing. So the scale has once again been thrown off by my not planning ahead. At any rate I am pleased with the overall effect. I hope you all enjoy the visit, until next time happy modeling!View attachment 266697View attachment 266698View attachment 266699View attachment 266700
Thank you Dean, I love the look of the rope and its enjoyable as well as fascinating to spin up.These look great Daniel! I think the rope really makes a big difference!
Hi Daniel Fantastic looking cannons I think I'll have to try and fully rig the guns on my next build.
Thank you Tony. Check for available room on your next build, I left the rear or back end pully system off because when I added in my own version of the deck grating I did not scale it right and left no room for it. Actually partly Billings fault as well.Hi Daniel Fantastic looking cannons I think I'll have to try and fully rig the guns on my next build.
Good morning to all.
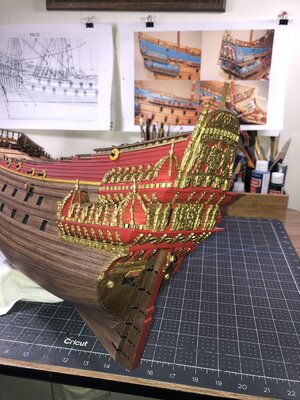
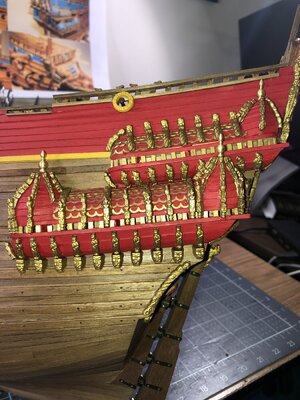
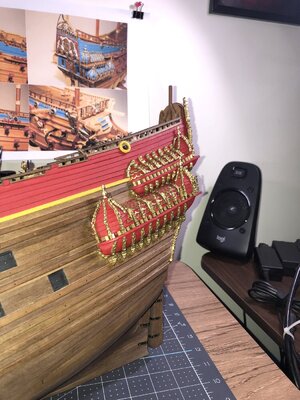
I have finished the port side gallery carvings and I am very happy with the result. I decided to omit the square opening in the lower gallery because I didn't want to 'interrupt' the look. The Billings version of the carvings lack some historical accuracy in quantity, shape, and locations, but still presents a quite beautiful rendition.
I love the way this ship challenges me, I love the way all of you following this build challenge me as well.
Thanks for checking in.


BOOM! That looks fantastic Daniel. I think the gold you selected is spot-on. Not too much - not too little. And notice how much more integrated your red color scheme is than the blue seen on the instruction sheet posted on your wall. You are making some good decisions on this build and you are being rewarded in spades. Keep it up!
Thank you Paul. After viewing your work I've just about decided my next hobby power tool needs to be a scroll saw.BOOM! That looks fantastic Daniel. I think the gold you selected is spot-on. Not too much - not too little. And notice how much more integrated your red color scheme is than the blue seen on the instruction sheet posted on your wall. You are making some good decisions on this build and you are being rewarded in spades. Keep it up!
Thank you so much Heinrich!That is indeed one sweet-looking gallery.
Daniel, I agree with the comments by Paul and Heinrich… it looks fantastic! I’m sure it was a lot of work! 
I think the Gold "Guild" looks fantastic. Nicely done.
Jan
Jan
I love the way the colours go together, great looking ship.
Thank you Dean. All the plastic carvings have a taper that I'm sure is there for easy mold release which makes them extremely difficult to find a grip with tweezers or pliers. I use a soldering iron to heat the plastic so I can mold it to the curves and I can't tell you how many times the pieces just slip out of the tweezers and go flying off somewhere.Daniel, I agree with the comments by Paul and Heinrich… it looks fantastic! I’m sure it was a lot of work!
Thank you Jan. I just took a peek at your Duyfken (very impressive) and see your a fan of the early Dutch design as well. In planning my next ship purchase I am going to look hard at Kolderstok as they are a favorite of @Heinrich as well.I think the Gold "Guild" looks fantastic. Nicely done.
Jan
Thank you Tony. Do you have your next build planned yet?I love the way the colours go together, great looking ship.
Hi Daniel I've started a new log on the HMS Unicorn by Corel, this is the one I started 25 years ago.Thank you Tony. Do you have your next build planned yet?
Hi Daniel. I’m with Paul re your Stern. Looks just right to me.Thank you Paul. After viewing your work I've just about decided my next hobby power tool needs to be a scroll saw.
Hello Grant, thank you for the compliment and welcome aboard my build log. I hope you enjoy it.Hi Daniel. I’m with Paul re your Stern. Looks just right to me.


