My Falkonet 2 Oared Yawl came yesterday, I just haven't looked at it yet. Judging from yours Heinrich I have a nice little boat waiting my attention.
-

Win a Free Custom Engraved Brass Coin!!!
As a way to introduce our brass coins to the community, we will raffle off a free coin during the month of August. Follow link ABOVE for instructions for entering.
-

PRE-ORDER SHIPS IN SCALE TODAY!
The beloved Ships in Scale Magazine is back and charting a new course for 2026!
Discover new skills, new techniques, and new inspirations in every issue.
NOTE THAT OUR FIRST ISSUE WILL BE JAN/FEB 2026
You are using an out of date browser. It may not display this or other websites correctly.
You should upgrade or use an alternative browser.
You should upgrade or use an alternative browser.
VOC SPIEGELRETOURSCHIP BATAVIA 1628 - KOLDERSTOK 1:72
- Thread starter Heinrich
- Start date
- Watchers 64
-
- Tags
- batavia kolderstok
Great to know it is with you expectation and satisfaction! It is a little project on it's own, and for sure will keep you busy with the size challenges. But at the end, you will be happy with results. Good luck. If you stumble across the Russian manual and has query, ping me and I will try to help.
I build already two of them and they are a lot of fun to build. Steam your ribs and planks well because these are very fragile when bending.
- Joined
- Jan 9, 2020
- Messages
- 10,566
- Points
- 938

@Dematosdg Absolute pleasure Daniel.
look at your yawl
Yes sir @Heinrich I did just look it over. Wow this thing is so tiny but Im sure it will look so cool if I can manage it. Also yes, Im better than yesterday thank you. Things have been mounting up a while and Im sorry I blew my lid in my build log. Sometimes you just feel overwhelmed in life.
- Joined
- Jan 9, 2020
- Messages
- 10,566
- Points
- 938

Dear Friends
It has been a while since my last post due to a combination of work pressure, studying up on Naviga Rules, planning the next steps on the Haarlem and the actual execution thereof.
First, I wanted to start with the side galleries and decided to work - for the time being - only on the starboard side.
The components that make up the galleries are fragile and have great care has to be taken during its construction. Also - despite Mike's love of CA glue - I have an aversion to the stuff. BUT ... that means only one thing - long drying times.
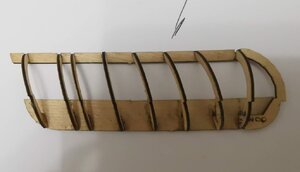
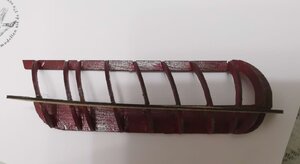
This is what the assembled frame of the gallery looks like - and painted in the Haarlem maroon (below)
Now it was time to fit the gallery to the hull ... BUT ... to do that two double wales and the rear Spiegel (or stern assembly) have to be taken into account as the gallery needs to line up with a decorative strip that was placed underneath the stern assembly.
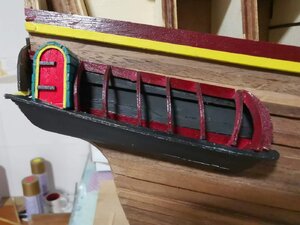
Here is the side gallery glued to the hull. Obvious to see is the door that has been installed and which had to be planked with 3mm Abachi strips painted green. You will also notice on this pic that the underside of the gallery has been planked (using 4mm Abachi strips) and has been painted black. Looking through the gallery, you will notice that I have painted a portion of the hull black as part of the gallery remains open.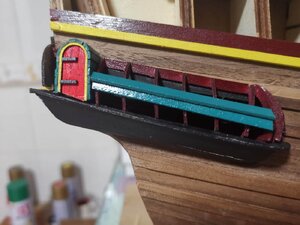
And then the planking of the gallery started with 4mm Abachi strips overlayed over one another.
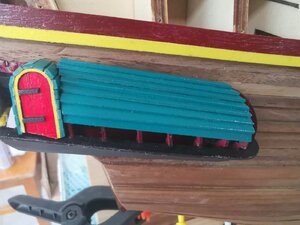
Planking completed on the side of the gallery. It is not nearly finished as there is still the section between the door and the stern assembly that needs to be done as well as the front of the gallery. Various yellow strips and other decorations are added to the gallery to complete the assembly, but that will be done at a later stage. As you can see on the picture above, the gallery fits in perfectly between the two wales so there was no need to remove some material as many other builders of the Batavia are sometimes forced to do. (When doing the hull planking - stick to the demarcated lines on the bulkheads!!!)
And talking about hull planking - now was the time to finish that!
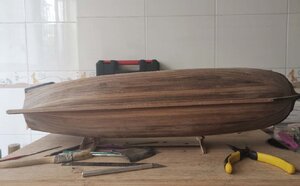
Done!
Some close-ups: The Stern (below):
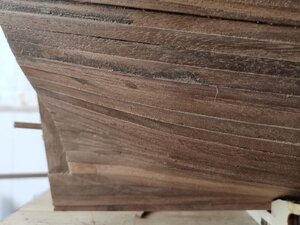
Aft Middle-Section
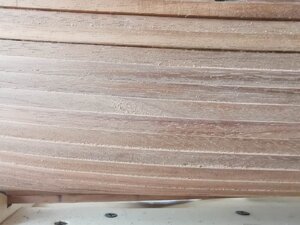
Bow Middle Section
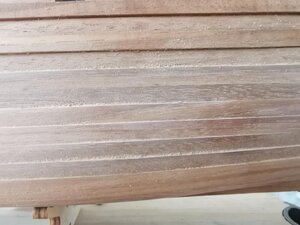
And Bow
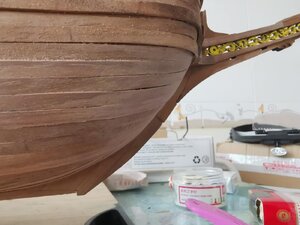
And now it was time to get the sandpaper out and for the fun and games to start - but more on that a little later.
I am very pleased by our "gang" of friends who have formed of late and want to thank you all for the encouragement and support you give to another. This is great guys - keep it up. On a personal note - thank you all for following. Comments and criticism - are as always - most appreciated.
Stay safe out there!
Warm greetings - Heinrich
It has been a while since my last post due to a combination of work pressure, studying up on Naviga Rules, planning the next steps on the Haarlem and the actual execution thereof.
First, I wanted to start with the side galleries and decided to work - for the time being - only on the starboard side.
The components that make up the galleries are fragile and have great care has to be taken during its construction. Also - despite Mike's love of CA glue

This is what the assembled frame of the gallery looks like - and painted in the Haarlem maroon (below)

Now it was time to fit the gallery to the hull ... BUT ... to do that two double wales and the rear Spiegel (or stern assembly) have to be taken into account as the gallery needs to line up with a decorative strip that was placed underneath the stern assembly.

Here is the side gallery glued to the hull. Obvious to see is the door that has been installed and which had to be planked with 3mm Abachi strips painted green. You will also notice on this pic that the underside of the gallery has been planked (using 4mm Abachi strips) and has been painted black. Looking through the gallery, you will notice that I have painted a portion of the hull black as part of the gallery remains open.

And then the planking of the gallery started with 4mm Abachi strips overlayed over one another.

Planking completed on the side of the gallery. It is not nearly finished as there is still the section between the door and the stern assembly that needs to be done as well as the front of the gallery. Various yellow strips and other decorations are added to the gallery to complete the assembly, but that will be done at a later stage. As you can see on the picture above, the gallery fits in perfectly between the two wales so there was no need to remove some material as many other builders of the Batavia are sometimes forced to do. (When doing the hull planking - stick to the demarcated lines on the bulkheads!!!)
And talking about hull planking - now was the time to finish that!

Done!
Some close-ups: The Stern (below):

Aft Middle-Section

Bow Middle Section

And Bow

And now it was time to get the sandpaper out and for the fun and games to start - but more on that a little later.
I am very pleased by our "gang" of friends who have formed of late and want to thank you all for the encouragement and support you give to another. This is great guys - keep it up. On a personal note - thank you all for following. Comments and criticism - are as always - most appreciated.
Stay safe out there!
Warm greetings - Heinrich
- Joined
- Jan 9, 2020
- Messages
- 10,566
- Points
- 938

@shota70 Thank you my friend. Your words are greatly valued and highly appreciated.
I am also very happy to have someone from Israel on our forum. Throughout the difficult years, South Africa and Israel have always had a very special relationship - difficult for the world to fathom, but vital to all South Africans.
I am also very happy to have someone from Israel on our forum. Throughout the difficult years, South Africa and Israel have always had a very special relationship - difficult for the world to fathom, but vital to all South Africans.
Now if only we could teach our governments how to get along just as well as we do, the world would be a wonderful place.
- Joined
- Jan 9, 2020
- Messages
- 10,566
- Points
- 938

Ok Dear Friends
So I cheated a little. I was actually quite a bit further than what my last post showed, but first wanted to finish this section before I post pictures.
As you can see from the Kolderstok picture below, the Batavia - and most Dutch ships for that matter - feature a painted hull below the waterline.
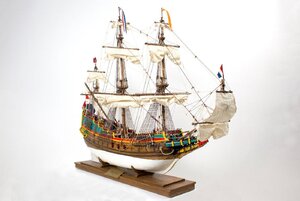
Having said that, I was really happy about the way that my planking turned out so I was in two minds whether to paint the hull or not. In the end, I do think that because the Batavia / Haarlem is rich in colour above the waterline, that area might just look colour "top-heavy" compared to a barren wooden finish! Whether this makes any sense, or not - I do not know.
The next challenge was to get the hull as smooth as I possible BUT without creating a finish that looks like a super-smooth GRP hull. So after some preliminary sanding to create a smooth effect, I immediately proceeded to paint the first coat of primer. I use a Danish primer called Flugger which is absolutely brilliant!
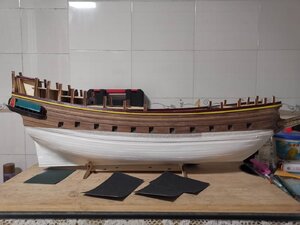
The reason I paint so early in the process is that it highlights all the uneven spots nicely and I can do some concentrated sanding. And on that topic - I do not play around. I use 80 grit sandpaper at first, then 120, 240 and finish off with 360.
And then it was time for sanding ...
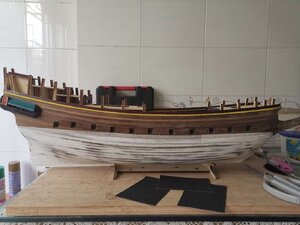
My least favourite picture of the build process so far. Cringe-worthy!
And then painting again, sanding again, painting again, sanding again and so we go on ... and on ... and on ...
And this is what she looks like tonight.
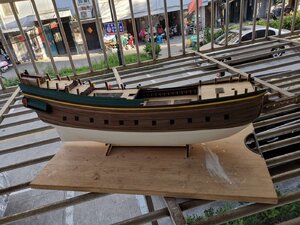
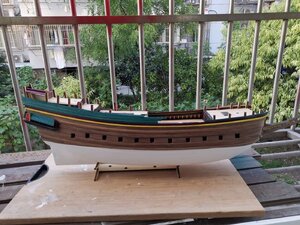
All finishing touches (cleaning up in places / making lines sharper etc.) still need to be done, but for now, I am happy.
Tomorrow it's back to work so things will slow down again. I wish you all a wonderful weekend and week ahead and happy building. Take care and stay safe.
Kind regards - Heinrich
So I cheated a little. I was actually quite a bit further than what my last post showed, but first wanted to finish this section before I post pictures.
As you can see from the Kolderstok picture below, the Batavia - and most Dutch ships for that matter - feature a painted hull below the waterline.

Having said that, I was really happy about the way that my planking turned out so I was in two minds whether to paint the hull or not. In the end, I do think that because the Batavia / Haarlem is rich in colour above the waterline, that area might just look colour "top-heavy" compared to a barren wooden finish! Whether this makes any sense, or not - I do not know.
The next challenge was to get the hull as smooth as I possible BUT without creating a finish that looks like a super-smooth GRP hull. So after some preliminary sanding to create a smooth effect, I immediately proceeded to paint the first coat of primer. I use a Danish primer called Flugger which is absolutely brilliant!

The reason I paint so early in the process is that it highlights all the uneven spots nicely and I can do some concentrated sanding. And on that topic - I do not play around. I use 80 grit sandpaper at first, then 120, 240 and finish off with 360.
And then it was time for sanding ...

My least favourite picture of the build process so far. Cringe-worthy!
And then painting again, sanding again, painting again, sanding again and so we go on ... and on ... and on ...
And this is what she looks like tonight.


All finishing touches (cleaning up in places / making lines sharper etc.) still need to be done, but for now, I am happy.
Tomorrow it's back to work so things will slow down again. I wish you all a wonderful weekend and week ahead and happy building. Take care and stay safe.
Kind regards - Heinrich
Wow, she's beautiful Heinrich, absolutely beautiful 

Man your model is looking good!!! Consider yourself criticized!!!criticism - are as always - most appreciated.
Nice job you're doing Heinrich.
Well done, Heinrich!! She looks very nice!!


