YUANQING BLUENOSE - Don Robinson

Hello Terry, You could always piece up a piece of a glass shelf at a glass store for a few dollars.
Regards Lawrence
Yes. I was going to use an old glass platen from a scanner which I put away somewhere safe ...........but I can't remember where I put it. Happens a lot these days!
However I have ordered and just received this from Amazon UK.

Harbour Housewares Glass Worktop Saver - Clear - 50 x 40 cm Non-Slip Kitchen Glass Chopping Board​

£8.99 delivered!! After all they are made of hardened glass. We will see how we go next year.
New kitchen due early January so have postponed my build until this is complete and therefore , I hope, no further distractions.
Best wishes to all. I will be following your progress.
Mike.
PS
The above could be construed as devious lateral thinks!!

 
Good Day all, I'm hoping you all had a great Christmas and have no need to go shopping today! :p
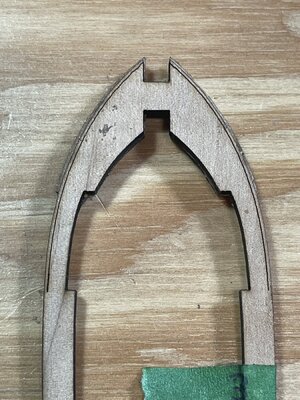
IMG_3838.JPG
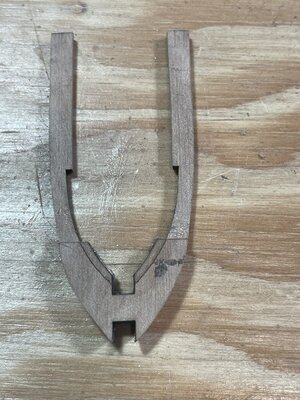
I wanted to add a little bit on the fairing of the frames. I have used two different frames in this series of pictures but the process is the same for all of them so it should not matter. Here is the front side of frame 3 before any bevelling is done. If you look close you can see the overlap of the back piece.

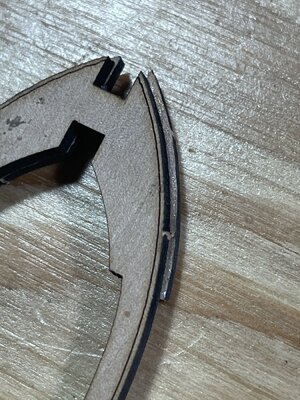
IMG_3839.JPG
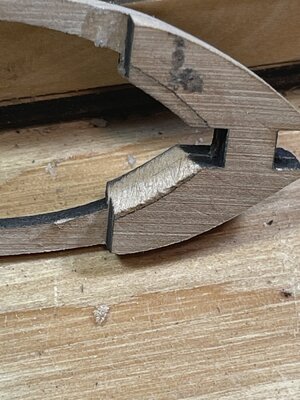
Another image this time showing the overlap, this is a super macro so don't get too excited about the overlap it really is not that much. The point here is to show how the bevelling is done. What you need to do is to bevel from the etched line to the back edge of the bottom piece(the edge laying flat on work bench). I feel, and this is only my opinion, leaving the char on helps in this exercise.

IMG_3831.JPG
Right hand side done

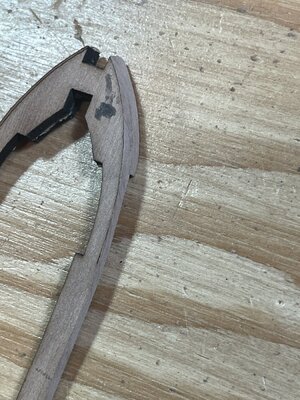
IMG_3832.JPG
Another view of the bevel

IMG_3834.JPG
With both outer edges done it is now on to the inner edges. This is showing the back side and it's bevel lines. Excuse the glueo_O

IMG_3835.JPG
The bevel needs to go from the etched line to the outer edge of the front piece. You can see here how my bevelling is matching on both edges, this is where the laser char helps to guide you. This is just my preference and by no means the only way to accomplish this task

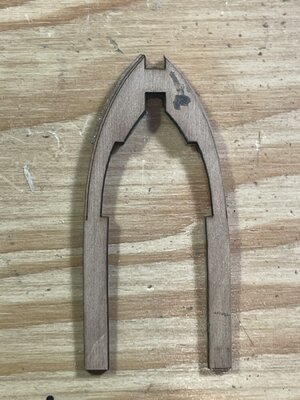
IMG_3836.JPG
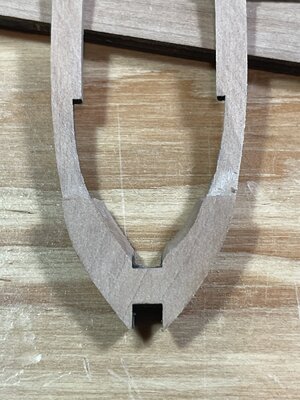
Here is the back side completed, it still needs a little tweaking but hopefully this helps you understand what is required with the frames


IMG_3837.JPG

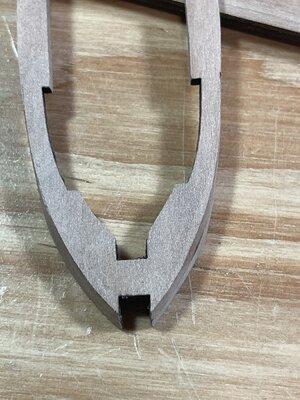
And the front side.

Thanks all and have a good one!
 
FANTASTIC HELP DON, ONE OF MYDOWNFALLS UNDERSTANDING BEVELS, AND I REALLY PEFER TO DO IT AS YOU ARE INDIVIDUALLY, QUICK QUESTION ONE OF MY CHRISTMAS PRESENTS WAS A HAND HEL/ BENCH MOUNT SPINDEL SANDER VARIABLE SPPED WONDER IF I CAN USE IT FOR INSIDE BEVELING WITH OUT DESTROYING FRAMES. GOD BLESS STAY SAFE YOU AND YOUR S DON
 
IMG_3840[1].JPG
@donfarr I suppose you could use your new machine( I would love to see a picture of it, post here if you want) one of the problems would be the size of the sanding drum(s), in some of these frames there is not much room. The picture shows what I use, it does not take too much work as the frames are small and the wood is not that thick. The next frame I will time myself as to how long it takes to sand to a completed finish. As I mentioned those pictures are macro making it look like a job that would be very difficult but really it is not. Another important thing to remember is to use a sanding stick or file, just something that has a hard surface otherwise you will run into the problem of having rounded edges.
Hope this helps, if not ask more! :)
 
DON YOU ARE PROBABLY RIGHT I AM UNBOXING IT TODAY WILL POST A PICTURE OF IT, THE SMALEST DRUM IS 1/2 INCH, WILL POST HERE IF YOU DO NOT MIND, ONE OTHER QUESTION NOT ONLY FOR THIS BUILD BUTN OTHER POF BUILDS DOC BLAKE HAS GIVEN THE MOST PRACTAL ANSWER JUST WONDERING OTHER MODELERS THOUGHTS HOW DO YOU FINISH THE FRAMES TUNG OIL POLY DOCS ANSWER WAS TO FINISH THEM BEFORE INSTALLING THAT IS THE SIDES OF THE FRAMES. GOD BLESS YOU AND YOURS DON
 
Ahh @donfarr , I have seen you ask that so many times!! I never answered as I have never built a framed ship. I know with this one what I will do is to use piece of rag that will fit between the frames soaked in the finish I'm going to be using and feed it through the frames then rub it up and down the frame until coated. Follow this by using a dry rag to wipe off any excess.
 
Those are great pictures that explain the beveling Don! This is what is so great about a build log - we all get to see things from another perspective than our own.

@donfarr Personally, I would do that by hand Don. Like @DonRobinson said - it is really not difficult and doesn't take long. Also with regards to a Tung Oil Finish - if you apply tung oil to the frames before installation, you are going to struggle to no end to get the glue to adhere to it.

@Heinrich , you are correct about the tung oil and applying it after frames are glued in place. Again I did not explain myself very well, but the method using the rags I mentioned would be done after everything is permanently fixed in position.
 
Don, I really like the 00 or 0 cut jewelers files like Uwe is using on his Le Coureur build, I bought a few sets from https://www.ottofrei.com/Glardon-Vallorbe-LA2443-0-Needle-File-Set-of-6-6-1-4-160mm-Cut-0-Medium
The sets are around $50 for six files or you can get individual files for about $7-8. I have been using the Barrette style mostly and if you have the Le Coureur and the Bluenose you might want to get a set - they remove material well and are easy to control - I bought the 00, 0, and 2 cut sets. They only cut one way- on the push stroke so you get your angle set and push fwd and away you go...
 
As far as finish application, I use an old paint brush (small) and brush Wipe on Poly on after I have everything assembled, you can use a soft rag to finish up and I also use a dry brush to remove excess poly in the tight spots and less accessible areas and it will also polish to a certain degree.
 
Last edited:
THANKS GUYS ALL VERY HELPFULL ESPECIALLY THE FILES AND AGAIN I LEARN SOMETHING EVERYDAY I DID NOT RELIZE THAT THE CUT WITH THE BARRET FILES IS ONE WAY VERY HELPFULL. GOD BLESS STAY SAFE ALL DON
 
@Stargazer Thanks so much., I am trying to order some as we speak, but for some reason they don`t like my address so I am now waiting for them to reply. I did find out that the 0 is for coarse, 2 is medium and 4 is fine. I am trying to order one each of the half round as these are the ones I use the most.
The diamond one I have, in the above picture, gives a nice smooth finish but is almost worn out already. The one with the wooden handle is a perma - grit file, which is excellent, but is a little coarse for this application.
 
Back
Top